Background removal with RMBG v1.4 and OpenVINO#
This Jupyter notebook can be launched after a local installation only.

Background matting is the process of accurately estimating the foreground object in images and videos. It is a very important technique in image and video editing applications, particularly in film production for creating visual effects. In case of image segmentation, we segment the image into foreground and background by labeling the pixels. Image segmentation generates a binary image, in which a pixel either belongs to foreground or background. However, Image Matting is different from the image segmentation, wherein some pixels may belong to foreground as well as background, such pixels are called partial or mixed pixels. In order to fully separate the foreground from the background in an image, accurate estimation of the alpha values for partial or mixed pixels is necessary.
RMBG v1.4 is background removal model, designed to effectively separate foreground from background in a range of categories and image types. This model has been trained on a carefully selected dataset, which includes: general stock images, e-commerce, gaming, and advertising content, making it suitable for commercial use cases powering enterprise content creation at scale. The accuracy, efficiency, and versatility currently rival leading source-available models.
More details about model can be found in model card.
In this tutorial we consider how to convert and run this model using OpenVINO.
Table of contents:
Installation Instructions#
This is a self-contained example that relies solely on its own code.
We recommend running the notebook in a virtual environment. You only need a Jupyter server to start. For details, please refer to Installation Guide.
Prerequisites#
install required dependencies
%pip install -q torch torchvision pillow huggingface_hub "openvino>=2024.0.0" "matplotlib>=3.4" "gradio>=4.15" "transformers>=4.39.1" tqdm --extra-index-url https://download.pytorch.org/whl/cpu
Note: you may need to restart the kernel to use updated packages.
Download model code from HuggingFace hub
from huggingface_hub import hf_hub_download
from pathlib import Path

repo_id = "briaai/RMBG-1.4"

download_files = ["utilities.py", "example_input.jpg"]

for file_for_downloading in download_files:
    if not Path(file_for_downloading).exists():
        hf_hub_download(repo_id=repo_id, filename=file_for_downloading, local_dir=".")
utilities.py: 0%| | 0.00/980 [00:00<?, ?B/s]
example_input.jpg: 0%| | 0.00/327k [00:00<?, ?B/s]
Load PyTorch model#
For loading model using PyTorch, we should use
AutoModelForImageSegmentation.from_pretrained method. Model weights
will be downloaded automatically during first model usage. Please, note,
it may take some time.
from transformers import AutoModelForImageSegmentation

net = AutoModelForImageSegmentation.from_pretrained("briaai/RMBG-1.4", trust_remote_code=True)
2024-12-10 05:02:42.657474: I tensorflow/core/util/port.cc:110] oneDNN custom operations are on. You may see slightly different numerical results due to floating-point round-off errors from different computation orders. To turn them off, set the environment variable TF_ENABLE_ONEDNN_OPTS=0.
2024-12-10 05:02:42.682685: I tensorflow/core/platform/cpu_feature_guard.cc:182] This TensorFlow binary is optimized to use available CPU instructions in performance-critical operations.
To enable the following instructions: AVX2 AVX512F AVX512_VNNI FMA, in other operations, rebuild TensorFlow with the appropriate compiler flags.
Run PyTorch model inference#
preprocess_image function is responsible for preparing input data in
model-specific format. postprocess_image function is responsible for
postprocessing model output. After postprocessing, generated background
mask can be inserted into original image as alpha-channel.
import torch
from PIL import Image
from utilities import preprocess_image, postprocess_image
import numpy as np
from matplotlib import pyplot as plt
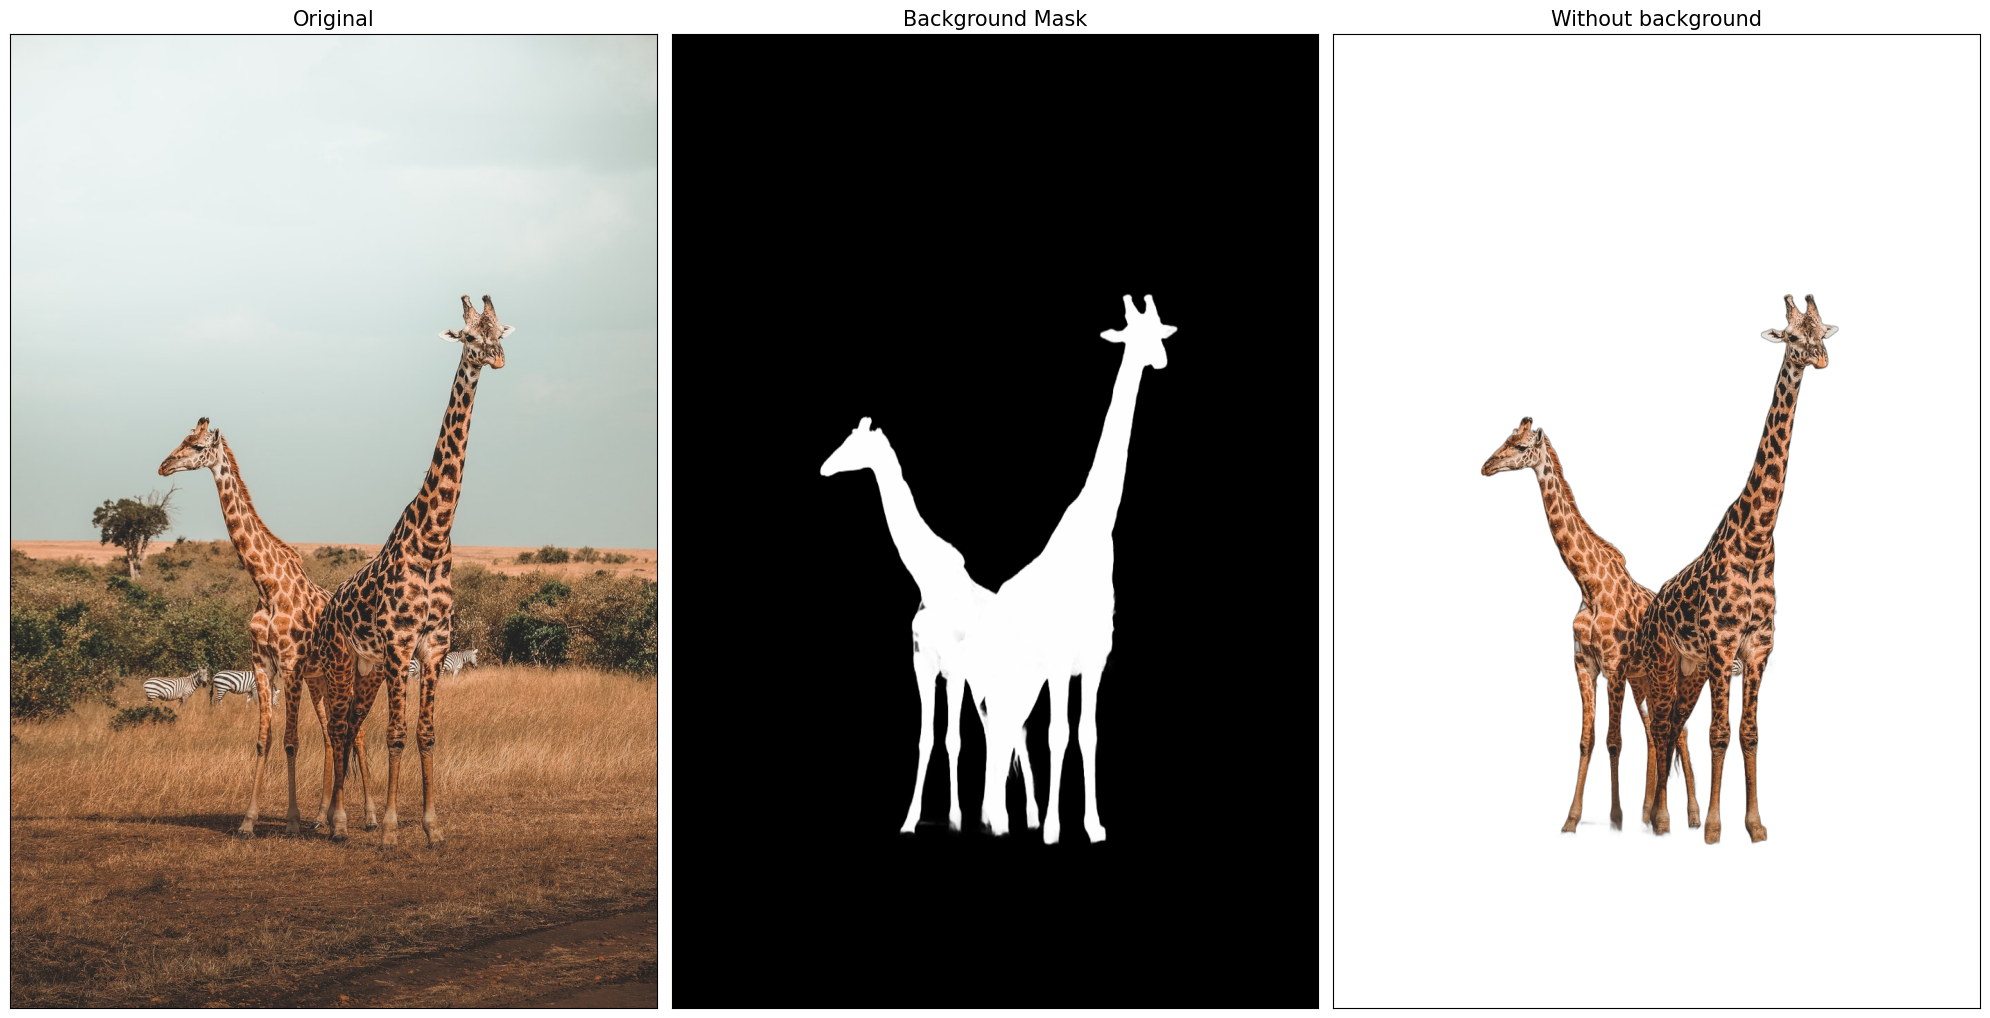
def visualize_result(orig_img: Image, mask: Image, result_img: Image):
"""
Helper for results visualization
parameters:
orig_img (Image): input image
mask (Image): background mask
result_img (Image) output image
returns:
plt.Figure: plot with 3 images for visualization
"""
titles = ["Original", "Background Mask", "Without background"]
im_w, im_h = orig_img.size
is_horizontal = im_h <= im_w
figsize = (20, 20)
num_images = 3
fig, axs = plt.subplots(
num_images if is_horizontal else 1,
1 if is_horizontal else num_images,
figsize=figsize,
sharex="all",
sharey="all",
)
fig.patch.set_facecolor("white")
list_axes = list(axs.flat)
for a in list_axes:
a.set_xticklabels([])
a.set_yticklabels([])
a.get_xaxis().set_visible(False)
a.get_yaxis().set_visible(False)
a.grid(False)
list_axes[0].imshow(np.array(orig_img))
list_axes[1].imshow(np.array(mask), cmap="gray")
list_axes[0].set_title(titles[0], fontsize=15)
list_axes[1].set_title(titles[1], fontsize=15)
list_axes[2].imshow(np.array(result_img))
list_axes[2].set_title(titles[2], fontsize=15)
fig.subplots_adjust(wspace=0.01 if is_horizontal else 0.00, hspace=0.01 if is_horizontal else 0.1)
fig.tight_layout()
return fig
im_path = "./example_input.jpg"
# prepare input
model_input_size = [1024, 1024]
orig_im = np.array(Image.open(im_path))
orig_im_size = orig_im.shape[0:2]
image = preprocess_image(orig_im, model_input_size)
# inference
result = net(image)
# post process
result_image = postprocess_image(result[0][0], orig_im_size)
# save result
pil_im = Image.fromarray(result_image)
no_bg_image = Image.new("RGBA", pil_im.size, (0, 0, 0, 0))
orig_image = Image.open(im_path)
no_bg_image.paste(orig_image, mask=pil_im)
no_bg_image.save("example_image_no_bg.png")
visualize_result(orig_image, pil_im, no_bg_image);

Convert Model to OpenVINO Intermediate Representation format#
OpenVINO supports PyTorch models via conversion to OpenVINO Intermediate
Representation (IR). OpenVINO model conversion
API
should be used for these purposes. ov.convert_model function accepts
original PyTorch model instance and example input for tracing and
returns ov.Model representing this model in OpenVINO framework.
Converted model can be used for saving on disk using ov.save_model
function or directly loading on device using core.complie_model.
import openvino as ov

ov_model_path = Path("rmbg-1.4.xml")

if not ov_model_path.exists():
    ov_model = ov.convert_model(net, example_input=image, input=[1, 3, *model_input_size])
    ov.save_model(ov_model, ov_model_path)
WARNING:tensorflow:Please fix your imports. Module tensorflow.python.training.tracking.base has been moved to tensorflow.python.trackable.base. The old module will be deleted in version 2.11.
[ WARNING ]  Please fix your imports. Module %s has been moved to %s. The old module will be deleted in version %s.
/opt/home/k8sworker/ci-ai/cibuilds/jobs/ov-notebook/jobs/OVNotebookOps/builds/835/archive/.workspace/scm/ov-notebook/.venv/lib/python3.8/site-packages/transformers/modeling_utils.py:5006: FutureWarning: _is_quantized_training_enabled is going to be deprecated in transformers 4.39.0. Please use model.hf_quantizer.is_trainable instead
  warnings.warn(
loss_type=None was set in the config but it is unrecognised.Using the default loss: ForCausalLMLoss.
Run OpenVINO model inference#
After finishing conversion, we can compile converted model and run it using OpenVINO on specified device. For selection inference device, please use dropdown list below:
import ipywidgets as widgets

core = ov.Core()

device = widgets.Dropdown(
    options=core.available_devices + ["AUTO"],
    value="AUTO",
    description="Device:",
    disabled=False,
)

device
Dropdown(description='Device:', index=1, options=('CPU', 'AUTO'), value='AUTO')
Let’s run model on the same image that we used before for launching PyTorch model. OpenVINO model input and output is fully compatible with original pre- and postprocessing steps, it means that we can reuse them.
ov_compiled_model = core.compile_model(ov_model_path, device.value)

result = ov_compiled_model(image)[0]

# post process
result_image = postprocess_image(torch.from_numpy(result), orig_im_size)

# save result
pil_im = Image.fromarray(result_image)
no_bg_image = Image.new("RGBA", pil_im.size, (0, 0, 0, 0))
orig_image = Image.open(im_path)
no_bg_image.paste(orig_image, mask=pil_im)
no_bg_image.save("example_image_no_bg.png")

visualize_result(orig_image, pil_im, no_bg_image);
Interactive demo#
def get_background_mask(model, image):
    return model(image)[0]


def on_submit(image):
    original_image = image.copy()

    h, w = image.shape[:2]
    image = preprocess_image(original_image, model_input_size)

    mask = get_background_mask(ov_compiled_model, image)
    result_image = postprocess_image(torch.from_numpy(mask), (h, w))
    pil_im = Image.fromarray(result_image)
    orig_img = Image.fromarray(original_image)
    no_bg_image = Image.new("RGBA", pil_im.size, (0, 0, 0, 0))
    no_bg_image.paste(orig_img, mask=pil_im)

    return no_bg_image
import requests

if not Path("gradio_helper.py").exists():
    r = requests.get(url="https://raw.githubusercontent.com/openvinotoolkit/openvino_notebooks/latest/notebooks/rmbg-background-removal/gradio_helper.py")
    open("gradio_helper.py", "w").write(r.text)

from gradio_helper import make_demo

demo = make_demo(fn=on_submit)

try:
    demo.launch(debug=False)
except Exception:
    demo.launch(share=True, debug=False)
# If you are launching remotely, specify server_name and server_port
# EXAMPLE: `demo.launch(server_name='your server name', server_port='server port in int')`
# To learn more please refer to the Gradio docs: https://gradio.app/docs/
Running on local URL:  http://127.0.0.1:7860

To create a public link, set share=True in launch().
# please uncomment and run this cell for stopping gradio interface
# demo.close()