Depth estimation with DepthAnythingV2 and OpenVINO#
This Jupyter notebook can be launched on-line, opening an interactive environment in a browser window. You can also make a local installation. Choose one of the following options:
Depth Anything V2 is a solution for robust relative depth estimation. Without pursuing fancy techniques, this project aim to reveal crucial findings to pave the way towards building a powerful monocular depth estimation model. This model is an improvement of the Depth Anything V1. Notably, compared with V1, this version produces much finer and more robust depth predictions through three key practices: replacing all labeled real images with synthetic images, scaling up the capacity of our teacher model and teaching student models via the bridge of large-scale pseudo-labeled real images.
The pipeline of training of Depth Anything V2 is shown below. It consists of three steps: train a reliable teacher model purely on high-quality synthetic image; produce precise pseudo depth on large-scale unlabeled real images; train final student models on pseudo-labeled real images for robust generalization.

image.png#
More details about model can be found in project web page, paper and official repository
In this tutorial we will explore how to convert and run DepthAnythingV2 using OpenVINO. An additional part demonstrates how to run quantization with NNCF to speed up the model.
Table of contents:
Installation Instructions#
This is a self-contained example that relies solely on its own code.
We recommend running the notebook in a virtual environment. You only need a Jupyter server to start. For details, please refer to Installation Guide.
Prerequisites#
import requests
from pathlib import Path


if not Path("notebook_utils.py").exists():
    r = requests.get(
        url="https://raw.githubusercontent.com/openvinotoolkit/openvino_notebooks/latest/utils/notebook_utils.py",
    )
    open("notebook_utils.py", "w").write(r.text)

if not Path("cmd_helper.py").exists():
    r = requests.get(
        url="https://raw.githubusercontent.com/openvinotoolkit/openvino_notebooks/latest/utils/cmd_helper.py",
    )
    open("cmd_helper.py", "w").write(r.text)
from cmd_helper import clone_repo


clone_repo("https://huggingface.co/spaces/depth-anything/Depth-Anything-V2")
PosixPath('Depth-Anything-V2')
import platform


%pip install -q "openvino>=2024.2.0" "datasets>=2.14.6" "nncf>=2.11.0" "tqdm" "matplotlib>=3.4"
%pip install -q "typing-extensions>=4.9.0" eval-type-backport "gradio>=4.19" gradio_imageslider
%pip install -q torch torchvision "opencv-python" huggingface_hub --extra-index-url https://download.pytorch.org/whl/cpu

if platform.system() == "Darwin":
    %pip install -q "numpy<2.0.0"
if platform.python_version_tuple()[1] in ["8", "9"]:
    %pip install -q "gradio-imageslider<=0.0.17" "typing-extensions>=4.9.0"
Note: you may need to restart the kernel to use updated packages.
Note: you may need to restart the kernel to use updated packages.
Note: you may need to restart the kernel to use updated packages.
Note: you may need to restart the kernel to use updated packages.
Load and run PyTorch model#
To be able run PyTorch model on CPU, we should disable xformers attention optimizations first.
attention_file_path = Path("./Depth-Anything-V2/depth_anything_v2/dinov2_layers/attention.py")
orig_attention_path = attention_file_path.parent / ("orig_" + attention_file_path.name)

if not orig_attention_path.exists():
    attention_file_path.rename(orig_attention_path)

    with orig_attention_path.open("r") as f:
        data = f.read()
        data = data.replace("XFORMERS_AVAILABLE = True", "XFORMERS_AVAILABLE = False")
        with attention_file_path.open("w") as out_f:
            out_f.write(data)
Prepare input data#
from PIL import Image

from notebook_utils import download_file, device_widget, quantization_widget


download_file(
    "https://github.com/openvinotoolkit/openvino_notebooks/assets/29454499/3f779fc1-c1b2-4dec-915a-64dae510a2bb",
    "furseal.png",
)

Image.open("furseal.png").resize((600, 400))
furseal.png: 0%| | 0.00/2.55M [00:00<?, ?B/s]

Run model inference#
DepthAnythingV2.from_pretrained method creates PyTorch model class
instance and load model weights. There are 3 available models in
repository depends on VIT encoder size: * Depth-Anything-V2-Small
(24.8M) * Depth-Anything-V2-Base (97.5M) * Depth-Anything-V2-Large
(335.3M)
We will use Depth-Anything-V2-Small, but the same steps for running
model and converting to OpenVINO are applicable for other models from
DepthAnythingV2 family.
from huggingface_hub import hf_hub_download

encoder = "vits"
model_type = "Small"
model_id = f"depth_anything_v2_{encoder}"

model_path = hf_hub_download(repo_id=f"depth-anything/Depth-Anything-V2-{model_type}", filename=f"{model_id}.pth", repo_type="model")
Preprocessed image passed to model forward and model returns depth map
in format B x H x W, where B is input batch size, H
is preprocessed image height, W is preprocessed image width.
import cv2
import torch
import torch.nn.functional as F

from depth_anything_v2.dpt import DepthAnythingV2

model = DepthAnythingV2(encoder=encoder, features=64, out_channels=[48, 96, 192, 384])
model.load_state_dict(torch.load(model_path, map_location="cpu"))
model.eval()

raw_img = cv2.imread("furseal.png")
image, (h, w) = model.image2tensor(raw_img)
image = image.to("cpu").to(torch.float32)

with torch.no_grad():
    depth = model.forward(image)

depth = F.interpolate(depth[:, None], (h, w), mode="bilinear", align_corners=True)[0, 0]

output = depth.cpu().numpy()
xFormers not available
xFormers not available
/tmp/ipykernel_2168902/1110356474.py:8: FutureWarning: You are using torch.load with weights_only=False (the current default value), which uses the default pickle module implicitly. It is possible to construct malicious pickle data which will execute arbitrary code during unpickling (See pytorch/pytorch for more details). In a future release, the default value for weights_only will be flipped to True. This limits the functions that could be executed during unpickling. Arbitrary objects will no longer be allowed to be loaded via this mode unless they are explicitly allowlisted by the user via torch.serialization.add_safe_globals. We recommend you start setting weights_only=True for any use case where you don't have full control of the loaded file. Please open an issue on GitHub for any issues related to this experimental feature.
  model.load_state_dict(torch.load(model_path, map_location="cpu"))
from matplotlib import pyplot as plt
import numpy as np
import cv2


def get_depth_map(output, w, h):
    depth = cv2.resize(output, (w, h))

    depth = (depth - depth.min()) / (depth.max() - depth.min()) * 255.0
    depth = depth.astype(np.uint8)

    depth = cv2.applyColorMap(depth, cv2.COLORMAP_INFERNO)

    return depth
h, w = raw_img.shape[:-1]
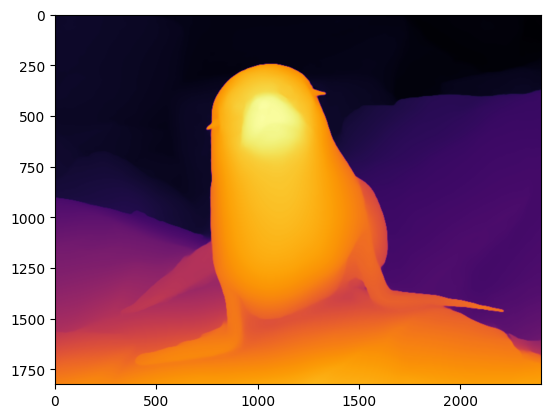
res_depth = get_depth_map(output, w, h)
plt.imshow(res_depth[:, :, ::-1])
<matplotlib.image.AxesImage at 0x7ff4796ead60>

Convert Model to OpenVINO IR format#
OpenVINO supports PyTorch models via conversion to OpenVINO Intermediate
Representation (IR). OpenVINO model conversion API should be used for
these purposes. ov.convert_model function accepts original PyTorch
model instance and example input for tracing and returns ov.Model
representing this model in OpenVINO framework. Converted model can be
used for saving on disk using ov.save_model function or directly
loading on device using core.complie_model.
import openvino as ov

OV_DEPTH_ANYTHING_PATH = Path(f"{model_id}.xml")

if not OV_DEPTH_ANYTHING_PATH.exists():
    ov_model = ov.convert_model(model, example_input=torch.rand(1, 3, 518, 518), input=[1, 3, 518, 518])
    ov.save_model(ov_model, OV_DEPTH_ANYTHING_PATH)
/opt/home/k8sworker/ci-ai/cibuilds/jobs/ov-notebook/jobs/OVNotebookOps/builds/835/archive/.workspace/scm/ov-notebook/notebooks/depth-anything/Depth-Anything-V2/depth_anything_v2/dinov2_layers/patch_embed.py:73: TracerWarning: Converting a tensor to a Python boolean might cause the trace to be incorrect. We can't record the data flow of Python values, so this value will be treated as a constant in the future. This means that the trace might not generalize to other inputs!
  assert H % patch_H == 0, f"Input image height {H} is not a multiple of patch height {patch_H}"
/opt/home/k8sworker/ci-ai/cibuilds/jobs/ov-notebook/jobs/OVNotebookOps/builds/835/archive/.workspace/scm/ov-notebook/notebooks/depth-anything/Depth-Anything-V2/depth_anything_v2/dinov2_layers/patch_embed.py:74: TracerWarning: Converting a tensor to a Python boolean might cause the trace to be incorrect. We can't record the data flow of Python values, so this value will be treated as a constant in the future. This means that the trace might not generalize to other inputs!
  assert W % patch_W == 0, f"Input image width {W} is not a multiple of patch width: {patch_W}"
/opt/home/k8sworker/ci-ai/cibuilds/jobs/ov-notebook/jobs/OVNotebookOps/builds/835/archive/.workspace/scm/ov-notebook/notebooks/depth-anything/Depth-Anything-V2/depth_anything_v2/dinov2.py:183: TracerWarning: Converting a tensor to a Python boolean might cause the trace to be incorrect. We can't record the data flow of Python values, so this value will be treated as a constant in the future. This means that the trace might not generalize to other inputs!
  if npatch == N and w == h:
/opt/home/k8sworker/ci-ai/cibuilds/jobs/ov-notebook/jobs/OVNotebookOps/builds/835/archive/.workspace/scm/ov-notebook/notebooks/depth-anything/Depth-Anything-V2/depth_anything_v2/dpt.py:147: TracerWarning: Converting a tensor to a Python integer might cause the trace to be incorrect. We can't record the data flow of Python values, so this value will be treated as a constant in the future. This means that the trace might not generalize to other inputs!
  out = F.interpolate(out, (int(patch_h * 14), int(patch_w * 14)), mode="bilinear", align_corners=True)
Run OpenVINO model inference#
Now, we are ready to run OpenVINO model
Select inference device#
For starting work, please select inference device from dropdown list.
device = device_widget()

device
Dropdown(description='Device:', index=1, options=('CPU', 'AUTO'), value='AUTO')
core = ov.Core()

compiled_model = core.compile_model(OV_DEPTH_ANYTHING_PATH, device.value)
Run inference on image#
For simplicity of usage, model authors provide helper functions for preprocessing input image. The main conditions are that image size should be divisible on 14 (size of vit patch) and normalized in [0, 1] range.
from depth_anything_v2.util.transform import Resize, NormalizeImage, PrepareForNet
from torchvision.transforms import Compose

transform = Compose(
    [
        Resize(
            width=518,
            height=518,
            resize_target=False,
            ensure_multiple_of=14,
            resize_method="lower_bound",
            image_interpolation_method=cv2.INTER_CUBIC,
        ),
        NormalizeImage(mean=[0.485, 0.456, 0.406], std=[0.229, 0.224, 0.225]),
        PrepareForNet(),
    ]
)
h, w = raw_img.shape[:-1]

image = cv2.cvtColor(raw_img, cv2.COLOR_BGR2RGB) / 255.0
image = transform({"image": image})["image"]
image = torch.from_numpy(image).unsqueeze(0)

res = compiled_model(image)[0]
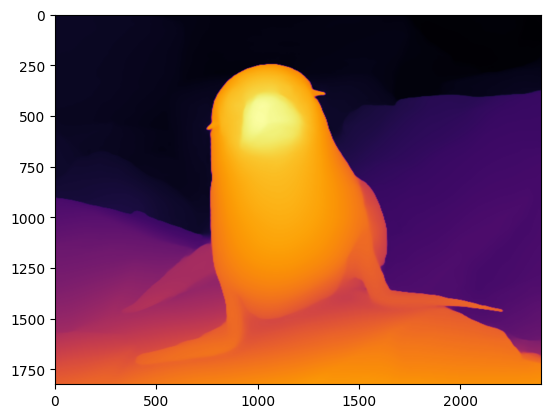
depth_color = get_depth_map(res[0], w, h)
plt.imshow(depth_color[:, :, ::-1])
<matplotlib.image.AxesImage at 0x7ff478e3bee0>

Run inference on video#
VIDEO_FILE = "./Coco Walking in Berkeley.mp4"

download_file(
    "https://storage.openvinotoolkit.org/repositories/openvino_notebooks/data/data/video/Coco%20Walking%20in%20Berkeley.mp4",
    VIDEO_FILE,
)

# Number of seconds of input video to process. Set `NUM_SECONDS` to 0 to process
# the full video.
NUM_SECONDS = 4
# Set `ADVANCE_FRAMES` to 1 to process every frame from the input video
# Set `ADVANCE_FRAMES` to 2 to process every second frame. This reduces
# the time it takes to process the video.
ADVANCE_FRAMES = 2
# Set `SCALE_OUTPUT` to reduce the size of the result video
# If `SCALE_OUTPUT` is 0.5, the width and height of the result video
# will be half the width and height of the input video.
SCALE_OUTPUT = 0.5
# The format to use for video encoding. The 'vp09` is slow,
# but it works on most systems.
# Try the `THEO` encoding if you have FFMPEG installed.
# FOURCC = cv2.VideoWriter_fourcc(*"THEO")
FOURCC = cv2.VideoWriter_fourcc(*"vp09")

# Create Path objects for the input video and the result video.
output_directory = Path("output")
output_directory.mkdir(exist_ok=True)
result_video_path = output_directory / f"{Path(VIDEO_FILE).stem}_depth_anything.mp4"
Coco Walking in Berkeley.mp4: 0%| | 0.00/877k [00:00<?, ?B/s]
cap = cv2.VideoCapture(str(VIDEO_FILE))
ret, image = cap.read()
if not ret:
    raise ValueError(f"The video at {VIDEO_FILE} cannot be read.")
input_fps = cap.get(cv2.CAP_PROP_FPS)
input_video_frame_height, input_video_frame_width = image.shape[:2]

target_fps = input_fps / ADVANCE_FRAMES
target_frame_height = int(input_video_frame_height * SCALE_OUTPUT)
target_frame_width = int(input_video_frame_width * SCALE_OUTPUT)

cap.release()
print(f"The input video has a frame width of {input_video_frame_width}, " f"frame height of {input_video_frame_height} and runs at {input_fps:.2f} fps")
print(
    "The output video will be scaled with a factor "
    f"{SCALE_OUTPUT}, have width {target_frame_width}, "
    f" height {target_frame_height}, and run at {target_fps:.2f} fps"
)
The input video has a frame width of 640, frame height of 360 and runs at 30.00 fps
The output video will be scaled with a factor 0.5, have width 320,  height 180, and run at 15.00 fps
def normalize_minmax(data):
    """Normalizes the values in `data` between 0 and 1"""
    return (data - data.min()) / (data.max() - data.min())


def convert_result_to_image(result, colormap="viridis"):
    """
    Convert network result of floating point numbers to an RGB image with
    integer values from 0-255 by applying a colormap.

    `result` is expected to be a single network result in 1,H,W shape
    `colormap` is a matplotlib colormap.
    See https://matplotlib.org/stable/tutorials/colors/colormaps.html
    """
    result = result.squeeze(0)
    result = normalize_minmax(result)
    result = result * 255
    result = result.astype(np.uint8)
    result = cv2.applyColorMap(result, cv2.COLORMAP_INFERNO)[:, :, ::-1]
    return result


def to_rgb(image_data) -> np.ndarray:
    """
    Convert image_data from BGR to RGB
    """
    return cv2.cvtColor(image_data, cv2.COLOR_BGR2RGB)
import time
from IPython.display import (
    HTML,
    FileLink,
    Pretty,
    ProgressBar,
    Video,
    clear_output,
    display,
)


def process_video(compiled_model, video_file, result_video_path):
    # Initialize variables.
    input_video_frame_nr = 0
    start_time = time.perf_counter()
    total_inference_duration = 0

    # Open the input video
    cap = cv2.VideoCapture(str(video_file))

    # Create a result video.
    out_video = cv2.VideoWriter(
        str(result_video_path),
        FOURCC,
        target_fps,
        (target_frame_width * 2, target_frame_height),
    )

    num_frames = int(NUM_SECONDS * input_fps)
    total_frames = cap.get(cv2.CAP_PROP_FRAME_COUNT) if num_frames == 0 else num_frames
    progress_bar = ProgressBar(total=total_frames)
    progress_bar.display()

    try:
        while cap.isOpened():
            ret, image = cap.read()
            if not ret:
                cap.release()
                break

            if input_video_frame_nr >= total_frames:
                break

            h, w = image.shape[:-1]
            input_image = cv2.cvtColor(image, cv2.COLOR_BGR2RGB) / 255.0
            input_image = transform({"image": input_image})["image"]
            # Reshape the image to network input shape NCHW.
            input_image = np.expand_dims(input_image, 0)

            # Do inference.
            inference_start_time = time.perf_counter()
            result = compiled_model(input_image)[0]
            inference_stop_time = time.perf_counter()
            inference_duration = inference_stop_time - inference_start_time
            total_inference_duration += inference_duration

            if input_video_frame_nr % (10 * ADVANCE_FRAMES) == 0:
                clear_output(wait=True)
                progress_bar.display()
                # input_video_frame_nr // ADVANCE_FRAMES gives the number of
                # Frames that have been processed by the network.
                display(
                    Pretty(
                        f"Processed frame {input_video_frame_nr // ADVANCE_FRAMES}"
                        f"/{total_frames // ADVANCE_FRAMES}. "
                        f"Inference time per frame: {inference_duration:.2f} seconds "
                        f"({1/inference_duration:.2f} FPS)"
                    )
                )

            # Transform the network result to a RGB image.
            result_frame = to_rgb(convert_result_to_image(result))
            # Resize the image and the result to a target frame shape.
            result_frame = cv2.resize(result_frame, (target_frame_width, target_frame_height))
            image = cv2.resize(image, (target_frame_width, target_frame_height))
            # Put the image and the result side by side.
            stacked_frame = np.hstack((image, result_frame))
            # Save a frame to the video.
            out_video.write(stacked_frame)

            input_video_frame_nr = input_video_frame_nr + ADVANCE_FRAMES
            cap.set(1, input_video_frame_nr)

            progress_bar.progress = input_video_frame_nr
            progress_bar.update()

    except KeyboardInterrupt:
        print("Processing interrupted.")
    finally:
        clear_output()
        processed_frames = num_frames // ADVANCE_FRAMES
        out_video.release()
        cap.release()
        end_time = time.perf_counter()
        duration = end_time - start_time

        print(
            f"Processed {processed_frames} frames in {duration:.2f} seconds. "
            f"Total FPS (including video processing): {processed_frames/duration:.2f}."
            f"Inference FPS: {processed_frames/total_inference_duration:.2f} "
        )
        print(f"Video saved to '{str(result_video_path)}'.")
    return stacked_frame
stacked_frame = process_video(compiled_model, VIDEO_FILE, result_video_path)
Processed 60 frames in 13.15 seconds. Total FPS (including video processing): 4.56.Inference FPS: 10.69
Video saved to 'output/Coco Walking in Berkeley_depth_anything.mp4'.
def display_video(stacked_frame):
    video = Video(result_video_path, width=800, embed=True)
    if not result_video_path.exists():
        plt.imshow(stacked_frame)
        raise ValueError("OpenCV was unable to write the video file. Showing one video frame.")
    else:
        print(f"Showing video saved at\n{result_video_path.resolve()}")
        print("If you cannot see the video in your browser, please click on the " "following link to download the video ")
        video_link = FileLink(result_video_path)
        video_link.html_link_str = "<a href='%s' download>%s</a>"
        display(HTML(video_link._repr_html_()))
        display(video)
display_video(stacked_frame)
Showing video saved at
/opt/home/k8sworker/ci-ai/cibuilds/jobs/ov-notebook/jobs/OVNotebookOps/builds/835/archive/.workspace/scm/ov-notebook/notebooks/depth-anything/output/Coco Walking in Berkeley_depth_anything.mp4
If you cannot see the video in your browser, please click on the following link to download the video
Quantization#
NNCF enables
post-training quantization by adding quantization layers into model
graph and then using a subset of the training dataset to initialize the
parameters of these additional quantization layers. Quantized operations
are executed in INT8 instead of FP32/FP16 making model
inference faster.
The optimization process contains the following steps:
Create a calibration dataset for quantization.
Run
nncf.quantize()to obtain quantized model.Save the
INT8model usingopenvino.save_model()function.
Please select below whether you would like to run quantization to improve model inference speed.
to_quantize = quantization_widget()

to_quantize
Checkbox(value=True, description='Quantization')
# Fetch `skip_kernel_extension` module
if not Path("skip_kernel_extension.py").exists():
    r = requests.get(
        url="https://raw.githubusercontent.com/openvinotoolkit/openvino_notebooks/latest/utils/skip_kernel_extension.py",
    )
    open("skip_kernel_extension.py", "w").write(r.text)

OV_DEPTH_ANYTHING_INT8_PATH = Path(f"{model_id}_int8.xml")

%load_ext skip_kernel_extension
Prepare calibration dataset#
We use a portion of Nahrawy/VIDIT-Depth-ControlNet dataset from Hugging Face as calibration data.
%%skip not $to_quantize.value

import datasets

if not OV_DEPTH_ANYTHING_INT8_PATH.exists():
    subset_size = 300
    calibration_data = []
    dataset = datasets.load_dataset("Nahrawy/VIDIT-Depth-ControlNet", split="train", streaming=True).shuffle(seed=42).take(subset_size)
    for batch in dataset:
        image = np.array(batch["image"])[...,:3]
        image = image / 255.0
        image = transform({'image': image})['image']
        image = np.expand_dims(image, 0)
        calibration_data.append(image)
Resolving data files: 0%| | 0/42 [00:00<?, ?it/s]
Run quantization#
Create a quantized model from the pre-trained converted OpenVINO model. > NOTE: Quantization is time and memory consuming operation. Running quantization code below may take some time.
%%skip not $to_quantize.value

import nncf

if not OV_DEPTH_ANYTHING_INT8_PATH.exists():
    model = core.read_model(OV_DEPTH_ANYTHING_PATH)
    quantized_model = nncf.quantize(
        model=model,
        subset_size=subset_size,
        model_type=nncf.ModelType.TRANSFORMER,
        calibration_dataset=nncf.Dataset(calibration_data),
    )
    ov.save_model(quantized_model, OV_DEPTH_ANYTHING_INT8_PATH)
INFO:nncf:NNCF initialized successfully. Supported frameworks detected: torch, tensorflow, onnx, openvino
2024-12-09 23:21:25.394147: I tensorflow/core/util/port.cc:110] oneDNN custom operations are on. You may see slightly different numerical results due to floating-point round-off errors from different computation orders. To turn them off, set the environment variable TF_ENABLE_ONEDNN_OPTS=0.
2024-12-09 23:21:25.427427: I tensorflow/core/platform/cpu_feature_guard.cc:182] This TensorFlow binary is optimized to use available CPU instructions in performance-critical operations.
To enable the following instructions: AVX2 AVX512F AVX512_VNNI FMA, in other operations, rebuild TensorFlow with the appropriate compiler flags.
2024-12-09 23:21:26.001101: W tensorflow/compiler/tf2tensorrt/utils/py_utils.cc:38] TF-TRT Warning: Could not find TensorRT
Output()
Output()
Output()
Output()
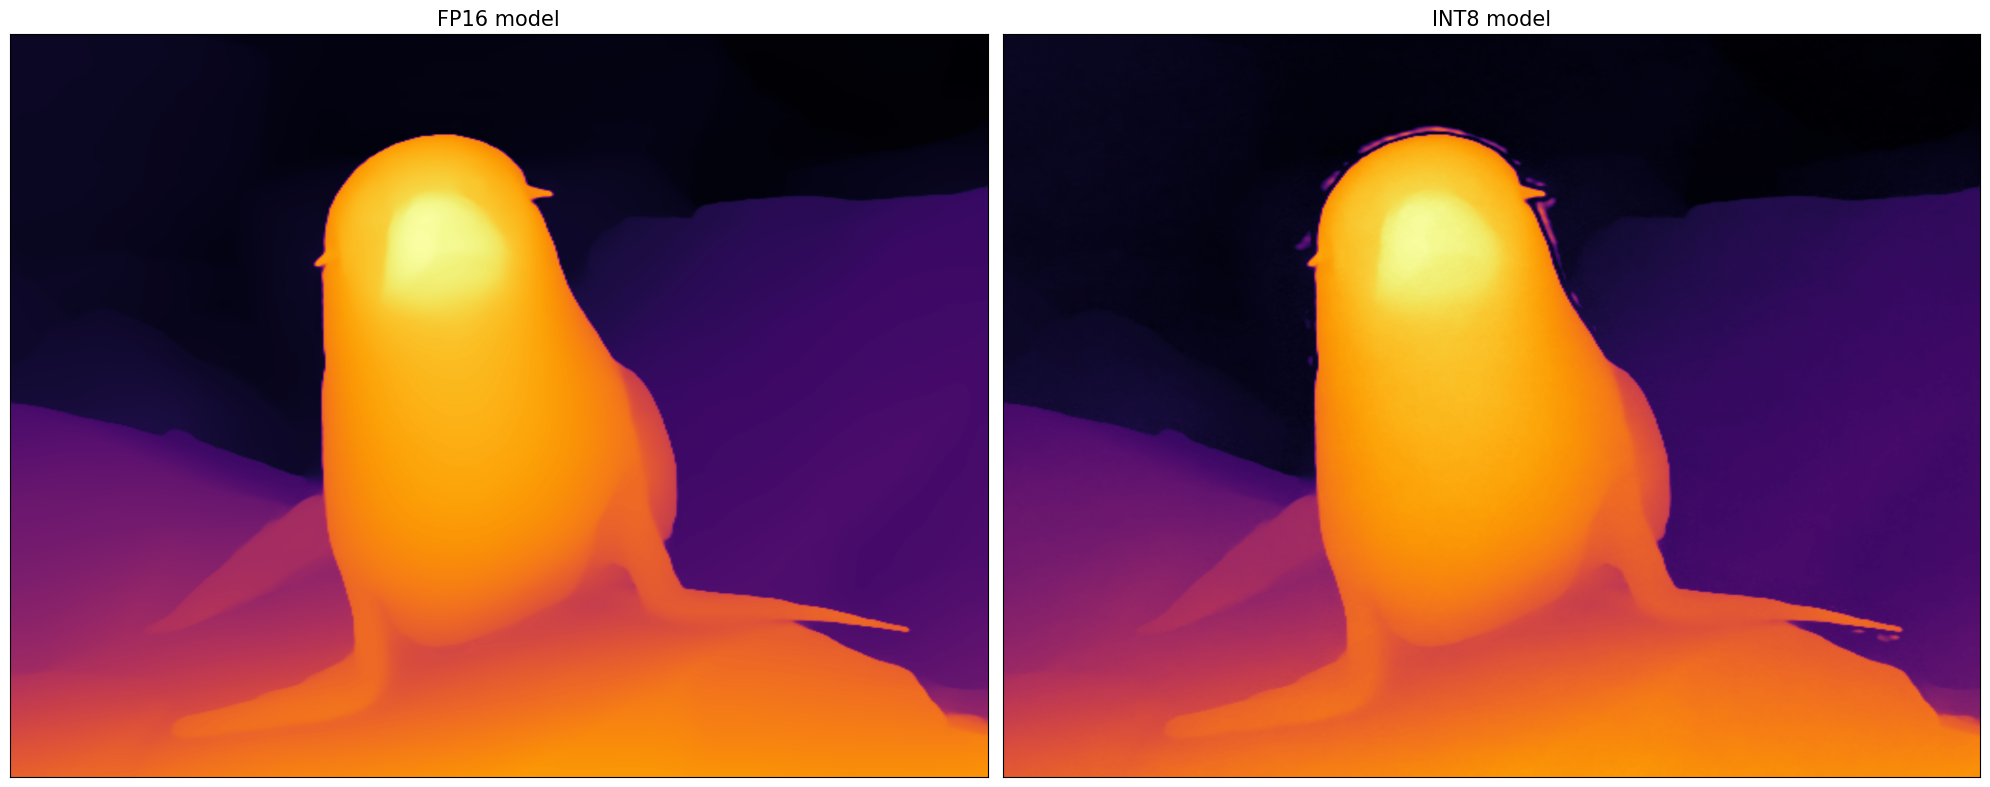
Let us check predictions with the quantized model using the same input data.
%%skip not $to_quantize.value

def visualize_results(orig_img:Image.Image, optimized_img:Image.Image):
    """
    Helper function for results visualization

    Parameters:
       orig_img (Image.Image): generated image using FP16 model
       optimized_img (Image.Image): generated image using quantized model
    Returns:
       fig (matplotlib.pyplot.Figure): matplotlib generated figure contains drawing result
    """
    orig_title = "FP16 model"
    control_title = "INT8 model"
    figsize = (20, 20)
    fig, axs = plt.subplots(1, 2, figsize=figsize, sharex='all', sharey='all')
    list_axes = list(axs.flat)
    for a in list_axes:
        a.set_xticklabels([])
        a.set_yticklabels([])
        a.get_xaxis().set_visible(False)
        a.get_yaxis().set_visible(False)
        a.grid(False)
    list_axes[0].imshow(np.array(orig_img))
    list_axes[1].imshow(np.array(optimized_img))
    list_axes[0].set_title(orig_title, fontsize=15)
    list_axes[1].set_title(control_title, fontsize=15)

    fig.subplots_adjust(wspace=0.01, hspace=0.01)
    fig.tight_layout()
    return fig
%%skip not $to_quantize.value

image = cv2.cvtColor(cv2.imread('furseal.png'), cv2.COLOR_BGR2RGB) / 255.0
image = transform({'image': image})['image']
image = torch.from_numpy(image).unsqueeze(0)

int8_compiled_model = core.compile_model(OV_DEPTH_ANYTHING_INT8_PATH, device.value)
int8_res = int8_compiled_model(image)[0]
int8_depth_color = get_depth_map(int8_res[0], w, h)
%%skip not $to_quantize.value

visualize_results(depth_color[:, :, ::-1], int8_depth_color[:, :, ::-1])

%%skip not $to_quantize.value

int8_result_video_path = output_directory / f"{Path(VIDEO_FILE).stem}_depth_anything_int8.mp4"
stacked_frame = process_video(int8_compiled_model, VIDEO_FILE, int8_result_video_path)
display_video(stacked_frame)
Processed 60 frames in 12.60 seconds. Total FPS (including video processing): 4.76.Inference FPS: 13.15
Video saved to 'output/Coco Walking in Berkeley_depth_anything_int8.mp4'.
Showing video saved at
/opt/home/k8sworker/ci-ai/cibuilds/jobs/ov-notebook/jobs/OVNotebookOps/builds/835/archive/.workspace/scm/ov-notebook/notebooks/depth-anything/output/Coco Walking in Berkeley_depth_anything.mp4
If you cannot see the video in your browser, please click on the following link to download the video
%%skip not $to_quantize.value

fp16_ir_model_size = OV_DEPTH_ANYTHING_PATH.with_suffix(".bin").stat().st_size / 2**20
quantized_model_size = OV_DEPTH_ANYTHING_INT8_PATH.with_suffix(".bin").stat().st_size / 2**20

print(f"FP16 model size: {fp16_ir_model_size:.2f} MB")
print(f"INT8 model size: {quantized_model_size:.2f} MB")
print(f"Model compression rate: {fp16_ir_model_size / quantized_model_size:.3f}")
FP16 model size: 47.11 MB
INT8 model size: 24.41 MB
Model compression rate: 1.930
Compare inference time of the FP16 and INT8 models#
To measure the inference performance of OpenVINO FP16 and INT8 models, use Benchmark Tool.
NOTE: For the most accurate performance estimation, it is recommended to run
benchmark_appin a terminal/command prompt after closing other applications.
import re


def get_fps(benchmark_output: str):
    parsed_output = [line for line in benchmark_output if "Throughput:" in line]
    fps = re.findall(r"\d+\.\d+", parsed_output[0])[0]
    return fps


if OV_DEPTH_ANYTHING_INT8_PATH.exists():
    benchmark_output = !benchmark_app -m $OV_DEPTH_ANYTHING_PATH -d $device.value -api async
    original_fps = get_fps(benchmark_output)
    print(f"FP16 Throughput: {original_fps} FPS")

    benchmark_output = !benchmark_app -m $OV_DEPTH_ANYTHING_INT8_PATH -d $device.value -api async
    optimized_fps = get_fps(benchmark_output)
    print(f"INT8 Throughput: {optimized_fps} FPS")
    print(f"Speed-up: {float(optimized_fps) / float(original_fps):.2f}")
FP16 Throughput: 10.67 FPS
INT8 Throughput: 14.21 FPS
Speed-up: 1.33
Interactive demo#
You can apply model on own images. You can move the slider on the resulting image to switch between the original image and the depth map view.
Please select below whether you would like to use the quantized model to launch the interactive demo.
import ipywidgets as widgets

quantized_model_present = OV_DEPTH_ANYTHING_INT8_PATH.exists()

use_quantized_model = widgets.Checkbox(
    value=True if quantized_model_present else False,
    description="Use quantized model",
    disabled=False,
)

use_quantized_model
Checkbox(value=True, description='Use quantized model')
import numpy as np
import cv2
import tempfile

if use_quantized_model.value:
    compiled_model = core.compile_model(OV_DEPTH_ANYTHING_INT8_PATH, device.value)


def predict_depth(model, image):
    return model(image)[0]


def on_submit(image):
    original_image = image.copy()

    h, w = image.shape[:2]

    image = cv2.cvtColor(image, cv2.COLOR_BGR2RGB) / 255.0
    image = transform({"image": image})["image"]
    image = np.expand_dims(image, 0)

    depth = predict_depth(compiled_model, image)
    depth = cv2.resize(depth[0], (w, h), interpolation=cv2.INTER_LINEAR)

    depth = (depth - depth.min()) / (depth.max() - depth.min()) * 255.0
    depth = depth.astype(np.uint8)
    colored_depth = cv2.applyColorMap(depth, cv2.COLORMAP_INFERNO)[:, :, ::-1]

    colored_depth_img = Image.fromarray(colored_depth)
    tmp = tempfile.NamedTemporaryFile(suffix=".png", delete=False)
    colored_depth_img.save(tmp.name)

    return [(original_image, colored_depth), tmp.name]
if not Path("gradio_helper.py").exists():
    r = requests.get(url="https://raw.githubusercontent.com/openvinotoolkit/openvino_notebooks/latest/notebooks/depth-anything/gradio_helper.py")
    open("gradio_helper.py", "w").write(r.text)

from gradio_helper import make_demo

demo = make_demo(fn=on_submit, examples_dir="Depth-Anything-V2/assets/examples")

try:
    demo.queue().launch(debug=False)
except Exception:
    demo.queue().launch(share=True, debug=False)
# if you are launching remotely, specify server_name and server_port
# demo.launch(server_name='your server name', server_port='server port in int')
# Read more in the docs: https://gradio.app/docs/
Running on local URL:  http://127.0.0.1:7860

To create a public link, set share=True in launch().