Quickstart Guide
OpenVINO Model Server can perform inference using pre-trained models in either OpenVINO IR , ONNX, PaddlePaddle or TensorFlow format. You can get them by:
downloading models from Open Model Zoo
generating the model in a training framework and saving it to a supported format: TensorFlow saved_model, ONNX or PaddlePaddle.
downloading the models from models hubs like TensorFlowHub or ONNX models zoo.
converting models from any formats using Model Optimizer
This guide uses a Faster R-CNN with Resnet-50 V1 Object Detection model in TensorFlow format.
Note: - OpenVINO Model Server can run on Linux and macOS. For use on Windows, WSL is required.
To quickly start using OpenVINO™ Model Server follow these steps:
Prepare Docker
Download the OpenVINO™ Model server
Provide a model
Start the Model Server Container
Prepare the Example Client Components
Download data for inference
Run inference
Review the results
Step 1: Prepare Docker
Install Docker Engine, including its post-installation steps, on your development system. To verify installation, test it using the following command. If it displays a test image and a message, it is ready.
$ docker run hello-world
Step 2: Download the Model Server
Download the Docker image that contains OpenVINO Model Server:
docker pull openvino/model_server:latest
Step 3: Provide a Model
Store components of the model in the model/1 directory. Here are example commands pulling an object detection model from TensorFlow Hub:
mkdir -p model/1
wget https://storage.googleapis.com/tfhub-modules/tensorflow/faster_rcnn/resnet50_v1_640x640/1.tar.gz
tar xzf 1.tar.gz -C model/1
OpenVINO Model Server expects a particular folder structure for models - in this case model directory has the following content:
model
└── 1
    ├── saved_model.pb
    └── variables
        ├── variables.data-00000-of-00001
        └── variables.index
Sub-folder 1 indicates the version of the model. If you want to upgrade the model, other versions can be added in separate subfolders (2,3…).
For more information about the directory structure and how to deploy multiple models at a time, check out the following sections:
Step 4: Start the Model Server Container
Start the container:
docker run -d -u $(id -u) --rm -v ${PWD}/model:/model -p 9000:9000 openvino/model_server:latest --model_name faster_rcnn --model_path /model --port 9000
During this step, the model folder is mounted to the Docker container. This folder will be used as the model storage.
Step 5: Prepare the Example Client Components
Client scripts are available for quick access to the Model Server. Run an example command to download all required components:
wget https://raw.githubusercontent.com/openvinotoolkit/model_server/releases/2023/3/demos/object_detection/python/object_detection.py
wget https://raw.githubusercontent.com/openvinotoolkit/model_server/releases/2023/3/demos/object_detection/python/requirements.txt
wget https://raw.githubusercontent.com/openvinotoolkit/open_model_zoo/master/data/dataset_classes/coco_91cl.txt
Check more information about the writing the client applications.
Step 6: Download Data for Inference
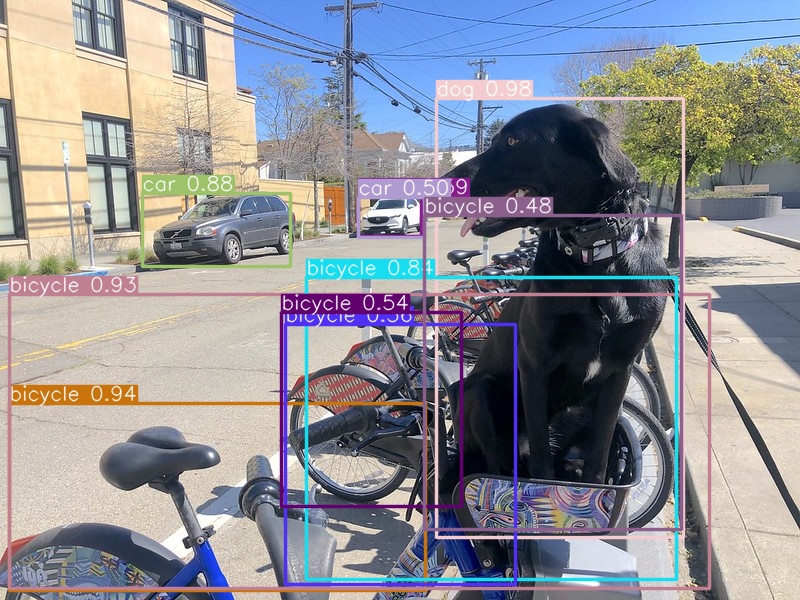
This example uses the file coco_bike.jpg. Run the following command to download the image:
wget https://storage.openvinotoolkit.org/repositories/openvino_notebooks/data/data/image/coco_bike.jpg
Step 7: Run Inference
Go to the folder with the client script and install dependencies. Create a folder for inference results and run the client script:
pip install --upgrade pip
pip install -r requirements.txt

python3 object_detection.py --image coco_bike.jpg --output output.jpg --service_url localhost:9000
Step 8: Review the Results
In the current folder, you can find files containing inference results. In our case, it will be a modified input image with bounding boxes indicating detected objects and their labels.

Note: Similar steps can be performed with other model formats. Check the ONNX use case example, TensorFlow classification model demo or PaddlePaddle model demo.
Congratulations, you have completed the QuickStart guide. Try other Model Server demos or explore more features to create your application.