Convert of TensorFlow Hub models to OpenVINO Intermediate Representation (IR)
This Jupyter notebook can be launched on-line, opening an interactive environment in a browser window. You can also make a local installation. Choose one of the following options:
This tutorial demonstrates step-by-step instructions on how to convert models loaded from TensorFlow Hub using OpenVINO Runtime.
TensorFlow Hub is a library and online platform developed by Google that simplifies machine learning model reuse and sharing. It serves as a repository of pre-trained models, embeddings, and reusable components, allowing researchers and developers to access and integrate state-of-the-art machine learning models into their own projects with ease. TensorFlow Hub provides a diverse range of models for various tasks like image classification, text embedding, and more. It streamlines the process of incorporating these models into TensorFlow workflows, fostering collaboration and accelerating the development of AI applications. This centralized hub enhances model accessibility and promotes the rapid advancement of machine learning capabilities across the community.
You have the flexibility to run this tutorial notebook in its entirety or selectively execute specific sections, as each section operates independently.
Table of contents:
Image classification
We will use the MobileNet_v2 image classification model from TensorFlow Hub.
MobileNetV2 is a compact and efficient deep learning architecture designed for mobile and embedded devices, developed by Google researchers. It builds on the success of the original MobileNet by introducing improvements in both speed and accuracy. MobileNetV2 employs a streamlined architecture with inverted residual blocks, making it highly efficient for real-time applications while minimizing computational resources. This network excels in tasks like image classification, object detection, and image segmentation, offering a balance between model size and performance. MobileNetV2 has become a popular choice for on-device AI applications, enabling faster and more efficient deep learning inference on smartphones and edge devices.
More information about model can be found on Model page on TensorFlow Hub
Install required packages
%pip install -q tensorflow_hub tensorflow pillow numpy matplotlib
%pip install -q "openvino>=2023.2.0"
Note: you may need to restart the kernel to use updated packages.
Note: you may need to restart the kernel to use updated packages.
Import libraries
from pathlib import Path
import os
from urllib.request import urlretrieve
os.environ["TF_CPP_MIN_LOG_LEVEL"] = "2"

import tensorflow_hub as hub
import tensorflow as tf
import PIL
import numpy as np
import matplotlib.pyplot as plt

import openvino as ov

tf.get_logger().setLevel("ERROR")
IMAGE_SHAPE = (224, 224)
IMAGE_URL, IMAGE_PATH = "https://storage.googleapis.com/download.tensorflow.org/example_images/grace_hopper.jpg", "data/grace_hopper.jpg"
MODEL_URL, MODEL_PATH = "https://www.kaggle.com/models/google/mobilenet-v1/frameworks/tensorFlow2/variations/100-224-classification/versions/2", "models/mobilenet_v2_100_224.xml"
Download the classifier
Select a MobileNetV2
pre-trained model from TensorFlow
Hub
and wrap it as a Keras layer with hub.KerasLayer.
model = hub.KerasLayer(MODEL_URL, input_shape=IMAGE_SHAPE + (3,))
2024-02-09 23:12:03.569013: E tensorflow/compiler/xla/stream_executor/cuda/cuda_driver.cc:266] failed call to cuInit: CUDA_ERROR_COMPAT_NOT_SUPPORTED_ON_DEVICE: forward compatibility was attempted on non supported HW
2024-02-09 23:12:03.569190: E tensorflow/compiler/xla/stream_executor/cuda/cuda_diagnostics.cc:312] kernel version 470.182.3 does not match DSO version 470.223.2 -- cannot find working devices in this configuration
Download a single image to try the model on
The input images are
expected to have color values in the range [0,1], following the common
image input
conventions.
For this model, the size of the input images is fixed to height x
width = 224 x 224 pixels.
Path(IMAGE_PATH).parent.mkdir(parents=True, exist_ok=True)
grace_hopper, _ = urlretrieve(IMAGE_URL, IMAGE_PATH)
grace_hopper = PIL.Image.open(grace_hopper).resize(IMAGE_SHAPE)
grace_hopper
Normalize the image to [0,1] range.
grace_hopper = np.array(grace_hopper) / 255.0
grace_hopper.shape
(224, 224, 3)
Convert model to OpenVINO IR
We will convert the loaded model to OpenVINO IR using
ov.convert_model function. We pass the model object to it, no
additional arguments required. Then, we save the model to disk using
ov.save_model function.
if not Path(MODEL_PATH).exists():
    converted_model = ov.convert_model(model)
    ov.save_model(converted_model, MODEL_PATH)
Select inference device
select device from dropdown list for running inference using OpenVINO
import ipywidgets as widgets

core = ov.Core()

device = widgets.Dropdown(
    options=core.available_devices + ["AUTO"],
    value='AUTO',
    description='Device:',
    disabled=False,
)

device
Dropdown(description='Device:', index=1, options=('CPU', 'AUTO'), value='AUTO')
compiled_model = core.compile_model(MODEL_PATH, device_name=device.value)
Inference
Add a batch dimension (with np.newaxis) and pass the image to the
model:
output = compiled_model(grace_hopper[np.newaxis, ...])[0]
output.shape
(1, 1001)
The result is a 1001-element vector of logits, rating the probability of each class for the image.
The top class ID can be found with np.argmax:
predicted_class = np.argmax(output[0], axis=-1)
predicted_class
653
Take the predicted_class ID (such as 653) and fetch the ImageNet
dataset labels to decode the predictions:
labels_path = tf.keras.utils.get_file('ImageNetLabels.txt','https://storage.googleapis.com/download.tensorflow.org/data/ImageNetLabels.txt')
imagenet_labels = np.array(open(labels_path).read().splitlines())
plt.imshow(grace_hopper)
plt.axis('off')
predicted_class_name = imagenet_labels[predicted_class]
_ = plt.title("Prediction: " + predicted_class_name.title())
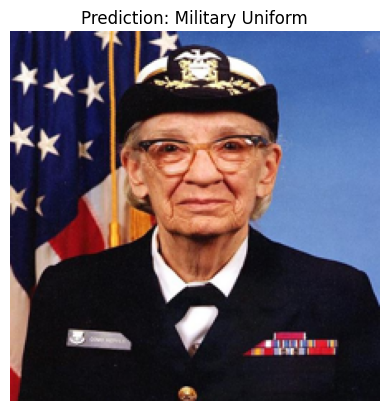
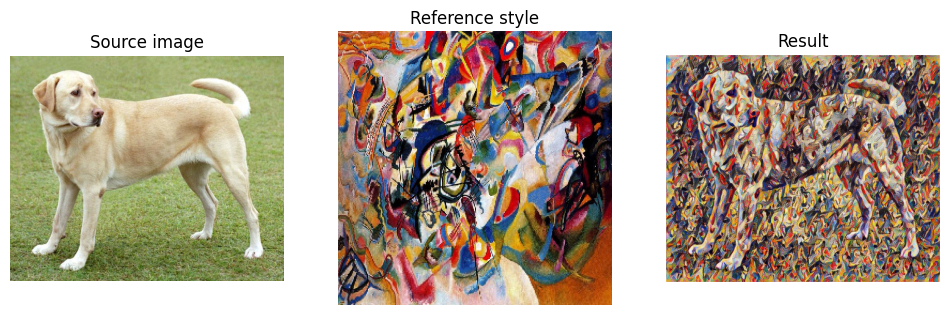
Image style transfer
We will use arbitrary image stylization model from TensorFlow Hub.
The model contains conditional instance normalization (CIN) layers
The CIN network consists of two main components: a feature extractor and a stylization module. The feature extractor extracts a set of features from the content image. The stylization module then uses these features to generate a stylized image.
The stylization module is a stack of convolutional layers. Each convolutional layer is followed by a CIN layer. The CIN layer takes the features from the previous layer and the CIN parameters from the style image as input and produces a new set of features as output.
The output of the stylization module is a stylized image. The stylized image has the same content as the original content image, but the style has been transferred from the style image.
The CIN network is able to stylize images in real time because it is very efficient.
More model information can be found on Model page on TensorFlow Hub.
Install required packages
%pip install -q tensorflow tensorflow_hub "opencv-python" numpy matplotlib
%pip install -q "openvino>=2023.2.0"
Note: you may need to restart the kernel to use updated packages.
Note: you may need to restart the kernel to use updated packages.
import os
os.environ["TF_CPP_MIN_LOG_LEVEL"] = "2"
from urllib.request import urlretrieve
from pathlib import Path

import openvino as ov

import tensorflow_hub as hub
import tensorflow as tf
import cv2
import numpy as np
import matplotlib.pyplot as plt
CONTENT_IMAGE_URL = "https://upload.wikimedia.org/wikipedia/commons/2/26/YellowLabradorLooking_new.jpg"
CONTENT_IMAGE_PATH = "./data/YellowLabradorLooking_new.jpg"

STYLE_IMAGE_URL = "https://upload.wikimedia.org/wikipedia/commons/b/b4/Vassily_Kandinsky%2C_1913_-_Composition_7.jpg"
STYLE_IMAGE_PATH = "./data/Vassily_Kandinsky%2C_1913_-_Composition_7.jpg"

MODEL_URL = "https://www.kaggle.com/models/google/arbitrary-image-stylization-v1/frameworks/tensorFlow1/variations/256/versions/2"
MODEL_PATH = "./models/arbitrary-image-stylization-v1-256.xml"
Load the model
We load the model from TensorFlow Hub using hub.KerasLayer. Since
the model has multiple inputs (content image and style image), we need
to build it by calling with placeholders and wrap in tf.keras.Model
function.
inputs = {
    "placeholder": tf.keras.layers.Input(shape=(None, None, 3)),
    "placeholder_1": tf.keras.layers.Input(shape=(None, None, 3)),
}
model = hub.KerasLayer(MODEL_URL, signature="serving_default", signature_outputs_as_dict=True)  # define the signature to allow passing inputs as a dictionary
outputs = model(inputs)
model = tf.keras.Model(inputs=inputs, outputs=outputs)
Convert the model to OpenVINO IR
We convert the loaded model to OpenVINO IR using ov.convert_model
function. We pass our model to the function, no additional arguments
needed. After converting, we save the model to disk using
ov.save_model function.
if not Path(MODEL_PATH).exists():
    Path(MODEL_PATH).parent.mkdir(parents=True, exist_ok=True)
    converted_model = ov.convert_model(model)
    ov.save_model(converted_model, MODEL_PATH)
Select inference device
select device from dropdown list for running inference using OpenVINO
import ipywidgets as widgets

core = ov.Core()

device = widgets.Dropdown(
    options=core.available_devices + ["AUTO"],
    value='AUTO',
    description='Device:',
    disabled=False,
)

device
Dropdown(description='Device:', index=1, options=('CPU', 'AUTO'), value='AUTO')
compiled_model = core.compile_model(MODEL_PATH, device_name=device.value)
Inference
def download_image(src, dst):
    if not Path(dst).exists():
        Path(dst).parent.mkdir(parents=True, exist_ok=True)
        urlretrieve(src, dst)
    image = cv2.imread(dst)
    image = cv2.cvtColor(image, cv2.COLOR_BGR2RGB)  # Convert image color to RGB space
    image = image / 255  # Normalize to [0, 1] interval
    image = image.astype(np.float32)
    return image
content_image = download_image(CONTENT_IMAGE_URL, CONTENT_IMAGE_PATH)
style_image = download_image(STYLE_IMAGE_URL, STYLE_IMAGE_PATH)
style_image = cv2.resize(style_image, (256,256))  # model was trained on 256x256 images
result = compiled_model([content_image[np.newaxis, ...], style_image[np.newaxis, ...]])[0]
title2img = {
    "Source image": content_image,
    "Reference style": style_image,
    "Result": result[0],
}
plt.figure(figsize=(12, 12))
for i, (title, img) in enumerate(title2img.items()):
    ax = plt.subplot(1, 3, i + 1)
    ax.set_title(title)
    plt.imshow(img)
    plt.axis("off")