Convert and Optimize YOLOv8 instance segmentation model with OpenVINO™
This Jupyter notebook can be launched on-line, opening an interactive environment in a browser window. You can also make a local installation. Choose one of the following options:
Instance segmentation goes a step further than object detection and involves identifying individual objects in an image and segmenting them from the rest of the image. Instance segmentation as an object detection are often used as key components in computer vision systems. Applications that use real-time instance segmentation models include video analytics, robotics, autonomous vehicles, multi-object tracking and object counting, medical image analysis, and many others.
This tutorial demonstrates step-by-step instructions on how to run and optimize PyTorch YOLOv8 with OpenVINO. We consider the steps required for instance segmentation scenario.
The tutorial consists of the following steps: - Prepare the PyTorch model. - Download and prepare a dataset. - Validate the original model. - Convert the PyTorch model to OpenVINO IR. - Validate the converted model. - Prepare and run optimization pipeline. - Compare performance of the FP32 and quantized models. - Compare accuracy of the FP32 and quantized models. - Live demo
Table of contents:
Get PyTorch model
Generally, PyTorch models represent an instance of the
torch.nn.Module
class, initialized by a state dictionary with model weights. We will use
the YOLOv8 nano model (also known as yolov8n) pre-trained on a COCO
dataset, which is available in this
repo. Similar steps are
also applicable to other YOLOv8 models. Typical steps to obtain a
pre-trained model: 1. Create an instance of a model class. 2. Load a
checkpoint state dict, which contains the pre-trained model weights. 3.
Turn the model to evaluation for switching some operations to inference
mode.
In this case, the creators of the model provide an API that enables converting the YOLOv8 model to ONNX and then to OpenVINO IR. Therefore, we do not need to do these steps manually.
Prerequisites
Install necessary packages.
%pip install -q "openvino>=2023.1.0" "nncf>=2.5.0"
%pip install -q "torch>=2.1" "torchvision>=0.16" "ultralytics==8.0.43" onnx --extra-index-url https://download.pytorch.org/whl/cpu
Import required utility functions. The lower cell will download the
notebook_utils Python module from GitHub.
from pathlib import Path

# Fetch the notebook utils script from the openvino_notebooks repo
import urllib.request
urllib.request.urlretrieve(
    url='https://raw.githubusercontent.com/openvinotoolkit/openvino_notebooks/main/notebooks/utils/notebook_utils.py',
    filename='notebook_utils.py'
)

from notebook_utils import download_file, VideoPlayer
Define utility functions for drawing results
from typing import Tuple, Dict
import cv2
import numpy as np
from PIL import Image
from ultralytics.yolo.utils.plotting import colors


def plot_one_box(box:np.ndarray, img:np.ndarray, color:Tuple[int, int, int] = None, mask:np.ndarray = None, label:str = None, line_thickness:int = 5):
    """
    Helper function for drawing single bounding box on image
    Parameters:
        x (np.ndarray): bounding box coordinates in format [x1, y1, x2, y2]
        img (no.ndarray): input image
        color (Tuple[int, int, int], *optional*, None): color in BGR format for drawing box, if not specified will be selected randomly
        mask (np.ndarray, *optional*, None): instance segmentation mask polygon in format [N, 2], where N - number of points in contour, if not provided, only box will be drawn
        label (str, *optonal*, None): box label string, if not provided will not be provided as drowing result
        line_thickness (int, *optional*, 5): thickness for box drawing lines
    """
    # Plots one bounding box on image img
    tl = line_thickness or round(0.002 * (img.shape[0] + img.shape[1]) / 2) + 1  # line/font thickness
    color = color or [random.randint(0, 255) for _ in range(3)]
    c1, c2 = (int(box[0]), int(box[1])), (int(box[2]), int(box[3]))
    cv2.rectangle(img, c1, c2, color, thickness=tl, lineType=cv2.LINE_AA)
    if label:
        tf = max(tl - 1, 1)  # font thickness
        t_size = cv2.getTextSize(label, 0, fontScale=tl / 3, thickness=tf)[0]
        c2 = c1[0] + t_size[0], c1[1] - t_size[1] - 3
        cv2.rectangle(img, c1, c2, color, -1, cv2.LINE_AA)  # filled
        cv2.putText(img, label, (c1[0], c1[1] - 2), 0, tl / 3, [225, 255, 255], thickness=tf, lineType=cv2.LINE_AA)
    if mask is not None:
        image_with_mask = img.copy()
        mask
        cv2.fillPoly(image_with_mask, pts=[mask.astype(int)], color=color)
        img = cv2.addWeighted(img, 0.5, image_with_mask, 0.5, 1)
    return img


def draw_results(results:Dict, source_image:np.ndarray, label_map:Dict):
    """
    Helper function for drawing bounding boxes on image
    Parameters:
        image_res (np.ndarray): detection predictions in format [x1, y1, x2, y2, score, label_id]
        source_image (np.ndarray): input image for drawing
        label_map; (Dict[int, str]): label_id to class name mapping
    Returns:

    """
    boxes = results["det"]
    masks = results.get("segment")
    for idx, (*xyxy, conf, lbl) in enumerate(boxes):
        label = f'{label_map[int(lbl)]} {conf:.2f}'
        mask = masks[idx] if masks is not None else None
        source_image = plot_one_box(xyxy, source_image, mask=mask, label=label, color=colors(int(lbl)), line_thickness=1)
    return source_image
# Download a test sample
IMAGE_PATH = Path('./data/coco_bike.jpg')
download_file(
    url='https://storage.openvinotoolkit.org/repositories/openvino_notebooks/data/data/image/coco_bike.jpg',
    filename=IMAGE_PATH.name,
    directory=IMAGE_PATH.parent
)
'data/coco_bike.jpg' already exists.
PosixPath('/home/ea/work/openvino_notebooks/notebooks/230-yolov8-optimization/data/coco_bike.jpg')
Instantiate model
For loading the model, required to specify a path to the model checkpoint. It can be some local path or name available on models hub (in this case model checkpoint will be downloaded automatically).
Making prediction, the model accepts a path to input image and returns
list with Results class object. Results contains boxes for object
detection model and boxes and masks for segmentation model. Also it
contains utilities for processing results, for example, plot()
method for drawing.
Let us consider the examples:
models_dir = Path('./models')
models_dir.mkdir(exist_ok=True)
from ultralytics import YOLO
SEG_MODEL_NAME = "yolov8n-seg"
seg_model = YOLO(models_dir / f'{SEG_MODEL_NAME}.pt')
label_map = seg_model.model.names
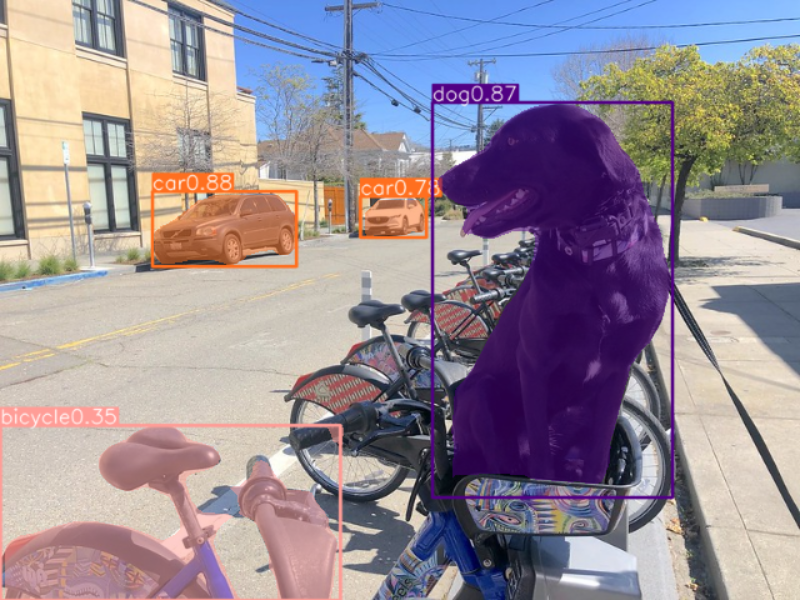
res = seg_model(IMAGE_PATH)
Image.fromarray(res[0].plot()[:, :, ::-1])
2023-10-05 19:10:02.690018: I tensorflow/core/util/port.cc:110] oneDNN custom operations are on. You may see slightly different numerical results due to floating-point round-off errors from different computation orders. To turn them off, set the environment variable TF_ENABLE_ONEDNN_OPTS=0.
2023-10-05 19:10:02.730258: I tensorflow/core/platform/cpu_feature_guard.cc:182] This TensorFlow binary is optimized to use available CPU instructions in performance-critical operations.
To enable the following instructions: AVX2 AVX512F AVX512_VNNI FMA, in other operations, rebuild TensorFlow with the appropriate compiler flags.
2023-10-05 19:10:03.377715: W tensorflow/compiler/tf2tensorrt/utils/py_utils.cc:38] TF-TRT Warning: Could not find TensorRT
Ultralytics YOLOv8.0.43 🚀 Python-3.8.10 torch-2.0.1+cpu CPU
YOLOv8n-seg summary (fused): 195 layers, 3404320 parameters, 0 gradients, 12.6 GFLOPs

image 1/1 /home/ea/work/openvino_notebooks/notebooks/230-yolov8-optimization/data/coco_bike.jpg: 480x640 1 bicycle, 2 cars, 1 dog, 55.0ms
Speed: 2.6ms preprocess, 55.0ms inference, 3.4ms postprocess per image at shape (1, 3, 640, 640)
/home/ea/work/ov_venv/lib/python3.8/site-packages/torchvision/transforms/functional.py:1603: UserWarning: The default value of the antialias parameter of all the resizing transforms (Resize(), RandomResizedCrop(), etc.) will change from None to True in v0.17, in order to be consistent across the PIL and Tensor backends. To suppress this warning, directly pass antialias=True (recommended, future default), antialias=None (current default, which means False for Tensors and True for PIL), or antialias=False (only works on Tensors - PIL will still use antialiasing). This also applies if you are using the inference transforms from the models weights: update the call to weights.transforms(antialias=True).
  warnings.warn(
Convert model to OpenVINO IR
YOLOv8 provides API for convenient model exporting to different formats
including OpenVINO IR. model.export is responsible for model
conversion. We need to specify the format, and additionally, we can
preserve dynamic shapes in the model.
# instance segmentation model
seg_model_path = models_dir / f"{SEG_MODEL_NAME}_openvino_model/{SEG_MODEL_NAME}.xml"
if not seg_model_path.exists():
    seg_model.export(format="openvino", dynamic=True, half=False)
Verify model inference
To test model work, we create inference pipeline similar to
model.predict method. The pipeline consists of preprocessing step,
inference of OpenVINO model and results post-processing to get results.
Preprocessing
Model input is a tensor with the [-1, 3, -1, -1] shape in the
N, C, H, W format, where * N - number of images in batch (batch
size) * C - image channels * H - image height * W - image
width
The model expects images in RGB channels format and normalized in [0, 1]
range. Although the model supports dynamic input shape with preserving
input divisibility to 32, it is recommended to use static shapes, for
example, 640x640 for better efficiency. To resize images to fit model
size letterbox, resize approach is used, where the aspect ratio of
width and height is preserved.
To keep a specific shape, preprocessing automatically enables padding.
from typing import Tuple
from ultralytics.yolo.utils import ops
import torch
import numpy as np


def letterbox(img: np.ndarray, new_shape:Tuple[int, int] = (640, 640), color:Tuple[int, int, int] = (114, 114, 114), auto:bool = False, scale_fill:bool = False, scaleup:bool = False, stride:int = 32):
    """
    Resize image and padding for detection. Takes image as input,
    resizes image to fit into new shape with saving original aspect ratio and pads it to meet stride-multiple constraints

    Parameters:
      img (np.ndarray): image for preprocessing
      new_shape (Tuple(int, int)): image size after preprocessing in format [height, width]
      color (Tuple(int, int, int)): color for filling padded area
      auto (bool): use dynamic input size, only padding for stride constrins applied
      scale_fill (bool): scale image to fill new_shape
      scaleup (bool): allow scale image if it is lower then desired input size, can affect model accuracy
      stride (int): input padding stride
    Returns:
      img (np.ndarray): image after preprocessing
      ratio (Tuple(float, float)): hight and width scaling ratio
      padding_size (Tuple(int, int)): height and width padding size


    """
    # Resize and pad image while meeting stride-multiple constraints
    shape = img.shape[:2]  # current shape [height, width]
    if isinstance(new_shape, int):
        new_shape = (new_shape, new_shape)

    # Scale ratio (new / old)
    r = min(new_shape[0] / shape[0], new_shape[1] / shape[1])
    if not scaleup:  # only scale down, do not scale up (for better test mAP)
        r = min(r, 1.0)

    # Compute padding
    ratio = r, r  # width, height ratios
    new_unpad = int(round(shape[1] * r)), int(round(shape[0] * r))
    dw, dh = new_shape[1] - new_unpad[0], new_shape[0] - new_unpad[1]  # wh padding
    if auto:  # minimum rectangle
        dw, dh = np.mod(dw, stride), np.mod(dh, stride)  # wh padding
    elif scale_fill:  # stretch
        dw, dh = 0.0, 0.0
        new_unpad = (new_shape[1], new_shape[0])
        ratio = new_shape[1] / shape[1], new_shape[0] / shape[0]  # width, height ratios

    dw /= 2  # divide padding into 2 sides
    dh /= 2

    if shape[::-1] != new_unpad:  # resize
        img = cv2.resize(img, new_unpad, interpolation=cv2.INTER_LINEAR)
    top, bottom = int(round(dh - 0.1)), int(round(dh + 0.1))
    left, right = int(round(dw - 0.1)), int(round(dw + 0.1))
    img = cv2.copyMakeBorder(img, top, bottom, left, right, cv2.BORDER_CONSTANT, value=color)  # add border
    return img, ratio, (dw, dh)


def preprocess_image(img0: np.ndarray):
    """
    Preprocess image according to YOLOv8 input requirements.
    Takes image in np.array format, resizes it to specific size using letterbox resize and changes data layout from HWC to CHW.

    Parameters:
      img0 (np.ndarray): image for preprocessing
    Returns:
      img (np.ndarray): image after preprocessing
    """
    # resize
    img = letterbox(img0)[0]

    # Convert HWC to CHW
    img = img.transpose(2, 0, 1)
    img = np.ascontiguousarray(img)
    return img


def image_to_tensor(image:np.ndarray):
    """
    Preprocess image according to YOLOv8 input requirements.
    Takes image in np.array format, resizes it to specific size using letterbox resize and changes data layout from HWC to CHW.

    Parameters:
      img (np.ndarray): image for preprocessing
    Returns:
      input_tensor (np.ndarray): input tensor in NCHW format with float32 values in [0, 1] range
    """
    input_tensor = image.astype(np.float32)  # uint8 to fp32
    input_tensor /= 255.0  # 0 - 255 to 0.0 - 1.0

    # add batch dimension
    if input_tensor.ndim == 3:
        input_tensor = np.expand_dims(input_tensor, 0)
    return input_tensor
Postprocessing
The model output contains: - detection boxes candidates - proto mask candidates
Detection boxes candidates are the tensors with the [-1,84,-1] shape
in the B,84,N format, where:
B- batch sizeN- number of detection boxes
For getting the final prediction, we need to apply a non-maximum suppression algorithm and rescale box coordinates to the original image size.
After final prediction detection box has the [x, y, h,
w, class_no_1, …, class_no_80] format, where:
(
x,y) - raw coordinates of box centerh,w- raw height and width of the boxclass_no_1, …,class_no_80- probability distribution over the classes.
Proto mask candidates are used for instance segmentation. It should be
decoded by using box coordinates. It is a tensor with the
[-1 32, -1, -1] shape in the B,C H,W format, where: - B -
batch size - C - number of candidates - H - mask height - W
- mask width
try:
    scale_segments = ops.scale_segments
except AttributeError:
    scale_segments = ops.scale_coords

def postprocess(
    pred_boxes:np.ndarray,
    input_hw:Tuple[int, int],
    orig_img:np.ndarray,
    min_conf_threshold:float = 0.25,
    nms_iou_threshold:float = 0.7,
    agnosting_nms:bool = False,
    max_detections:int = 300,
    pred_masks:np.ndarray = None,
    retina_mask:bool = False
):
    """
    YOLOv8 model postprocessing function. Applied non maximum supression algorithm to detections and rescale boxes to original image size
    Parameters:
        pred_boxes (np.ndarray): model output prediction boxes
        input_hw (np.ndarray): preprocessed image
        orig_image (np.ndarray): image before preprocessing
        min_conf_threshold (float, *optional*, 0.25): minimal accepted confidence for object filtering
        nms_iou_threshold (float, *optional*, 0.45): minimal overlap score for removing objects duplicates in NMS
        agnostic_nms (bool, *optiona*, False): apply class agnostinc NMS approach or not
        max_detections (int, *optional*, 300):  maximum detections after NMS
        pred_masks (np.ndarray, *optional*, None): model ooutput prediction masks, if not provided only boxes will be postprocessed
        retina_mask (bool, *optional*, False): retina mask postprocessing instead of native decoding
    Returns:
       pred (List[Dict[str, np.ndarray]]): list of dictionary with det - detected boxes in format [x1, y1, x2, y2, score, label] and
                                           segment - segmentation polygons for each element in batch
    """
    nms_kwargs = {"agnostic": agnosting_nms, "max_det":max_detections}
    # if pred_masks is not None:
    #     nms_kwargs["nm"] = 32
    preds = ops.non_max_suppression(
        torch.from_numpy(pred_boxes),
        min_conf_threshold,
        nms_iou_threshold,
        nc=80,
        **nms_kwargs
    )
    results = []
    proto = torch.from_numpy(pred_masks) if pred_masks is not None else None

    for i, pred in enumerate(preds):
        shape = orig_img[i].shape if isinstance(orig_img, list) else orig_img.shape
        if not len(pred):
            results.append({"det": [], "segment": []})
            continue
        if proto is None:
            pred[:, :4] = ops.scale_boxes(input_hw, pred[:, :4], shape).round()
            results.append({"det": pred})
            continue
        if retina_mask:
            pred[:, :4] = ops.scale_boxes(input_hw, pred[:, :4], shape).round()
            masks = ops.process_mask_native(proto[i], pred[:, 6:], pred[:, :4], shape[:2])  # HWC
            segments = [scale_segments(input_hw, x, shape, normalize=False) for x in ops.masks2segments(masks)]
        else:
            masks = ops.process_mask(proto[i], pred[:, 6:], pred[:, :4], input_hw, upsample=True)
            pred[:, :4] = ops.scale_boxes(input_hw, pred[:, :4], shape).round()
            segments = [scale_segments(input_hw, x, shape, normalize=False) for x in ops.masks2segments(masks)]
        results.append({"det": pred[:, :6].numpy(), "segment": segments})
    return results
Select inference device
Select device from dropdown list for running inference using OpenVINO
import ipywidgets as widgets
import openvino as ov

core = ov.Core()

device = widgets.Dropdown(
    options=core.available_devices + ["AUTO"],
    value='AUTO',
    description='Device:',
    disabled=False,
)

device
Dropdown(description='Device:', index=2, options=('CPU', 'GPU', 'AUTO'), value='AUTO')
Test on single image
Now, once we have defined preprocessing and postprocessing steps, we are ready to check model prediction.
core = ov.Core()
seg_ov_model = core.read_model(seg_model_path)
if device.value != "CPU":
    seg_ov_model.reshape({0: [1, 3, 640, 640]})
seg_compiled_model = core.compile_model(seg_ov_model, device.value)


def detect(image:np.ndarray, model:ov.Model):
    """
    OpenVINO YOLOv8 model inference function. Preprocess image, runs model inference and postprocess results using NMS.
    Parameters:
        image (np.ndarray): input image.
        model (Model): OpenVINO compiled model.
    Returns:
        detections (np.ndarray): detected boxes in format [x1, y1, x2, y2, score, label]
    """
    num_outputs = len(model.outputs)
    preprocessed_image = preprocess_image(image)
    input_tensor = image_to_tensor(preprocessed_image)
    result = model(input_tensor)
    boxes = result[model.output(0)]
    masks = None
    if num_outputs > 1:
        masks = result[model.output(1)]
    input_hw = input_tensor.shape[2:]
    detections = postprocess(pred_boxes=boxes, input_hw=input_hw, orig_img=image, pred_masks=masks)
    return detections

input_image = np.array(Image.open(IMAGE_PATH))
detections = detect(input_image, seg_compiled_model)[0]
image_with_masks = draw_results(detections, input_image, label_map)

Image.fromarray(image_with_masks)
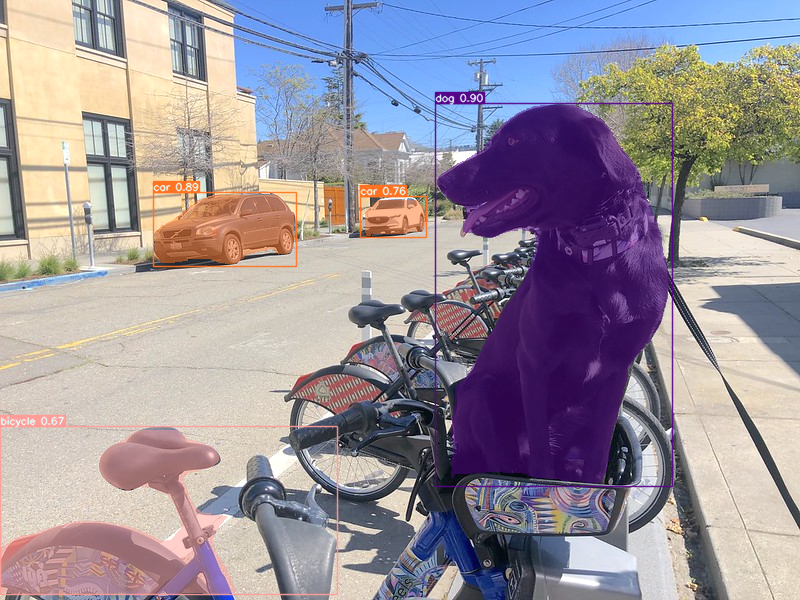
Great! The result is the same, as produced by original models.
Check model accuracy on the dataset
For comparing the optimized model result with the original, it is good to know some measurable results in terms of model accuracy on the validation dataset.
Download the validation dataset
YOLOv8 is pre-trained on the COCO dataset, so to evaluate the model accuracy we need to download it. According to the instructions provided in the YOLOv8 repo, we also need to download annotations in the format used by the author of the model, for use with the original model evaluation function.
NOTE: The initial dataset download may take a few minutes to complete. The download speed will vary depending on the quality of your internet connection.
from zipfile import ZipFile

DATA_URL = "http://images.cocodataset.org/zips/val2017.zip"
LABELS_URL = "https://github.com/ultralytics/yolov5/releases/download/v1.0/coco2017labels-segments.zip"
CFG_URL = "https://raw.githubusercontent.com/ultralytics/ultralytics/8ebe94d1e928687feaa1fee6d5668987df5e43be/ultralytics/datasets/coco.yaml"  # last compatible format with ultralytics 8.0.43

from ultralytics.yolo.utils import DATASETS_DIR

OUT_DIR = DATASETS_DIR

DATA_PATH = OUT_DIR / "val2017.zip"
LABELS_PATH = OUT_DIR / "coco2017labels-segments.zip"
CFG_PATH = OUT_DIR / "coco.yaml"

download_file(DATA_URL, DATA_PATH.name, DATA_PATH.parent)
download_file(LABELS_URL, LABELS_PATH.name, LABELS_PATH.parent)
download_file(CFG_URL, CFG_PATH.name, CFG_PATH.parent)

if not (OUT_DIR / "coco/labels").exists():
    with ZipFile(LABELS_PATH , "r") as zip_ref:
        zip_ref.extractall(OUT_DIR)
    with ZipFile(DATA_PATH , "r") as zip_ref:
        zip_ref.extractall(OUT_DIR / 'coco/images')
'/home/ea/work/openvino_notebooks/notebooks/230-yolov8-optimization/datasets/val2017.zip' already exists.
'/home/ea/work/openvino_notebooks/notebooks/230-yolov8-optimization/datasets/coco2017labels-segments.zip' already exists.
/home/ea/work/openvino_notebooks/notebooks/230-yolov8-optimization/datasets/coco.yaml: 0%| | 0.00/1…
Define validation function
from tqdm.notebook import tqdm
from ultralytics.yolo.utils.metrics import ConfusionMatrix


def test(model:ov.Model, core:ov.Core, data_loader:torch.utils.data.DataLoader, validator, num_samples:int = None):
    """
    OpenVINO YOLOv8 model accuracy validation function. Runs model validation on dataset and returns metrics
    Parameters:
        model (Model): OpenVINO model
        data_loader (torch.utils.data.DataLoader): dataset loader
        validator: instance of validator class
        num_samples (int, *optional*, None): validate model only on specified number samples, if provided
    Returns:
        stats: (Dict[str, float]) - dictionary with aggregated accuracy metrics statistics, key is metric name, value is metric value
    """
    validator.seen = 0
    validator.jdict = []
    validator.stats = []
    validator.batch_i = 1
    validator.confusion_matrix = ConfusionMatrix(nc=validator.nc)
    model.reshape({0: [1, 3, -1, -1]})
    num_outputs = len(model.outputs)
    compiled_model = core.compile_model(model)
    for batch_i, batch in enumerate(tqdm(data_loader, total=num_samples)):
        if num_samples is not None and batch_i == num_samples:
            break
        batch = validator.preprocess(batch)
        results = compiled_model(batch["img"])
        if num_outputs == 1:
            preds = torch.from_numpy(results[compiled_model.output(0)])
        else:
            preds = [torch.from_numpy(results[compiled_model.output(0)]), torch.from_numpy(results[compiled_model.output(1)])]
        preds = validator.postprocess(preds)
        validator.update_metrics(preds, batch)
    stats = validator.get_stats()
    return stats


def print_stats(stats:np.ndarray, total_images:int, total_objects:int):
    """
    Helper function for printing accuracy statistic
    Parameters:
        stats: (Dict[str, float]) - dictionary with aggregated accuracy metrics statistics, key is metric name, value is metric value
        total_images (int) -  number of evaluated images
        total objects (int)
    Returns:
        None
    """
    print("Boxes:")
    mp, mr, map50, mean_ap = stats['metrics/precision(B)'], stats['metrics/recall(B)'], stats['metrics/mAP50(B)'], stats['metrics/mAP50-95(B)']
    # Print results
    s = ('%20s' + '%12s' * 6) % ('Class', 'Images', 'Labels', 'Precision', 'Recall', 'mAP@.5', 'mAP@.5:.95')
    print(s)
    pf = '%20s' + '%12i' * 2 + '%12.3g' * 4  # print format
    print(pf % ('all', total_images, total_objects, mp, mr, map50, mean_ap))
    if 'metrics/precision(M)' in stats:
        s_mp, s_mr, s_map50, s_mean_ap = stats['metrics/precision(M)'], stats['metrics/recall(M)'], stats['metrics/mAP50(M)'], stats['metrics/mAP50-95(M)']
        # Print results
        s = ('%20s' + '%12s' * 6) % ('Class', 'Images', 'Labels', 'Precision', 'Recall', 'mAP@.5', 'mAP@.5:.95')
        print(s)
        pf = '%20s' + '%12i' * 2 + '%12.3g' * 4  # print format
        print(pf % ('all', total_images, total_objects, s_mp, s_mr, s_map50, s_mean_ap))
Configure Validator helper and create DataLoader
The original model repository uses a Validator wrapper, which
represents the accuracy validation pipeline. It creates dataloader and
evaluation metrics and updates metrics on each data batch produced by
the dataloader. Besides that, it is responsible for data preprocessing
and results postprocessing. For class initialization, the configuration
should be provided. We will use the default setup, but it can be
replaced with some parameters overriding to test on custom data. The
model has connected the ValidatorClass method, which creates a
validator class instance.
from ultralytics.yolo.utils import DEFAULT_CFG
from ultralytics.yolo.cfg import get_cfg
from ultralytics.yolo.data.utils import check_det_dataset

args = get_cfg(cfg=DEFAULT_CFG)
args.data = str(CFG_PATH)
seg_validator = seg_model.ValidatorClass(args=args)
seg_validator.data = check_det_dataset(args.data)
seg_data_loader = seg_validator.get_dataloader("datasets/coco/", 1)

seg_validator.is_coco = True
seg_validator.class_map = ops.coco80_to_coco91_class()
seg_validator.names = seg_model.model.names
seg_validator.metrics.names = seg_validator.names
seg_validator.nc = seg_model.model.model[-1].nc
seg_validator.nm = 32
seg_validator.process = ops.process_mask
seg_validator.plot_masks = []
val: Scanning datasets/coco/labels/val2017.cache... 4952 images, 48 backgrounds, 0 corrupt: 100%|██████████| 5000/5000 [00:00<?, ?it/s]
After definition test function and validator creation, we are ready for getting accuracy metrics.
NOTE: Model evaluation is time consuming process and can take several minutes, depending on the hardware. For reducing calculation time, we define
num_samplesparameter with evaluation subset size, but in this case, accuracy can be noncomparable with originally reported by the authors of the model, due to validation subset difference. To validate the models on the full dataset set ``NUM_TEST_SAMPLES = None``.
NUM_TEST_SAMPLES = 300
fp_seg_stats = test(seg_ov_model, core, seg_data_loader, seg_validator, num_samples=NUM_TEST_SAMPLES)
0%| | 0/300 [00:00<?, ?it/s]
print_stats(fp_seg_stats, seg_validator.seen, seg_validator.nt_per_class.sum())
Boxes:
               Class      Images      Labels   Precision      Recall      mAP@.5  mAP@.5:.95
                 all         300        2145       0.609       0.524       0.579       0.416
               Class      Images      Labels   Precision      Recall      mAP@.5  mAP@.5:.95
                 all         300        2145       0.602       0.501       0.557       0.354
print_stats reports the following list of accuracy metrics:
Precisionis the degree of exactness of the model in identifying only relevant objects.Recallmeasures the ability of the model to detect all ground truths objects.mAP@t- mean average precision, represented as area under the Precision-Recall curve aggregated over all classes in the dataset, wheretis the Intersection Over Union (IOU) threshold, degree of overlapping between ground truth and predicted objects. Therefore,mAP@.5indicates that mean average precision is calculated at 0.5 IOU threshold,mAP@.5:.95- is calculated on range IOU thresholds from 0.5 to 0.95 with step 0.05.
Optimize model using NNCF Post-training Quantization API
NNCF provides a suite of advanced algorithms for Neural Networks inference optimization in OpenVINO with minimal accuracy drop. We will use 8-bit quantization in post-training mode (without the fine-tuning pipeline) to optimize YOLOv8.
The optimization process contains the following steps:
Create a Dataset for quantization.
Run
nncf.quantizefor getting an optimized model.Serialize OpenVINO IR model, using the
openvino.runtime.serializefunction.
Reuse validation dataloader in accuracy testing for quantization. For
that, it should be wrapped into the nncf.Dataset object and define a
transformation function for getting only input tensors.
import nncf  # noqa: F811
from typing import Dict


def transform_fn(data_item:Dict):
    """
    Quantization transform function. Extracts and preprocess input data from dataloader item for quantization.
    Parameters:
       data_item: Dict with data item produced by DataLoader during iteration
    Returns:
        input_tensor: Input data for quantization
    """
    input_tensor = seg_validator.preprocess(data_item)['img'].numpy()
    return input_tensor


quantization_dataset = nncf.Dataset(seg_data_loader, transform_fn)
INFO:nncf:NNCF initialized successfully. Supported frameworks detected: torch, tensorflow, onnx, openvino
The nncf.quantize function provides an interface for model
quantization. It requires an instance of the OpenVINO Model and
quantization dataset. Optionally, some additional parameters for the
configuration quantization process (number of samples for quantization,
preset, ignored scope, etc.) can be provided. YOLOv8 model contains
non-ReLU activation functions, which require asymmetric quantization of
activations. To achieve a better result, we will use a mixed
quantization preset. It provides symmetric quantization of weights and
asymmetric quantization of activations. For more accurate results, we
should keep the operation in the postprocessing subgraph in floating
point precision, using the ignored_scope parameter.
NOTE: Model post-training quantization is time-consuming process. Be patient, it can take several minutes depending on your hardware.
ignored_scope = nncf.IgnoredScope(
    types=["Multiply", "Subtract", "Sigmoid"],  # ignore operations
    names=[
        "/model.22/dfl/conv/Conv",           # in the post-processing subgraph
        "/model.22/Add",
        "/model.22/Add_1",
        "/model.22/Add_2",
        "/model.22/Add_3",
        "/model.22/Add_4",
        "/model.22/Add_5",
        "/model.22/Add_6",
        "/model.22/Add_7",
        "/model.22/Add_8",
        "/model.22/Add_9",
        "/model.22/Add_10"
    ]
)


# Detection model
quantized_seg_model = nncf.quantize(
    seg_ov_model,
    quantization_dataset,
    preset=nncf.QuantizationPreset.MIXED,
    ignored_scope=ignored_scope
)
INFO:nncf:12 ignored nodes was found by name in the NNCFGraph
INFO:nncf:9 ignored nodes was found by types in the NNCFGraph
INFO:nncf:Not adding activation input quantizer for operation: 140 /model.22/Sigmoid
INFO:nncf:Not adding activation input quantizer for operation: 174 /model.22/dfl/conv/Conv
INFO:nncf:Not adding activation input quantizer for operation: 199 /model.22/Sub
INFO:nncf:Not adding activation input quantizer for operation: 200 /model.22/Add_10
INFO:nncf:Not adding activation input quantizer for operation: 217 /model.22/Sub_1
INFO:nncf:Not adding activation input quantizer for operation: 250 /model.22/Mul_5
Statistics collection: 100%|████████████████████████████████████████████████████████████████████████████████████████████████████████████████████████████████████████████████| 300/300 [00:38<00:00,  7.78it/s]
Applying Fast Bias correction: 100%|██████████████████████████████████████████████████████████████████████████████████████████████████████████████████████████████████████████| 75/75 [00:03<00:00, 19.05it/s]
from openvino.runtime import serialize

int8_model_seg_path = models_dir / f'{SEG_MODEL_NAME}_openvino_int8_model/{SEG_MODEL_NAME}.xml'
print(f"Quantized segmentation model will be saved to {int8_model_seg_path}")
serialize(quantized_seg_model, str(int8_model_seg_path))
Quantized segmentation model will be saved to models/yolov8n-seg_openvino_int8_model/yolov8n-seg.xml
Validate Quantized model inference
nncf.quantize returns the OpenVINO Model class instance, which is
suitable for loading on a device for making predictions. INT8 model
input data and output result formats have no difference from the
floating point model representation. Therefore, we can reuse the same
detect function defined above for getting the INT8 model result
on the image.
device
Dropdown(description='Device:', index=2, options=('CPU', 'GPU', 'AUTO'), value='AUTO')
if device.value != "CPU":
    quantized_seg_model.reshape({0: [1, 3, 640, 640]})
quantized_seg_compiled_model = core.compile_model(quantized_seg_model, device.value)
input_image = np.array(Image.open(IMAGE_PATH))
detections = detect(input_image, quantized_seg_compiled_model)[0]
image_with_masks = draw_results(detections, input_image, label_map)

Image.fromarray(image_with_masks)

Compare the Original and Quantized Models
Compare performance of the Original and Quantized Models
Finally, use the OpenVINO
Benchmark
Tool
to measure the inference performance of the FP32 and INT8
models.
NOTE: For more accurate performance, it is recommended to run
benchmark_appin a terminal/command prompt after closing other applications. Runbenchmark_app -m <model_path> -d CPU -shape "<input_shape>"to benchmark async inference on CPU on specific input data shape for one minute. ChangeCPUtoGPUto benchmark on GPU. Runbenchmark_app --helpto see an overview of all command-line options.
device
Dropdown(description='Device:', index=2, options=('CPU', 'GPU', 'AUTO'), value='AUTO')
!benchmark_app -m $seg_model_path -d $device.value -api async -shape "[1,3,640,640]" -t 15
[Step 1/11] Parsing and validating input arguments
[ INFO ] Parsing input parameters
[Step 2/11] Loading OpenVINO Runtime
[ INFO ] OpenVINO:
[ INFO ] Build ................................. 2023.2.0-12690-0ee0b4d9561
[ INFO ]
[ INFO ] Device info:
[ INFO ] AUTO
[ INFO ] Build ................................. 2023.2.0-12690-0ee0b4d9561
[ INFO ]
[ INFO ]
[Step 3/11] Setting device configuration
[ WARNING ] Performance hint was not explicitly specified in command line. Device(AUTO) performance hint will be set to PerformanceMode.THROUGHPUT.
[Step 4/11] Reading model files
[ INFO ] Loading model files
[ INFO ] Read model took 20.21 ms
[ INFO ] Original model I/O parameters:
[ INFO ] Model inputs:
[ INFO ]     images (node: images) : f32 / [...] / [?,3,?,?]
[ INFO ] Model outputs:
[ INFO ]     output0 (node: output0) : f32 / [...] / [?,116,?]
[ INFO ]     output1 (node: output1) : f32 / [...] / [?,32,8..,8..]
[Step 5/11] Resizing model to match image sizes and given batch
[ INFO ] Model batch size: 1
[ INFO ] Reshaping model: 'images': [1,3,640,640]
[ INFO ] Reshape model took 13.52 ms
[Step 6/11] Configuring input of the model
[ INFO ] Model inputs:
[ INFO ]     images (node: images) : u8 / [N,C,H,W] / [1,3,640,640]
[ INFO ] Model outputs:
[ INFO ]     output0 (node: output0) : f32 / [...] / [1,116,8400]
[ INFO ]     output1 (node: output1) : f32 / [...] / [1,32,160,160]
[Step 7/11] Loading the model to the device
[ INFO ] Compile model took 457.49 ms
[Step 8/11] Querying optimal runtime parameters
[ INFO ] Model:
[ INFO ]   NETWORK_NAME: torch_jit
[ INFO ]   EXECUTION_DEVICES: ['CPU']
[ INFO ]   PERFORMANCE_HINT: PerformanceMode.THROUGHPUT
[ INFO ]   OPTIMAL_NUMBER_OF_INFER_REQUESTS: 12
[ INFO ]   MULTI_DEVICE_PRIORITIES: CPU
[ INFO ]   CPU:
[ INFO ]     AFFINITY: Affinity.CORE
[ INFO ]     CPU_DENORMALS_OPTIMIZATION: False
[ INFO ]     CPU_SPARSE_WEIGHTS_DECOMPRESSION_RATE: 1.0
[ INFO ]     ENABLE_CPU_PINNING: True
[ INFO ]     ENABLE_HYPER_THREADING: True
[ INFO ]     EXECUTION_DEVICES: ['CPU']
[ INFO ]     EXECUTION_MODE_HINT: ExecutionMode.PERFORMANCE
[ INFO ]     INFERENCE_NUM_THREADS: 36
[ INFO ]     INFERENCE_PRECISION_HINT: <Type: 'float32'>
[ INFO ]     NETWORK_NAME: torch_jit
[ INFO ]     NUM_STREAMS: 12
[ INFO ]     OPTIMAL_NUMBER_OF_INFER_REQUESTS: 12
[ INFO ]     PERFORMANCE_HINT: PerformanceMode.THROUGHPUT
[ INFO ]     PERFORMANCE_HINT_NUM_REQUESTS: 0
[ INFO ]     PERF_COUNT: False
[ INFO ]     SCHEDULING_CORE_TYPE: SchedulingCoreType.ANY_CORE
[ INFO ]   MODEL_PRIORITY: Priority.MEDIUM
[ INFO ]   LOADED_FROM_CACHE: False
[Step 9/11] Creating infer requests and preparing input tensors
[ WARNING ] No input files were given for input 'images'!. This input will be filled with random values!
[ INFO ] Fill input 'images' with random values
[Step 10/11] Measuring performance (Start inference asynchronously, 12 inference requests, limits: 15000 ms duration)
[ INFO ] Benchmarking in inference only mode (inputs filling are not included in measurement loop).
[ INFO ] First inference took 42.16 ms
[Step 11/11] Dumping statistics report
[ INFO ] Execution Devices:['CPU']
[ INFO ] Count:            1860 iterations
[ INFO ] Duration:         15069.12 ms
[ INFO ] Latency:
[ INFO ]    Median:        92.86 ms
[ INFO ]    Average:       96.95 ms
[ INFO ]    Min:           53.68 ms
[ INFO ]    Max:           181.23 ms
[ INFO ] Throughput:   123.43 FPS
!benchmark_app -m $int8_model_seg_path -d $device.value -api async -shape "[1,3,640,640]" -t 15
[Step 1/11] Parsing and validating input arguments
[ INFO ] Parsing input parameters
[Step 2/11] Loading OpenVINO Runtime
[ INFO ] OpenVINO:
[ INFO ] Build ................................. 2023.2.0-12690-0ee0b4d9561
[ INFO ]
[ INFO ] Device info:
[ INFO ] AUTO
[ INFO ] Build ................................. 2023.2.0-12690-0ee0b4d9561
[ INFO ]
[ INFO ]
[Step 3/11] Setting device configuration
[ WARNING ] Performance hint was not explicitly specified in command line. Device(AUTO) performance hint will be set to PerformanceMode.THROUGHPUT.
[Step 4/11] Reading model files
[ INFO ] Loading model files
[ INFO ] Read model took 31.10 ms
[ INFO ] Original model I/O parameters:
[ INFO ] Model inputs:
[ INFO ]     images (node: images) : f32 / [...] / [1,3,?,?]
[ INFO ] Model outputs:
[ INFO ]     output0 (node: output0) : f32 / [...] / [1,116,21..]
[ INFO ]     output1 (node: output1) : f32 / [...] / [1,32,8..,8..]
[Step 5/11] Resizing model to match image sizes and given batch
[ INFO ] Model batch size: 1
[ INFO ] Reshaping model: 'images': [1,3,640,640]
[ INFO ] Reshape model took 17.80 ms
[Step 6/11] Configuring input of the model
[ INFO ] Model inputs:
[ INFO ]     images (node: images) : u8 / [N,C,H,W] / [1,3,640,640]
[ INFO ] Model outputs:
[ INFO ]     output0 (node: output0) : f32 / [...] / [1,116,8400]
[ INFO ]     output1 (node: output1) : f32 / [...] / [1,32,160,160]
[Step 7/11] Loading the model to the device
[ INFO ] Compile model took 679.71 ms
[Step 8/11] Querying optimal runtime parameters
[ INFO ] Model:
[ INFO ]   NETWORK_NAME: torch_jit
[ INFO ]   EXECUTION_DEVICES: ['CPU']
[ INFO ]   PERFORMANCE_HINT: PerformanceMode.THROUGHPUT
[ INFO ]   OPTIMAL_NUMBER_OF_INFER_REQUESTS: 12
[ INFO ]   MULTI_DEVICE_PRIORITIES: CPU
[ INFO ]   CPU:
[ INFO ]     AFFINITY: Affinity.CORE
[ INFO ]     CPU_DENORMALS_OPTIMIZATION: False
[ INFO ]     CPU_SPARSE_WEIGHTS_DECOMPRESSION_RATE: 1.0
[ INFO ]     ENABLE_CPU_PINNING: True
[ INFO ]     ENABLE_HYPER_THREADING: True
[ INFO ]     EXECUTION_DEVICES: ['CPU']
[ INFO ]     EXECUTION_MODE_HINT: ExecutionMode.PERFORMANCE
[ INFO ]     INFERENCE_NUM_THREADS: 36
[ INFO ]     INFERENCE_PRECISION_HINT: <Type: 'float32'>
[ INFO ]     NETWORK_NAME: torch_jit
[ INFO ]     NUM_STREAMS: 12
[ INFO ]     OPTIMAL_NUMBER_OF_INFER_REQUESTS: 12
[ INFO ]     PERFORMANCE_HINT: PerformanceMode.THROUGHPUT
[ INFO ]     PERFORMANCE_HINT_NUM_REQUESTS: 0
[ INFO ]     PERF_COUNT: False
[ INFO ]     SCHEDULING_CORE_TYPE: SchedulingCoreType.ANY_CORE
[ INFO ]   MODEL_PRIORITY: Priority.MEDIUM
[ INFO ]   LOADED_FROM_CACHE: False
[Step 9/11] Creating infer requests and preparing input tensors
[ WARNING ] No input files were given for input 'images'!. This input will be filled with random values!
[ INFO ] Fill input 'images' with random values
[Step 10/11] Measuring performance (Start inference asynchronously, 12 inference requests, limits: 15000 ms duration)
[ INFO ] Benchmarking in inference only mode (inputs filling are not included in measurement loop).
[ INFO ] First inference took 24.87 ms
[Step 11/11] Dumping statistics report
[ INFO ] Execution Devices:['CPU']
[ INFO ] Count:            4416 iterations
[ INFO ] Duration:         15063.93 ms
[ INFO ] Latency:
[ INFO ]    Median:        38.93 ms
[ INFO ]    Average:       40.76 ms
[ INFO ]    Min:           24.40 ms
[ INFO ]    Max:           83.87 ms
[ INFO ] Throughput:   293.15 FPS
Validate quantized model accuracy
As we can see, there is no significant difference between INT8 and
float model result in a single image test. To understand how
quantization influences model prediction precision, we can compare model
accuracy on a dataset.
int8_seg_stats = test(quantized_seg_model, core, seg_data_loader, seg_validator, num_samples=NUM_TEST_SAMPLES)
0%| | 0/300 [00:00<?, ?it/s]
print("FP32 model accuracy")
print_stats(fp_seg_stats, seg_validator.seen, seg_validator.nt_per_class.sum())

print("INT8 model accuracy")
print_stats(int8_seg_stats, seg_validator.seen, seg_validator.nt_per_class.sum())
FP32 model accuracy
Boxes:
               Class      Images      Labels   Precision      Recall      mAP@.5  mAP@.5:.95
                 all         300        2145       0.609       0.524       0.579       0.416
               Class      Images      Labels   Precision      Recall      mAP@.5  mAP@.5:.95
                 all         300        2145       0.602       0.501       0.557       0.354
INT8 model accuracy
Boxes:
               Class      Images      Labels   Precision      Recall      mAP@.5  mAP@.5:.95
                 all         300        2145       0.604       0.505        0.57       0.407
               Class      Images      Labels   Precision      Recall      mAP@.5  mAP@.5:.95
                 all         300        2145       0.653       0.465       0.554       0.349
Great! Looks like accuracy was changed, but not significantly and it meets passing criteria.
Other ways to optimize model
The performance could be also improved by another OpenVINO method such as async inference pipeline or preprocessing API.
Async Inference pipeline help to utilize the device more optimal. The key advantage of the Async API is that when a device is busy with inference, the application can perform other tasks in parallel (for example, populating inputs or scheduling other requests) rather than wait for the current inference to complete first. To understand how to perform async inference using openvino, refer to Async API tutorial
Preprocessing API enables making preprocessing a part of the model reducing application code and dependency on additional image processing libraries. The main advantage of Preprocessing API is that preprocessing steps will be integrated into the execution graph and will be performed on a selected device (CPU/GPU etc.) rather than always being executed on CPU as part of an application. This will also improve selected device utilization. For more information, refer to the overview of Preprocessing API tutorial. To see, how it could be used with YOLOV8 object detection model , please, see Convert and Optimize YOLOv8 real-time object detection with OpenVINO tutorial
Live demo
The following code runs model inference on a video:
import collections
import time
from IPython import display


def run_instance_segmentation(source=0, flip=False, use_popup=False, skip_first_frames=0, model=seg_model, device=device.value):
    player = None
    if device != "CPU":
        model.reshape({0: [1, 3, 640, 640]})
    compiled_model = core.compile_model(model, device)
    try:
        # Create a video player to play with target fps.
        player = VideoPlayer(
            source=source, flip=flip, fps=30, skip_first_frames=skip_first_frames
        )
        # Start capturing.
        player.start()
        if use_popup:
            title = "Press ESC to Exit"
            cv2.namedWindow(
                winname=title, flags=cv2.WINDOW_GUI_NORMAL | cv2.WINDOW_AUTOSIZE
            )

        processing_times = collections.deque()
        while True:
            # Grab the frame.
            frame = player.next()
            if frame is None:
                print("Source ended")
                break
            # If the frame is larger than full HD, reduce size to improve the performance.
            scale = 1280 / max(frame.shape)
            if scale < 1:
                frame = cv2.resize(
                    src=frame,
                    dsize=None,
                    fx=scale,
                    fy=scale,
                    interpolation=cv2.INTER_AREA,
                )
            # Get the results.
            input_image = np.array(frame)

            start_time = time.time()
            # model expects RGB image, while video capturing in BGR
            detections = detect(input_image[:, :, ::-1], compiled_model)[0]
            stop_time = time.time()

            image_with_boxes = draw_results(detections, input_image, label_map)
            frame = image_with_boxes

            processing_times.append(stop_time - start_time)
            # Use processing times from last 200 frames.
            if len(processing_times) > 200:
                processing_times.popleft()

            _, f_width = frame.shape[:2]
            # Mean processing time [ms].
            processing_time = np.mean(processing_times) * 1000
            fps = 1000 / processing_time
            cv2.putText(
                img=frame,
                text=f"Inference time: {processing_time:.1f}ms ({fps:.1f} FPS)",
                org=(20, 40),
                fontFace=cv2.FONT_HERSHEY_COMPLEX,
                fontScale=f_width / 1000,
                color=(0, 0, 255),
                thickness=1,
                lineType=cv2.LINE_AA,
            )
            # Use this workaround if there is flickering.
            if use_popup:
                cv2.imshow(winname=title, mat=frame)
                key = cv2.waitKey(1)
                # escape = 27
                if key == 27:
                    break
            else:
                # Encode numpy array to jpg.
                _, encoded_img = cv2.imencode(
                    ext=".jpg", img=frame, params=[cv2.IMWRITE_JPEG_QUALITY, 100]
                )
                # Create an IPython image.
                i = display.Image(data=encoded_img)
                # Display the image in this notebook.
                display.clear_output(wait=True)
                display.display(i)
    # ctrl-c
    except KeyboardInterrupt:
        print("Interrupted")
    # any different error
    except RuntimeError as e:
        print(e)
    finally:
        if player is not None:
            # Stop capturing.
            player.stop()
        if use_popup:
            cv2.destroyAllWindows()
Run Live Object Detection and Segmentation
Use a webcam as the video input. By default, the primary webcam is set
with source=0. If you have multiple webcams, each one will be
assigned a consecutive number starting at 0. Set flip=True when
using a front-facing camera. Some web browsers, especially Mozilla
Firefox, may cause flickering. If you experience flickering,
set use_popup=True.
NOTE: To use this notebook with a webcam, you need to run the notebook on a computer with a webcam. If you run the notebook on a remote server (for example, in Binder or Google Colab service), the webcam will not work. By default, the lower cell will run model inference on a video file. If you want to try live inference on your webcam set
WEBCAM_INFERENCE = True
WEBCAM_INFERENCE = False

if WEBCAM_INFERENCE:
    VIDEO_SOURCE = 0  # Webcam
else:
    VIDEO_SOURCE = 'https://storage.openvinotoolkit.org/repositories/openvino_notebooks/data/data/video/people.mp4'
device
Dropdown(description='Device:', index=2, options=('CPU', 'GPU', 'AUTO'), value='AUTO')
run_instance_segmentation(source=VIDEO_SOURCE, flip=True, use_popup=False, model=seg_ov_model, device=device.value)
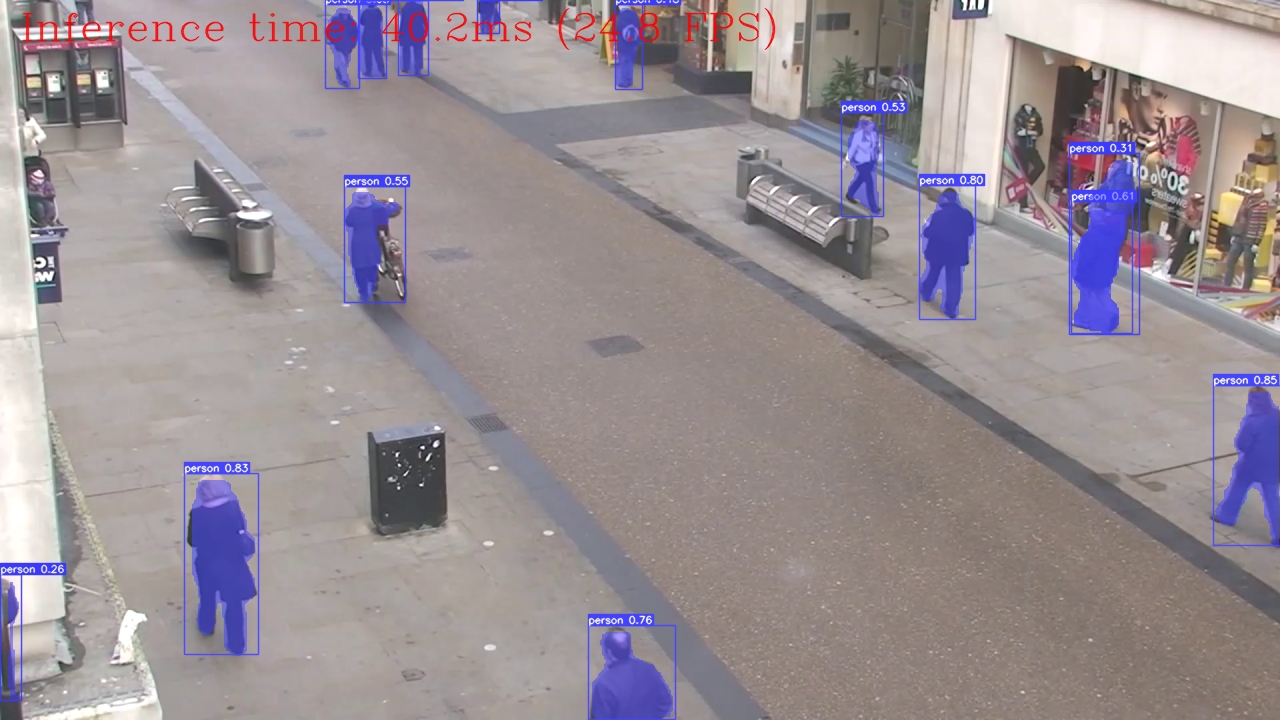
Source ended