OpenVINO™ Explainable AI Toolkit (2/3): Deep Dive#
This Jupyter notebook can be launched on-line, opening an interactive environment in a browser window. You can also make a local installation. Choose one of the following options:
Warning
Important note: This notebook requires python >= 3.10. Please make sure that your environment fulfill to this requirement before running it
This is the second notebook in series of exploring OpenVINO™ Explainable AI (XAI):
OpenVINO™ Explainable AI (XAI) provides a suite of XAI algorithms for visual explanation of OpenVINO™ Intermediate Representation (IR) models.
Using OpenVINO XAI, you can generate saliency maps that highlight regions of interest in input images from the model’s perspective. This helps users understand why complex AI models produce specific responses.
This notebook shows an example of how to use OpenVINO XAI, exploring its methods and functionality.
It displays a heatmap indicating areas of interest where a neural network (for classification or detection) focuses before making a decision.
Let’s imagine the case that our OpenVINO IR model is up and running on a inference pipeline. While watching the outputs, we may want to analyze the model’s behavior for debugging or understanding purposes.
By using the OpenVINO XAI Explainer, we can visualize why the model
gives such responses, meaning on which areas it focused before
predicting a particular label.
Table of contents:
Installation Instructions#
This is a self-contained example that relies solely on its own code.
We recommend running the notebook in a virtual environment. You only need a Jupyter server to start. For details, please refer to Installation Guide.
Prerequisites#
Install requirements#
%%capture

import platform

# Install openvino package
%pip install -q "openvino>=2024.2.0" opencv-python tqdm scipy

%pip install -q --no-deps "openvino-xai>=1.1.0"
%pip install -q -U "numpy==1.*"
%pip install -q scipy

%pip install -q "matplotlib>=3.4"
Imports#
from pathlib import Path

import cv2
import matplotlib.pyplot as plt
import numpy as np

import openvino.runtime as ov
from openvino.runtime.utils.data_helpers.wrappers import OVDict
import openvino_xai as xai
from openvino_xai.explainer import ExplainMode
from openvino_xai.explainer.explanation import Explanation

# Fetch `notebook_utils` module
import requests

if not Path("notebook_utils.py").exists():
    r = requests.get(
        url="https://raw.githubusercontent.com/openvinotoolkit/openvino_notebooks/latest/utils/notebook_utils.py",
    )

    open("notebook_utils.py", "w").write(r.text)

from notebook_utils import download_file

# Read more about telemetry collection at https://github.com/openvinotoolkit/openvino_notebooks?tab=readme-ov-file#-telemetry
from notebook_utils import collect_telemetry

collect_telemetry("explainable-ai-2-deep-dive.ipynb")
Download IR model#
In this notebook for demonstration purposes we’ll use an already converted to IR model from OpenVINO storage.
base_artifacts_dir = Path("./artifacts").expanduser()

model_name = "v3-small_224_1.0_float"
model_xml_name = f"{model_name}.xml"
model_bin_name = f"{model_name}.bin"

model_xml_path = base_artifacts_dir / model_xml_name

base_url = "https://storage.openvinotoolkit.org/repositories/openvino_notebooks/models/mobelinet-v3-tf/FP32/"

if not model_xml_path.exists():
    download_file(base_url + model_xml_name, model_xml_name, base_artifacts_dir)
    download_file(base_url + model_bin_name, model_bin_name, base_artifacts_dir)
else:
    print(f"{model_name} already downloaded to {base_artifacts_dir}")
# Create ov.Model
model = ov.Core().read_model(model_xml_path)
Load the Image#
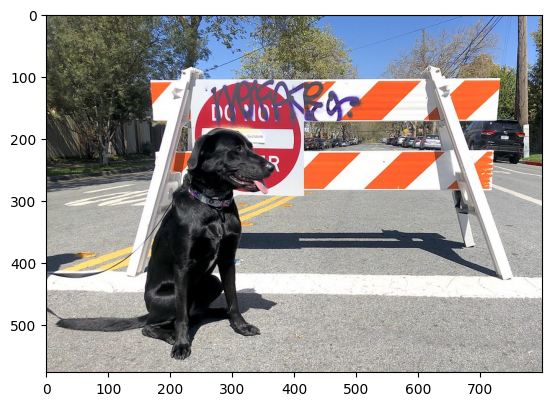
# Download the image from the openvino_notebooks storage
if not Path("data/coc.jpg").exists():
    image_filename = download_file(
        "https://storage.openvinotoolkit.org/repositories/openvino_notebooks/data/data/image/coco.jpg",
        directory="data",
    )

# The MobileNet model expects images in RGB format.
image = cv2.cvtColor(cv2.imread(filename=str(image_filename)), code=cv2.COLOR_BGR2RGB)
plt.imshow(image)
'data/coco.jpg' already exists.
<matplotlib.image.AxesImage at 0x7f0180958940>
Preprocess image for MobileNet#
# Resize to MobileNetV3 input image shape.
preprocessed_image = cv2.resize(src=image, dsize=(224, 224))
# Add batch dimension
preprocessed_image = np.expand_dims(preprocessed_image, 0)
Basic usage: Explainer in AUTO mode#
The easiest way to generate saliency maps is to use Explainer in
ExplainMode.AUTO mode (AUTO mode is used by default).
Under the hood of AUTO mode, Explainer will first try to run the
WHITEBOX mode. If WHITEBOX fails, it will then run the
BLACKBOX mode as a fallback option. See more details about
WHITEBOX and
BLACKBOX modes below.
Generating saliency maps involves model inference. The explainer will
perform model inference, but to do so, it requires preprocess_fn and
postprocess_fn. We can avoid passing preprocess_fn by
preprocessing (e.g., resizing and adding a batch dimension as shown
above) the input data beforehand - by default, preprocess_fn is the
identity function. We expect that current example will successfully use
WHITEBOX mode under the hood, therefore we don’t pass
postprocess_fn (postprocess_fn is not required for WHITEBOX
mode, only for BLACKBOX).
To learn more about pre- and post-process functions, refer to the pre- and post-process functions section.
Create Explainer object#
explainer = xai.Explainer(
    model=model,
    task=xai.Task.CLASSIFICATION,
)
INFO:openvino_xai:Assigning preprocess_fn to identity function assumes that input images were already preprocessed by user before passing it to the model. Please define preprocessing function OR preprocess images beforehand.
INFO:openvino_xai:Target insertion layer is not provided - trying to find it in auto mode.
INFO:openvino_xai:Using ReciproCAM method (for CNNs).
INFO:openvino_xai:Explaining the model in white-box mode.
Generate explanation#
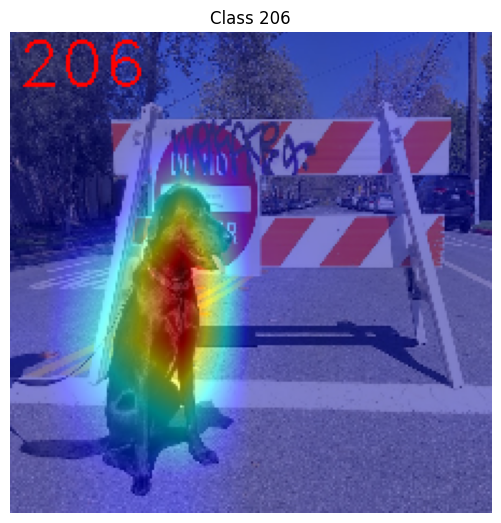
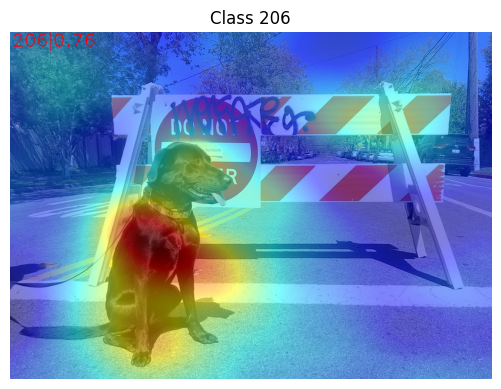
The predicted class for this model-image pair is
flat-coated_retriever with class index 206. So here and further
we will check saliency maps for this index.
# You can choose class(es) to generate saliency maps for.
# In this notebook we will check maps for predicted class with index 206 - "flat-coated retriever"
retriever_class_index = 206
explanation = explainer(
    preprocessed_image,
    targets=retriever_class_index,  # can be a single target or a container of targets
    overlay=True,  # saliency map overlay over the original image, False by default, set to True for better visual inspection
)
Visualize saliency maps#
explanation: Explanation
# explanation.saliency_map: Dict[int: np.ndarray]  # where key - class id, value - processed saliency map (e.g. 354 x 500 x 3 shape)

# Check saved saliency maps
print(f"Saliency maps were generated for the following classes: {explanation.targets}")
print(f"Saliency map size: {explanation.shape}")

# Visualize generated saliency maps for each target class (.plot() supports plotting multiple saliency maps)
explanation.plot()
Saliency maps were generated for the following classes: [206]
Saliency map size: (224, 224, 3)
Save saliency maps#
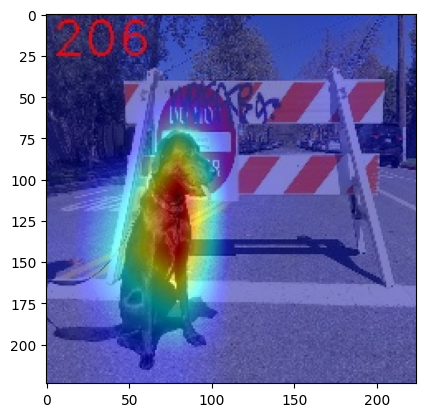
# Save saliency map
explanation.save(base_artifacts_dir, "explain_auto_")
# Plot saved saliency map
image_sal_map = cv2.imread(f"{base_artifacts_dir}/explain_auto_{retriever_class_index}.jpg")
image_sal_map = cv2.cvtColor(image_sal_map, cv2.COLOR_BGR2RGB)
plt.imshow(image_sal_map)
<matplotlib.image.AxesImage at 0x7f011efc9090>
Generate saliency maps for all classes#
To obtain saliency maps for all classes, set targets to None or
-1.
explanation = explainer(preprocessed_image, targets=-1)

# Check saved saliency maps
print(f"Saliency maps were generated for the following classes: {explanation.targets[:5]} ... {explanation.targets[-5:]}")
print(f"Saliency map size: {explanation.shape}")
Saliency maps were generated for the following classes: [0, 1, 2, 3, 4] ... [996, 997, 998, 999, 1000]
Saliency map size: (224, 224, 3)
Pre- and post-process functions#
The explainer can apply pre-processing internally during model inference, allowing you to provide a raw image as input to the explainer.
To enable this, define preprocess_fn and provide it to the explainer
constructor. By default, preprocess_fn is an identity function that
passes the input without any changes, assuming it is preprocessed
beforehand.
In AUTO mode, the explainer tries to run the WHITEBOX mode
first. If it fails, the corresponding exception will be raised, and the
BLACKBOX mode will be enabled as a fallback.
The BLACKBOX mode requires access to the output logits
(activated or not). Therefore, in such cases, postprocess_fn is
required, which accepts the raw IR model output and returns logits
(see below for a reference).
def preprocess_fn(x: np.ndarray) -> np.ndarray:
    # Implementing pre-processing based on model's pipeline
    x = cv2.resize(src=x, dsize=(224, 224))

    # Add batch dimension
    x = np.expand_dims(x, 0)
    return x


def postprocess_fn(x: OVDict):
    # Implementing post-processing function based on model's pipeline
    # Return "logits" model output
    return x[0]
# Create explainer object
explainer = xai.Explainer(
    model=model,
    task=xai.Task.CLASSIFICATION,
    preprocess_fn=preprocess_fn,
    postprocess_fn=postprocess_fn,
)

explanation = explainer(image, targets=retriever_class_index)
INFO:openvino_xai:Target insertion layer is not provided - trying to find it in auto mode.
INFO:openvino_xai:Using ReciproCAM method (for CNNs).
INFO:openvino_xai:Explaining the model in white-box mode.
Visualization Parameters#
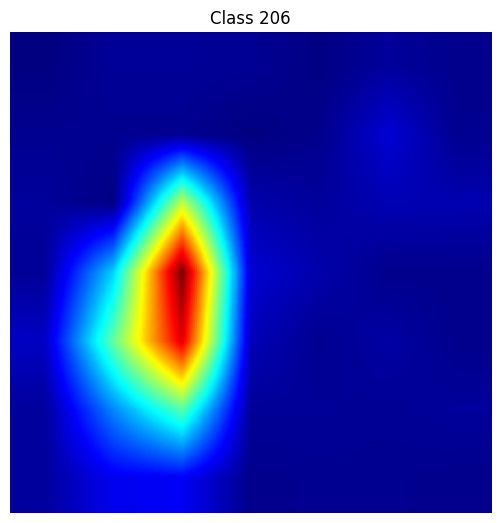
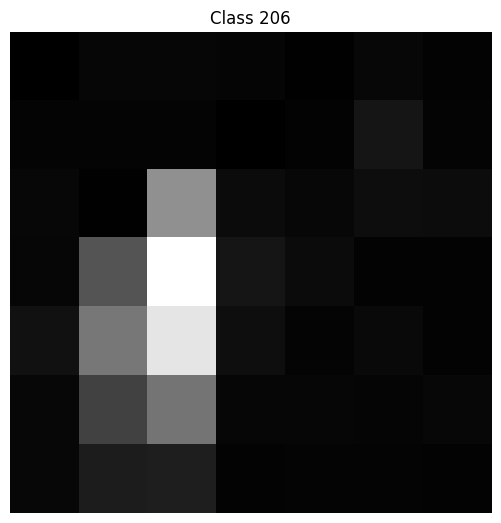
resize (True by default): If True, resize saliency map to the input image size.
colormap (True by default): If True, apply colormap to the grayscale saliency map.
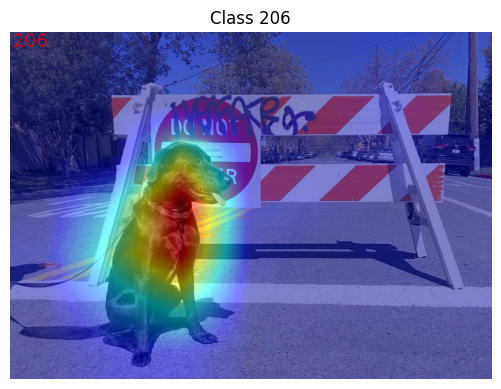
overlay (False by default): If True, generate overlay of the saliency map over the input image.
original_input_image (None by default): Provide the original, unprocessed image to apply the overlay. This ensures the overlay is not applied to a preprocessed image, which may be resized or normalized and lose readability.
overlay_weight (0.5 by default): Weight of the saliency map when overlaying the input data with the saliency map.
# Create explainer object
explainer = xai.Explainer(model=model, task=xai.Task.CLASSIFICATION)

# Generate overlayed saliency_map
explanation = explainer(
    preprocessed_image,
    targets=[retriever_class_index],  # target can be a single label index, label name or a list of indices/names
    overlay=True,  # False by default
    original_input_image=image,  # to apply overlay on the original image instead of preprocessed one that was used for the explainer
)

explanation.plot()

# Save saliency map
explanation.save(base_artifacts_dir, "overlay_")
INFO:openvino_xai:Assigning preprocess_fn to identity function assumes that input images were already preprocessed by user before passing it to the model. Please define preprocessing function OR preprocess images beforehand.
INFO:openvino_xai:Target insertion layer is not provided - trying to find it in auto mode.
INFO:openvino_xai:Using ReciproCAM method (for CNNs).
INFO:openvino_xai:Explaining the model in white-box mode.
# Generate saliency map without overlay over original image
explanation = explainer(
    preprocessed_image,
    targets=[retriever_class_index],  # target can be a single label index, label name or a list of indices/names
    overlay=False,  # False by default
)

explanation.plot()

# Save saliency map
explanation.save(base_artifacts_dir, "colormap_")
# Return low-resolution (raw) gray-scale saliency map
explanation = explainer(
    preprocessed_image,
    targets=[retriever_class_index],  # target can be a single label index, label name or a list of indices/names
    resize=False,  # True by default
    colormap=False,  # True by default
)

explanation.plot()

# Save saliency map
explanation.save(base_artifacts_dir, "grayscale_")
Explainer in WHITEBOX mode#
ReciproCAM XAI method#
Explainer in WHITEBOX mode treats the model as a white box and
performs its inner modifications. Explainer inserts extra XAI nodes
after the backbone to estimate which activations are important for model
prediction.
If a method is not specified, the XAI branch will be generated using the ReciproCAM method.
By default, the insertion of the XAI branch will be done automatically
by searching for the correct node - target_layer (target_layer
can be specified manually).
It works quickly and precisely, requiring only one model inference.
# Create explainer object
explainer = xai.Explainer(
    model=model,
    task=xai.Task.CLASSIFICATION,
    preprocess_fn=preprocess_fn,
    explain_mode=ExplainMode.WHITEBOX,  # defaults to ExplainMode.AUTO
    explain_method=xai.Method.RECIPROCAM,  # ReciproCAM is the default white-box method for CNNs
)
INFO:openvino_xai:Target insertion layer is not provided - trying to find it in auto mode.
INFO:openvino_xai:Using ReciproCAM method (for CNNs).
INFO:openvino_xai:Explaining the model in white-box mode.
Insert XAI branch#
It’s possible to update the model with an XAI branch using the
insert_xai functional API.
insert_xai will return an OpenVINO model with the XAI branch
inserted and an additional saliency_map output.
This helps to avoid OpenVINO XAI dependency in the inference environment.
Note: XAI branch introduce an additional computational overhead (usually less than a single model forward pass).
# insert XAI branch
model_xai: ov.Model
model_xai = xai.insert_xai(
    model,
    task=xai.Task.CLASSIFICATION,
    explain_method=xai.Method.RECIPROCAM,
    target_layer="MobilenetV3/Conv_1/Conv2D",  # optional, by default insert_xai will try to find target_layer automatically
    embed_scaling=True,
)
INFO:openvino_xai:Target insertion layer MobilenetV3/Conv_1/Conv2D is provided.
INFO:openvino_xai:Using ReciproCAM method (for CNNs).
INFO:openvino_xai:Insertion of the XAI branch into the model was successful.
Note: insert_xai supports both OpenVINO IR and PyTorch models.
See documentation for more details.
AISE (Adaptive Input Sampling for Explanation of Black-box Models)#
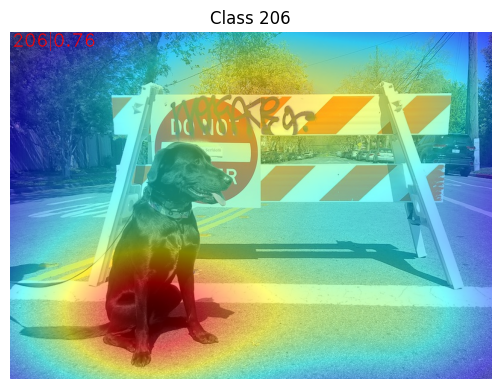
AISE is used as a default black-box method. AISE formulates saliency map generation as a kernel density estimation (KDE) problem, and adaptively sample input masks using a derivative-free optimizer to maximize mask saliency score.
# Create explainer object
explainer = xai.Explainer(
    model=model,
    task=xai.Task.CLASSIFICATION,
    preprocess_fn=preprocess_fn,
    postprocess_fn=postprocess_fn,
    explain_mode=ExplainMode.BLACKBOX,  # defaults to AUTO
)

# Generate explanation
explanation = explainer(
    image,
    targets=retriever_class_index,
    overlay=True,
)
INFO:openvino_xai:Explaining the model in black-box mode.
# Plot saliency map
explanation.plot()

# Save saliency map
explanation.save(base_artifacts_dir, "blackbox_aise_")
RISE (Randomized Input Sampling for Explanation of Black-box Models)#
RISE probes a model by sub-sampling the input image via random masks and records its response to each of them. RISE creates random masks from down-scaled space (e.g. 7×7 grid) and adds random translation shifts for the pixel-level explanation with further up-sampling. Weighted sum of all sampled masks used to generate the fine-grained saliency map.
# Create explainer object
explainer = xai.Explainer(
    model=model,
    task=xai.Task.CLASSIFICATION,
    preprocess_fn=preprocess_fn,
    postprocess_fn=postprocess_fn,
    explain_mode=ExplainMode.BLACKBOX,  # defaults to AUTO
    explain_method=xai.Method.RISE,  # xai.Method.AISE is used by default
)

# Generate explanation
explanation = explainer(
    image,
    targets=retriever_class_index,
    overlay=True,
)
# Plot saliency map
explanation.plot()

# Save saliency map
explanation.save(base_artifacts_dir, "blackbox_rise_")
Advanced#
Import ImageNet label names and add them to saliency maps#
If label_names are not provided to the explainer call, the saved
saliency map will have the predicted class index, not the label name.
For example, 206.jpg instead of retriever.jpg.
To conveniently view label names in saliency maps, we provide ImageNet label names information to the explanation call.
if not Path("data/imagenet_2012.txt").exists():

    imagenet_filename = download_file(
        "https://storage.openvinotoolkit.org/repositories/openvino_notebooks/data/data/datasets/imagenet/imagenet_2012.txt",
        directory="data",
    )

imagenet_classes = imagenet_filename.read_text().splitlines()
'data/imagenet_2012.txt' already exists.
imagenet_labels = []
for label in imagenet_classes:
    class_label = " ".join(label.split(" ")[1:])
    first_class_label = class_label.split(",")[0].replace(" ", "_")
    imagenet_labels.append(first_class_label)

print(" ".join(imagenet_labels[:10]))
tench goldfish great_white_shark tiger_shark hammerhead electric_ray stingray cock hen ostrich
# The model description states that for this model, class 0 is a background.
# Therefore, a background must be added at the beginning of imagenet_classes.
imagenet_labels = ["background"] + imagenet_labels
# Create explainer object
explainer = xai.Explainer(
    model=model,
    task=xai.Task.CLASSIFICATION,
    preprocess_fn=preprocess_fn,
    explain_mode=ExplainMode.WHITEBOX,
)

# Adding ImageNet label names.
explanation = explainer(
    image,
    # Return saliency maps for 2 named labels, possible if label_names is provided
    targets=["flat-coated_retriever", "microwave"],  # slso label indices [206, 652] are possible as target
    label_names=imagenet_labels,
)
INFO:openvino_xai:Target insertion layer is not provided - trying to find it in auto mode.
INFO:openvino_xai:Using ReciproCAM method (for CNNs).
INFO:openvino_xai:Explaining the model in white-box mode.
# Save saliency map
explanation.save(base_artifacts_dir, "label_names_")
Below in base_artifacts_dir / "label_names" you can see saved
saliency maps with label name on it:
# See saliency mas saved in `output` with predicted label in image name
for file_name in base_artifacts_dir.glob("label_names_*"):
    print(file_name)
artifacts/label_names_microwave.jpg
artifacts/label_names_flat-coated_retriever.jpg
Activation map XAI method#
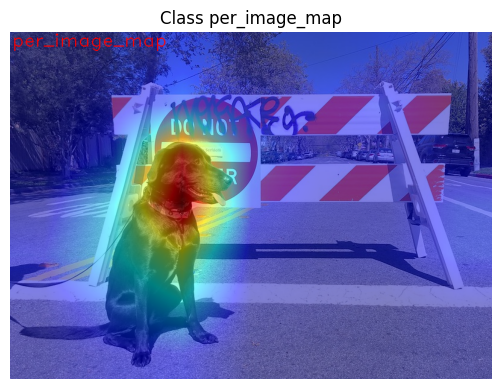
The Activation Map method shows a general attention map without respect to specific classes. It can be useful for understanding which areas the model identifies as important.
If the explanation method is set to Method.ACTIVATIONMAP, instead of
saliency maps for each class, the activation map is returned as
explanation.saliency_map["per_image_map"].
# Create explainer object
explainer = xai.Explainer(
    model=model,
    task=xai.Task.CLASSIFICATION,
    preprocess_fn=preprocess_fn,
    explain_mode=ExplainMode.WHITEBOX,
    explain_method=xai.Method.ACTIVATIONMAP,
)

explanation = explainer(image, overlay=True)
explanation.plot()
INFO:openvino_xai:Target insertion layer is not provided - trying to find it in auto mode.
INFO:openvino_xai:Using ActivationMap method (for CNNs).
INFO:openvino_xai:Explaining the model in white-box mode.
