Live Object Detection with OpenVINO™#
This Jupyter notebook can be launched on-line, opening an interactive environment in a browser window. You can also make a local installation. Choose one of the following options:
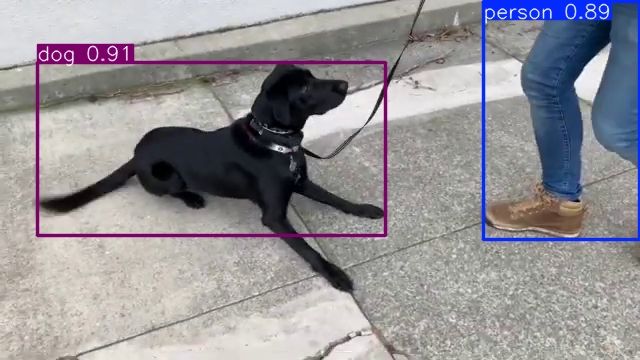
This notebook demonstrates live object detection with OpenVINO, using the Ultralytics YOLOv8. Final part of this notebook shows live inference results from a webcam. Additionally, you can also upload a video file.
NOTE: To use this notebook with a webcam, you need to run the notebook on a computer with a webcam. If you run the notebook on a server, the webcam will not work. However, you can still do inference on a video.
Table of contents:
Installation Instructions#
This is a self-contained example that relies solely on its own code.
We recommend running the notebook in a virtual environment. You only need a Jupyter server to start. For details, please refer to Installation Guide.
Preparation#
Install requirements#
%pip install -q "openvino>=2024.4.0"
%pip install -q "ultralytics==8.3.59" --extra-index-url https://download.pytorch.org/whl/cpu
%pip install -q opencv-python requests tqdm

# Fetch `notebook_utils` module
import requests
from pathlib import Path

if not Path("notebook_utils.py").exists():
    r = requests.get(
        url="https://raw.githubusercontent.com/openvinotoolkit/openvino_notebooks/latest/utils/notebook_utils.py",
    )

    open("notebook_utils.py", "w").write(r.text)

# Read more about telemetry collection at https://github.com/openvinotoolkit/openvino_notebooks?tab=readme-ov-file#-telemetry
from notebook_utils import collect_telemetry

collect_telemetry("object-detection.ipynb")
Imports#
from pathlib import Path
import gc
import openvino as ov
from ultralytics import YOLO

import notebook_utils as utils
The Model#
Download and convert the Model#
# A directory where the model will be downloaded.

# The name of the model
model_name = "yolov8n"

det_model_path = Path(f"{model_name}_openvino_model/{model_name}.xml")

# export model to OpenVINO format using Ultralytics API
if not det_model_path.exists():
    pt_model = YOLO(f"{model_name}.pt")
    pt_model.export(format="openvino", dynamic=True, half=True)
    del pt_model
    gc.collect()
Load the Model#
Only a few lines of code are required to run the model. First,
initialize OpenVINO Runtime. Then, read the network architecture and
model weights from the .bin and .xml files to compile for the
desired device. If you choose GPU you need to wait for a while, as
the startup time is much longer than in the case of CPU.
There is a possibility to let OpenVINO decide which hardware offers the
best performance. For that purpose, just use AUTO.
core = ov.Core()

device = utils.device_widget()
device
Dropdown(description='Device:', index=1, options=('CPU', 'AUTO'), value='AUTO')
core = ov.Core()


def load_model(det_model_path, device):
    compiled_model = compile_model(det_model_path, device)
    det_model = YOLO(det_model_path.parent, task="detect")

    if det_model.predictor is None:
        custom = {"conf": 0.25, "batch": 1, "save": False, "mode": "predict"}  # method defaults
        args = {**det_model.overrides, **custom}
        det_model.predictor = det_model._smart_load("predictor")(overrides=args, _callbacks=det_model.callbacks)
        det_model.predictor.setup_model(model=det_model.model)

    det_model.predictor.model.ov_compiled_model = compiled_model
    return det_model


def compile_model(det_model_path, device):
    det_ov_model = core.read_model(det_model_path)

    ov_config = {}
    if device != "CPU":
        det_ov_model.reshape({0: [1, 3, 640, 640]})
    if "GPU" in device or ("AUTO" in device and "GPU" in core.available_devices):
        ov_config = {"GPU_DISABLE_WINOGRAD_CONVOLUTION": "YES"}
    det_compiled_model = core.compile_model(det_ov_model, device, ov_config)
    return det_compiled_model


det_model = load_model(det_model_path, device.value)
Ultralytics 8.3.0 🚀 Python-3.11.4 torch-2.5.1+cpu CPU (Intel Core(TM) i9-10980XE 3.00GHz)
Loading yolov8n_openvino_model for OpenVINO inference...
Using OpenVINO LATENCY mode for batch=1 inference...
Main Processing Function#
Run object detection on the specified source. Either a webcam or a video file.
from IPython import display
import cv2
import numpy as np


# Main processing function to run object detection.
def run_object_detection(
    source=0,
    flip=False,
    use_popup=False,
    skip_first_frames=0,
):
    player = None
    try:
        # Create a video player to play with target fps.
        player = utils.VideoPlayer(source=source, flip=flip, fps=30, skip_first_frames=skip_first_frames)
        # Start capturing.
        player.start()
        if use_popup:
            title = "Press ESC to Exit"
            cv2.namedWindow(winname=title, flags=cv2.WINDOW_GUI_NORMAL | cv2.WINDOW_AUTOSIZE)

        while True:
            # Grab the frame.
            frame = player.next()
            if frame is None:
                print("Source ended")
                break
            # If the frame is larger than full HD, reduce size to improve the performance.
            scale = 1280 / max(frame.shape)
            if scale < 1:
                frame = cv2.resize(
                    src=frame,
                    dsize=None,
                    fx=scale,
                    fy=scale,
                    interpolation=cv2.INTER_AREA,
                )
            # Get the results.
            input_image = np.array(frame)
            detections = det_model(input_image, verbose=False)
            frame = detections[0].plot()

            # Use this workaround if there is flickering.
            if use_popup:
                cv2.imshow(winname=title, mat=frame)
                key = cv2.waitKey(1)
                # escape = 27
                if key == 27:
                    break
            else:
                # Encode numpy array to jpg.
                _, encoded_img = cv2.imencode(ext=".jpg", img=frame, params=[cv2.IMWRITE_JPEG_QUALITY, 100])
                # Create an IPython image.
                i = display.Image(data=encoded_img)
                # Display the image in this notebook.
                display.clear_output(wait=True)
                display.display(i)
    # ctrl-c
    except KeyboardInterrupt:
        print("Interrupted")
    # any different error
    except RuntimeError as e:
        print(e)
    finally:
        if player is not None:
            # Stop capturing.
            player.stop()
        if use_popup:
            cv2.destroyAllWindows()
Run#
Run Live Object Detection#
Use a webcam as the video input. By default, the primary webcam is set
with source=0. If you have multiple webcams, each one will be
assigned a consecutive number starting at 0. Set flip=True when
using a front-facing camera. Some web browsers, especially Mozilla
Firefox, may cause flickering. If you experience flickering, set
use_popup=True.
NOTE: To use this notebook with a webcam, you need to run the notebook on a computer with a webcam. If you run the notebook on a server (for example, Binder), the webcam will not work. Popup mode may not work if you run this notebook on a remote computer (for example, Binder).
If you do not have a webcam, you can still run this demo with a video file. Any format supported by OpenCV will work.
Run the object detection:
USE_WEBCAM = False

video_url = "https://storage.openvinotoolkit.org/repositories/openvino_notebooks/data/data/video/Coco%20Walking%20in%20Berkeley.mp4"

video_file = Path("coco.mp4")

if not USE_WEBCAM and not video_file.exists():
    utils.download_file(video_url, filename=video_file.name)

cam_id = 0

source = cam_id if USE_WEBCAM else video_file

run_object_detection(source=source, flip=isinstance(source, int), use_popup=False)

Source ended