Image generation with Stable Diffusion XL and OpenVINO#
This Jupyter notebook can be launched after a local installation only.

Stable Diffusion XL or SDXL is the latest image generation model that is tailored towards more photorealistic outputs with more detailed imagery and composition compared to previous Stable Diffusion models, including Stable Diffusion 2.1.
With Stable Diffusion XL you can now make more realistic images with improved face generation, produce legible text within images, and create more aesthetically pleasing art using shorter prompts.
pipeline#
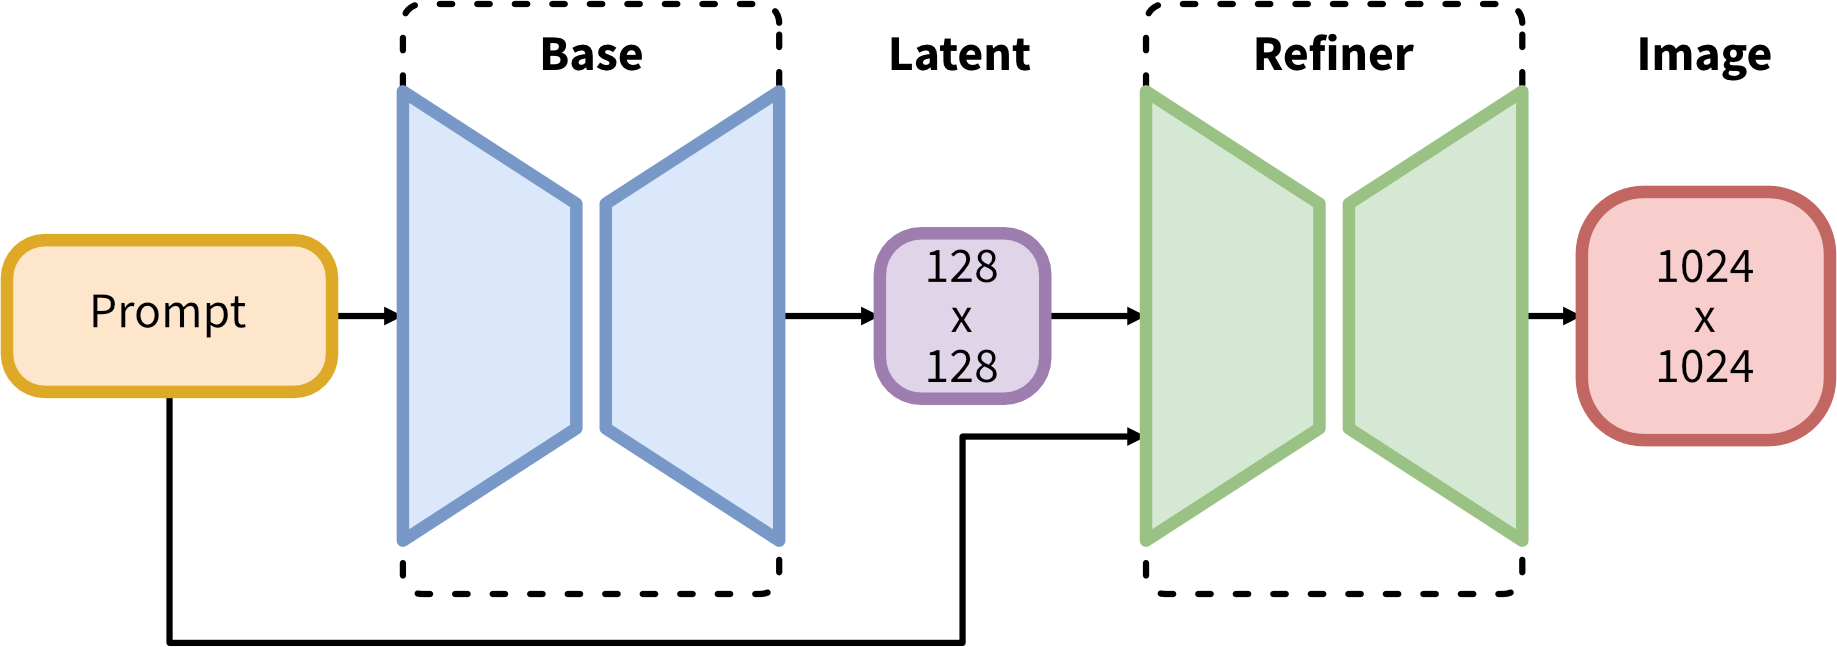
SDXL consists of an ensemble of experts pipeline for latent diffusion: In the first step, the base model is used to generate (noisy) latents, which are then further processed with a refinement model specialized for the final denoising steps. Note that the base model can be used as a standalone module or in a two-stage pipeline as follows: First, the base model is used to generate latents of the desired output size. In the second step, we use a specialized high-resolution model and apply a technique called SDEdit( also known as “image to image”) to the latents generated in the first step, using the same prompt.
Compared to previous versions of Stable Diffusion, SDXL leverages a three times larger UNet backbone: The increase of model parameters is mainly due to more attention blocks and a larger cross-attention context as SDXL uses a second text encoder. The authors design multiple novel conditioning schemes and train SDXL on multiple aspect ratios and also introduce a refinement model that is used to improve the visual fidelity of samples generated by SDXL using a post-hoc image-to-image technique. The testing of SDXL shows drastically improved performance compared to the previous versions of Stable Diffusion and achieves results competitive with those of black-box state-of-the-art image generators.
In this tutorial, we consider how to run the SDXL model using OpenVINO.
We will use a pre-trained model from the Hugging Face Diffusers library. To simplify the user experience, the Hugging Face Optimum Intel library is used to convert the models to OpenVINO™ IR format.
The tutorial consists of the following steps:
Install prerequisites
Download the Stable Diffusion XL Base model from a public source using the OpenVINO integration with Hugging Face Optimum.
Run Text2Image generation pipeline using Stable Diffusion XL base
Run Image2Image generation pipeline using Stable Diffusion XL base
Note: Some demonstrated models can require at least 64GB RAM for conversion and running.
Table of contents:
Installation Instructions#
This is a self-contained example that relies solely on its own code.
We recommend running the notebook in a virtual environment. You only need a Jupyter server to start. For details, please refer to Installation Guide.
Install prerequisites#
%pip install -q --extra-index-url https://download.pytorch.org/whl/cpu "torch>=2.1" "torchvision" "diffusers>=0.24.0" "invisible-watermark>=0.2.0" "transformers>=4.33.0" "accelerate" "onnx!=1.16.2" "peft>=0.6.2"
%pip install -q "git+https://github.com/huggingface/optimum-intel.git"
%pip install -q "openvino>=2023.1.0" "gradio>=4.19" "nncf>=2.9.0"
SDXL Base model#
We will start with the base model part, which is responsible for the generation of images of the desired output size. stable-diffusion-xl-base-1.0 is available for downloading via the HuggingFace hub. It already provides a ready-to-use model in OpenVINO format compatible with Optimum Intel.
To load an OpenVINO model and run an inference with OpenVINO Runtime,
you need to replace diffusers StableDiffusionXLPipeline with Optimum
OVStableDiffusionXLPipeline. In case you want to load a PyTorch
model and convert it to the OpenVINO format on the fly, you can set
export=True.
You can save the model on disk using the save_pretrained method.
from pathlib import Path
from optimum.intel.openvino import OVStableDiffusionXLPipeline
import gc

model_id = "stabilityai/stable-diffusion-xl-base-1.0"
model_dir = Path("openvino-sd-xl-base-1.0")

import requests

if not Path("notebook_utils.py").exists():
    r = requests.get(
        url="https://raw.githubusercontent.com/openvinotoolkit/openvino_notebooks/latest/utils/notebook_utils.py",
    )
    open("notebook_utils.py", "w").write(r.text)

# Read more about telemetry collection at https://github.com/openvinotoolkit/openvino_notebooks?tab=readme-ov-file#-telemetry
from notebook_utils import collect_telemetry

collect_telemetry("stable-diffusion-xl.ipynb")
2024-10-17 22:53:35.107765: I tensorflow/core/util/port.cc:110] oneDNN custom operations are on. You may see slightly different numerical results due to floating-point round-off errors from different computation orders. To turn them off, set the environment variable TF_ENABLE_ONEDNN_OPTS=0.
2024-10-17 22:53:35.109501: I tensorflow/tsl/cuda/cudart_stub.cc:28] Could not find cuda drivers on your machine, GPU will not be used.
2024-10-17 22:53:35.146015: I tensorflow/core/platform/cpu_feature_guard.cc:182] This TensorFlow binary is optimized to use available CPU instructions in performance-critical operations.
To enable the following instructions: AVX2 AVX512F AVX512_VNNI FMA, in other operations, rebuild TensorFlow with the appropriate compiler flags.
2024-10-17 22:53:35.889441: W tensorflow/compiler/tf2tensorrt/utils/py_utils.cc:38] TF-TRT Warning: Could not find TensorRT
Select inference device SDXL Base model#
select device from dropdown list for running inference using OpenVINO
from notebook_utils import device_widget

device = device_widget()

device
Dropdown(description='Device:', index=1, options=('CPU', 'AUTO'), value='AUTO')
Please select below whether you would like to use weight compression to
reduce memory footprint. Optimum
Intel
supports weight compression via NNCF out of the box. For 8-bit
compression we provide
quantization_config=OVWeightQuantizationConfig(bits=8, ...) argument
to from_pretrained() method containing number of bits and other
compression parameters.
import ipywidgets as widgets

compress_weights = widgets.Checkbox(
    description="Apply weight compression",
    value=True,
)

compress_weights
Checkbox(value=True, description='Apply weight compression')
if not model_dir.exists():
    !optimum-cli export openvino -m stabilityai/stable-diffusion-xl-base-1.0 --weight-format int8 {model_dir}

text2image_pipe = OVStableDiffusionXLPipeline.from_pretrained(model_dir, device=device.value)
Run Text2Image generation pipeline#
Now, we can run the model for the generation of images using text
prompts. To speed up evaluation and reduce the required memory we
decrease num_inference_steps and image size (using height and
width). You can modify them to suit your needs and depend on the
target hardware. We also specified a generator parameter based on a
numpy random state with a specific seed for results reproducibility.
import torch

prompt = "cute cat 4k, high-res, masterpiece, best quality, full hd, extremely detailed,  soft lighting, dynamic angle, 35mm"
image = text2image_pipe(
    prompt,
    num_inference_steps=25,
    height=512,
    width=512,
    generator=torch.Generator(device="cpu").manual_seed(903512),
).images[0]
image.save("cat.png")
image
0%| | 0/25 [00:00<?, ?it/s]

Text2image Generation Interactive Demo#
import requests

if not Path("gradio_helper.py").exists():
    r = requests.get(url="https://raw.githubusercontent.com/openvinotoolkit/openvino_notebooks/latest/notebooks/stable-diffusion-xl/gradio_helper.py")
    open("gradio_helper.py", "w").write(r.text)

from gradio_helper import make_demo_sd_xl_text2image

if text2image_pipe is None:
    text2image_pipe = OVStableDiffusionXLPipeline.from_pretrained(model_dir, device=device.value)

demo = make_demo_sd_xl_text2image(text2image_pipe)

# if you are launching remotely, specify server_name and server_port
# demo.launch(server_name='your server name', server_port='server port in int')
# Read more in the docs: https://gradio.app/docs/
# if you want create public link for sharing demo, please add share=True
try:
    demo.launch()
except Exception:
    demo.launch(share=True)
demo.close()
text2image_pipe = None
gc.collect();
Run Image2Image generation pipeline#
We can reuse the already converted model for running the Image2Image
generation pipeline. For that, we should replace
OVStableDiffusionXLPipeline with
OVStableDiffusionXLImage2ImagePipeline.
select device from dropdown list for running inference using OpenVINO
device
Dropdown(description='Device:', index=1, options=('CPU', 'AUTO'), value='AUTO')
from optimum.intel import OVStableDiffusionXLImg2ImgPipeline

image2image_pipe = OVStableDiffusionXLImg2ImgPipeline.from_pretrained(model_dir, device=device.value)
import torch

photo_prompt = "professional photo of a cat, extremely detailed, hyper realistic, best quality, full hd"
photo_image = image2image_pipe(
    photo_prompt,
    image=image,
    num_inference_steps=50,
    strength=0.75,
    generator=torch.Generator(device="cpu").manual_seed(4891),
).images[0]
photo_image.save("photo_cat.png")
photo_image
0%| | 0/37 [00:00<?, ?it/s]

Image2Image Generation Interactive Demo#
if not Path("gradio_helper.py").exists():
    r = requests.get(url="https://raw.githubusercontent.com/openvinotoolkit/openvino_notebooks/latest/notebooks/stable-diffusion-xl/gradio_helper.py")
    open("gradio_helper.py", "w").write(r.text)

from gradio_helper import make_demo_sd_xl_image2image

if image2image_pipe is None:
    image2image_pipe = OVStableDiffusionXLImg2ImgPipeline.from_pretrained(model_dir)

demo = make_demo_sd_xl_image2image(image2image_pipe)

# if you are launching remotely, specify server_name and server_port
# demo.launch(server_name='your server name', server_port='server port in int')
# Read more in the docs: https://gradio.app/docs/
# if you want create public link for sharing demo, please add share=True
try:
    demo.launch()
except Exception:
    demo.launch(share=True)
demo.close()
del image2image_pipe
gc.collect()
Closing server running on port: 7860
12351