Text-to-Image Generation with Stable Diffusion and OpenVINO™#
This Jupyter notebook can be launched after a local installation only.

Stable Diffusion is a text-to-image latent diffusion model created by the researchers and engineers from CompVis, Stability AI and LAION. It is trained on 512x512 images from a subset of the LAION-5B database. This model uses a frozen CLIP ViT-L/14 text encoder to condition the model on text prompts. With its 860M UNet and 123M text encoder. See the model card for more information.
General diffusion models are machine learning systems that are trained to denoise random gaussian noise step by step, to get to a sample of interest, such as an image. Diffusion models have shown to achieve state-of-the-art results for generating image data. But one downside of diffusion models is that the reverse denoising process is slow. In addition, these models consume a lot of memory because they operate in pixel space, which becomes unreasonably expensive when generating high-resolution images. Therefore, it is challenging to train these models and also use them for inference. OpenVINO brings capabilities to run model inference on Intel hardware and opens the door to the fantastic world of diffusion models for everyone!
Model capabilities are not limited text-to-image only, it also is able solve additional tasks, for example text-guided image-to-image generation and inpainting. This tutorial also considers how to run text-guided image-to-image generation using Stable Diffusion.
This notebook demonstrates how to convert and run stable diffusion model using OpenVINO.
Table of contents:
Installation Instructions#
This is a self-contained example that relies solely on its own code.
We recommend running the notebook in a virtual environment. You only need a Jupyter server to start. For details, please refer to Installation Guide.
Prerequisites#
%pip install -q "openvino>=2023.1.0" "git+https://github.com/huggingface/optimum-intel.git"
%pip install -q --extra-index-url https://download.pytorch.org/whl/cpu "diffusers>=0.9.0" "torch>=2.1"
%pip install -q "huggingface-hub>=0.9.1"
%pip install -q "gradio>=4.19"
%pip install -q transformers Pillow opencv-python tqdm
# Fetch `notebook_utils` module
import requests
from pathlib import Path

if not Path("notebook_utils.py").exists():
    r = requests.get(
        url="https://raw.githubusercontent.com/openvinotoolkit/openvino_notebooks/latest/utils/notebook_utils.py",
    )

    open("notebook_utils.py", "w").write(r.text)

from notebook_utils import download_file, device_widget

# Read more about telemetry collection at https://github.com/openvinotoolkit/openvino_notebooks?tab=readme-ov-file#-telemetry
from notebook_utils import collect_telemetry

collect_telemetry("stable-diffusion-text-to-image.ipynb")
Prepare Inference Pipelines#
Let us now take a closer look at how the model works in inference by illustrating the logical flow.
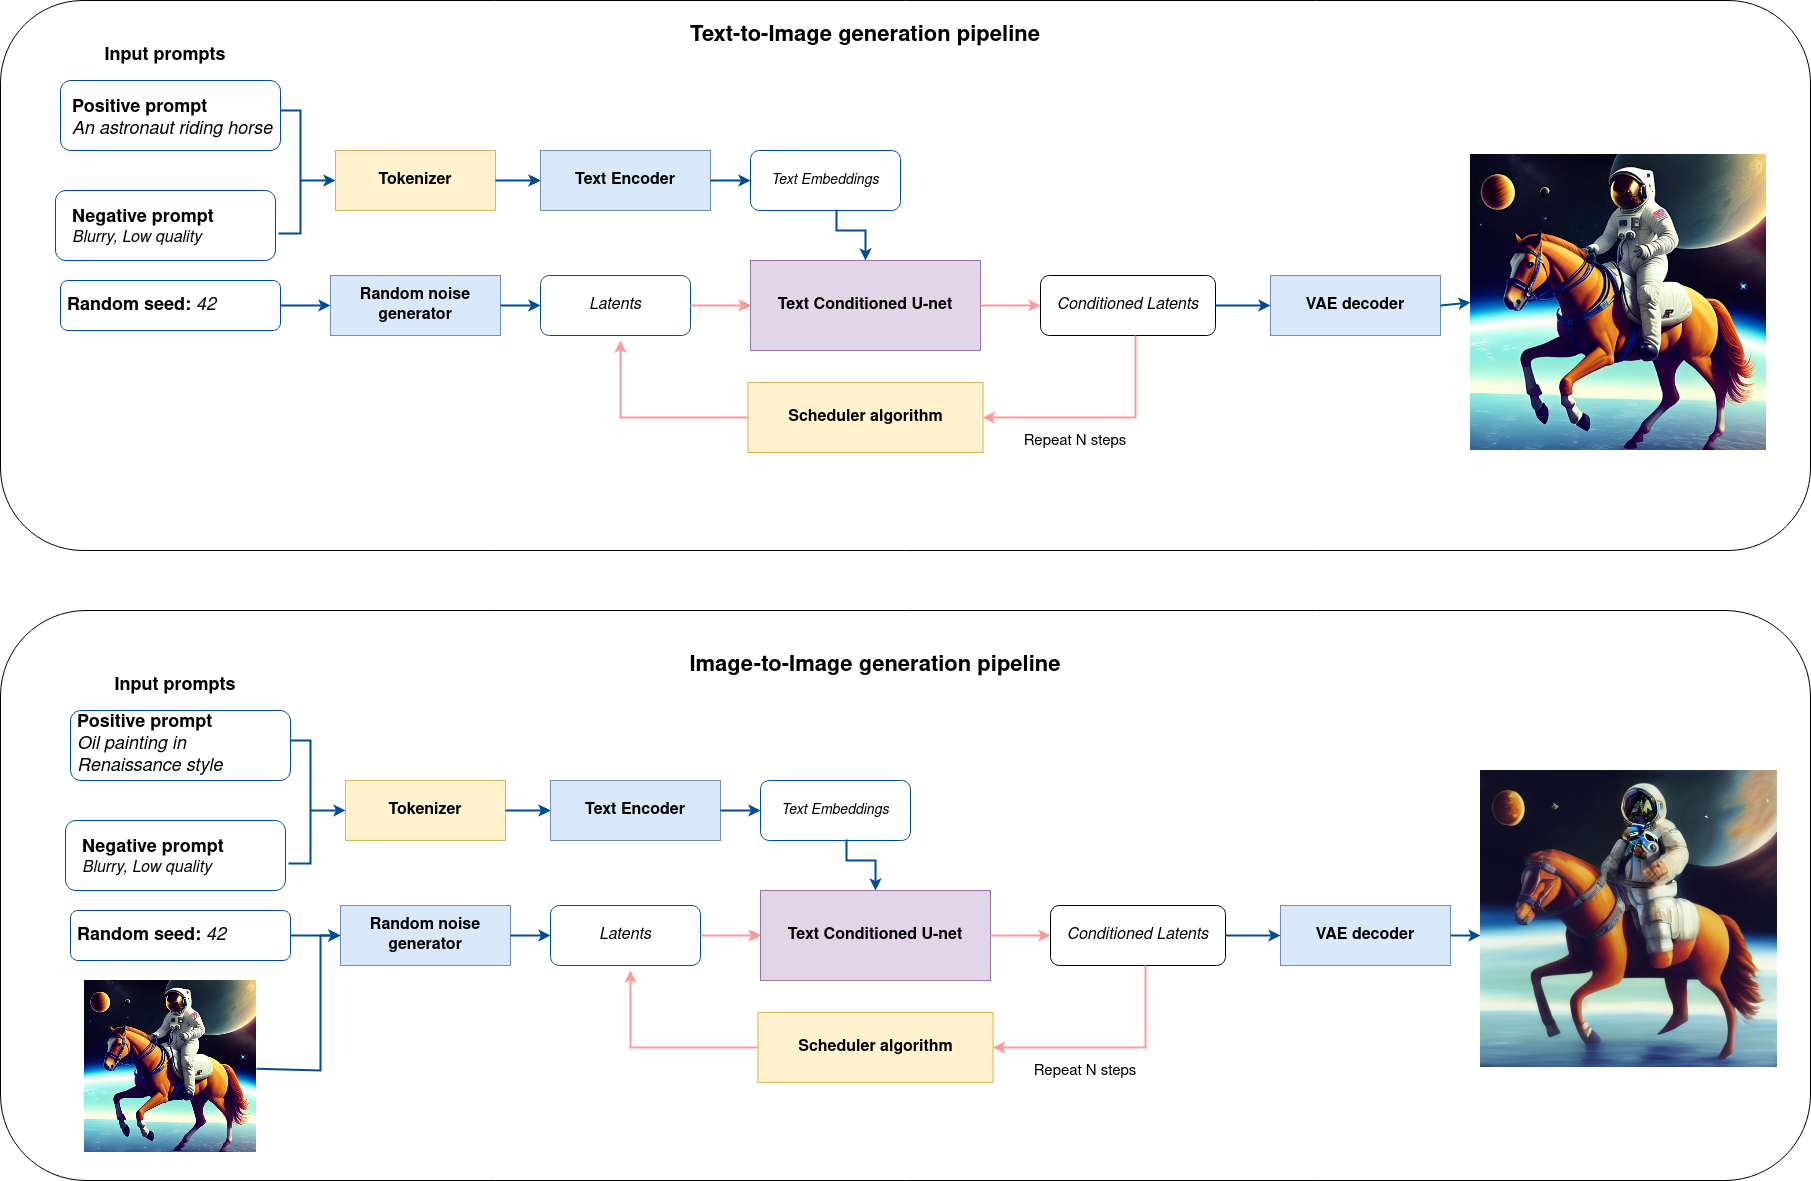
sd-pipeline#
As you can see from the diagram, the only difference between Text-to-Image and text-guided Image-to-Image generation in approach is how initial latent state is generated. In case of Image-to-Image generation, you additionally have an image encoded by VAE encoder mixed with the noise produced by using latent seed, while in Text-to-Image you use only noise as initial latent state. The stable diffusion model takes both a latent image representation of size \(64 \times 64\) and a text prompt is transformed to text embeddings of size \(77 \times 768\) via CLIP’s text encoder as an input.
Next, the U-Net iteratively denoises the random latent image representations while being conditioned on the text embeddings. The output of the U-Net, being the noise residual, is used to compute a denoised latent image representation via a scheduler algorithm. Many different scheduler algorithms can be used for this computation, each having its pros and cons. For Stable Diffusion, it is recommended to use one of:
K-LMS scheduler(you will use it in your pipeline)
Theory on how the scheduler algorithm function works is out of scope for this notebook. Nonetheless, in short, you should remember that you compute the predicted denoised image representation from the previous noise representation and the predicted noise residual. For more information, refer to the recommended Elucidating the Design Space of Diffusion-Based Generative Models
The denoising process is repeated given number of times (by default 50) to step-by-step retrieve better latent image representations. When complete, the latent image representation is decoded by the decoder part of the variational auto encoder.
Text-to-image pipeline#
Load Stable Diffusion model and create text-to-image pipeline#
We will load optimized Stable Diffusion model from the Hugging Face Hub and create pipeline to run an inference with OpenVINO Runtime by Optimum Intel.
For running the Stable Diffusion model with Optimum Intel, we will use
the optimum.intel.OVStableDiffusionPipeline class, which represents
the inference pipeline. OVStableDiffusionPipeline initialized by the
from_pretrained method. It supports on-the-fly conversion models
from PyTorch using the export=True parameter. A converted model can
be saved on disk using the save_pretrained method for the next
running.
When Stable Diffusion models are exported to the OpenVINO format, they are decomposed into three components that consist of four models combined during inference into the pipeline:
The text encoder
The text-encoder is responsible for transforming the input prompt(for example “a photo of an astronaut riding a horse”) into an embedding space that can be understood by the U-Net. It is usually a simple transformer-based encoder that maps a sequence of input tokens to a sequence of latent text embeddings.
The U-NET
Model predicts the
samplestate for the next step.
The VAE encoder
The encoder is used to convert the image into a low dimensional latent representation, which will serve as the input to the U-Net model.
The VAE decoder
The decoder transforms the latent representation back into an image.
Select device from dropdown list for running inference using OpenVINO.
device = device_widget()
device
Dropdown(description='Device:', index=1, options=('CPU', 'AUTO'), value='AUTO')
from optimum.intel.openvino import OVStableDiffusionPipeline
from pathlib import Path

DEVICE = device.value

MODEL_ID = "prompthero/openjourney"
MODEL_DIR = Path("diffusion_pipeline")

if not MODEL_DIR.exists():
    ov_pipe = OVStableDiffusionPipeline.from_pretrained(MODEL_ID, export=True, device=DEVICE, compile=False)
    ov_pipe.save_pretrained(MODEL_DIR)
else:
    ov_pipe = OVStableDiffusionPipeline.from_pretrained(MODEL_DIR, device=DEVICE, compile=False)

ov_pipe.compile()
Compiling the vae_decoder to CPU ...
Compiling the unet to CPU ...
Compiling the text_encoder to CPU ...
Compiling the vae_encoder to CPU ...
Text-to-Image generation#
Now, you can define a text prompt for image generation and run inference pipeline.
Note: Consider increasing
stepsto get more precise results. A suggested value is50, but it will take longer time to process.
import ipywidgets as widgets

sample_text = (
    "cyberpunk cityscape like Tokyo New York  with tall buildings at dusk golden hour cinematic lighting, epic composition. "
    "A golden daylight, hyper-realistic environment. "
    "Hyper and intricate detail, photo-realistic. "
    "Cinematic and volumetric light. "
    "Epic concept art. "
    "Octane render and Unreal Engine, trending on artstation"
)
text_prompt = widgets.Text(value=sample_text, description="your text")
num_steps = widgets.IntSlider(min=1, max=50, value=20, description="steps:")
seed = widgets.IntSlider(min=0, max=10000000, description="seed: ", value=42)
widgets.VBox([text_prompt, num_steps, seed])
VBox(children=(Text(value='cyberpunk cityscape like Tokyo New York with tall buildings at dusk golden hour ci…
print("Pipeline settings")
print(f"Input text: {text_prompt.value}")
print(f"Seed: {seed.value}")
print(f"Number of steps: {num_steps.value}")
Pipeline settings
Input text: cyberpunk cityscape like Tokyo New York  with tall buildings at dusk golden hour cinematic lighting, epic composition. A golden daylight, hyper-realistic environment. Hyper and intricate detail, photo-realistic. Cinematic and volumetric light. Epic concept art. Octane render and Unreal Engine, trending on artstation
Seed: 42
Number of steps: 20
Let’s generate an image and save the generation results. The pipeline
returns one or several results: images contains final generated
image. To get more than one result, you can set the
num_images_per_prompt parameter.
import numpy as np

np.random.seed(seed.value)

result = ov_pipe(text_prompt.value, num_inference_steps=num_steps.value)

final_image = result["images"][0]
final_image.save("result.png")
0%| | 0/21 [00:00<?, ?it/s]
Now is show time!
text = "\n\t".join(text_prompt.value.split("."))
print("Input text:")
print("\t" + text)
display(final_image)
Input text:
    cyberpunk cityscape like Tokyo New York  with tall buildings at dusk golden hour cinematic lighting, epic composition
     A golden daylight, hyper-realistic environment
     Hyper and intricate detail, photo-realistic
     Cinematic and volumetric light
     Epic concept art
     Octane render and Unreal Engine, trending on artstation
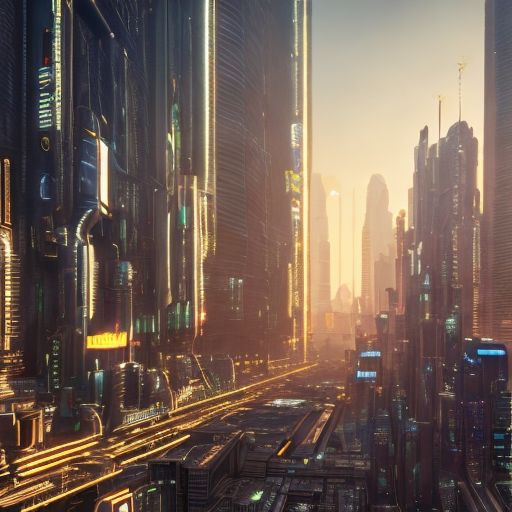
Nice. As you can see, the picture has quite a high definition 🔥.
Interactive text-to-image demo#
import gradio as gr


def generate_from_text(text, seed, num_steps, _=gr.Progress(track_tqdm=True)):
    np.random.seed(seed)
    result = ov_pipe(text, num_inference_steps=num_steps)
    return result["images"][0]


with gr.Blocks() as demo:
    with gr.Tab("Text-to-Image generation"):
        with gr.Row():
            with gr.Column():
                text_input = gr.Textbox(lines=3, label="Text")
                seed_input = gr.Slider(0, 10000000, value=42, step=1, label="Seed")
                steps_input = gr.Slider(1, 50, value=20, step=1, label="Steps")
            out = gr.Image(label="Result", type="pil")
        btn = gr.Button()
        btn.click(generate_from_text, [text_input, seed_input, steps_input], out)
        gr.Examples([[sample_text, 42, 20]], [text_input, seed_input, steps_input])
try:
    demo.queue().launch()
except Exception:
    demo.queue().launch(share=True)
# if you are launching remotely, specify server_name and server_port
# demo.launch(server_name='your server name', server_port='server port in int')
# Read more in the docs: https://gradio.app/docs/
demo.close()
del ov_pipe
np.random.seed(None)
Image-to-Image pipeline#
Create image-to-Image pipeline#
For running the Stable Diffusion model with Optimum Intel, we will use
the optimum.intel.OVStableDiffusionImg2ImgPipeline class, which
represents the inference pipeline. We will use the same model as for
text-to-image pipeline. The model has already been downloaded from the
Hugging Face Hub and converted to OpenVINO IR format on previous steps,
so we can just load it.
import requests

if not Path("notebook_utils.py").exists():
    r = requests.get(
        url="https://raw.githubusercontent.com/openvinotoolkit/openvino_notebooks/latest/utils/notebook_utils.py",
    )
    open("notebook_utils.py", "w").write(r.text)

from notebook_utils import device_widget

device = device_widget()

device
Dropdown(description='Device:', index=1, options=('CPU', 'AUTO'), value='AUTO')
from optimum.intel.openvino import OVStableDiffusionImg2ImgPipeline
from pathlib import Path

DEVICE = device.value

ov_pipe_i2i = OVStableDiffusionImg2ImgPipeline.from_pretrained(MODEL_DIR, device=DEVICE, compile=False)
ov_pipe_i2i.compile()
Compiling the vae_decoder to CPU ...
Compiling the unet to CPU ...
Compiling the text_encoder to CPU ...
Compiling the vae_encoder to CPU ...
Image-to-Image generation#
Image-to-Image generation, additionally to text prompt, requires
providing initial image. Optionally, you can also change strength
parameter, which is a value between 0.0 and 1.0, that controls the
amount of noise that is added to the input image. Values that approach
1.0 enable lots of variations but will also produce images that are not
semantically consistent with the input.
text_prompt_i2i = widgets.Text(value="amazing watercolor painting", description="your text")
num_steps_i2i = widgets.IntSlider(min=1, max=50, value=10, description="steps:")
seed_i2i = widgets.IntSlider(min=0, max=1024, description="seed: ", value=42)
image_widget = widgets.FileUpload(
    accept="",
    multiple=False,
    description="Upload image",
)
strength = widgets.FloatSlider(min=0, max=1, description="strength: ", value=0.5)
widgets.VBox([text_prompt_i2i, seed_i2i, num_steps_i2i, image_widget, strength])
VBox(children=(Text(value='amazing watercolor painting', description='your text'), IntSlider(value=42, descrip…
import io
import PIL
default_image_path = Path("coco.jpg")
if not default_image_path.exists():
download_file(
"https://storage.openvinotoolkit.org/repositories/openvino_notebooks/data/data/image/coco.jpg",
filename="coco.jpg",
)
# read uploaded image
image = PIL.Image.open(io.BytesIO(image_widget.value[-1]["content"]) if image_widget.value else str(default_image_path))
print("Pipeline settings")
print(f"Input text: {text_prompt_i2i.value}")
print(f"Seed: {seed_i2i.value}")
print(f"Number of steps: {num_steps_i2i.value}")
print(f"Strength: {strength.value}")
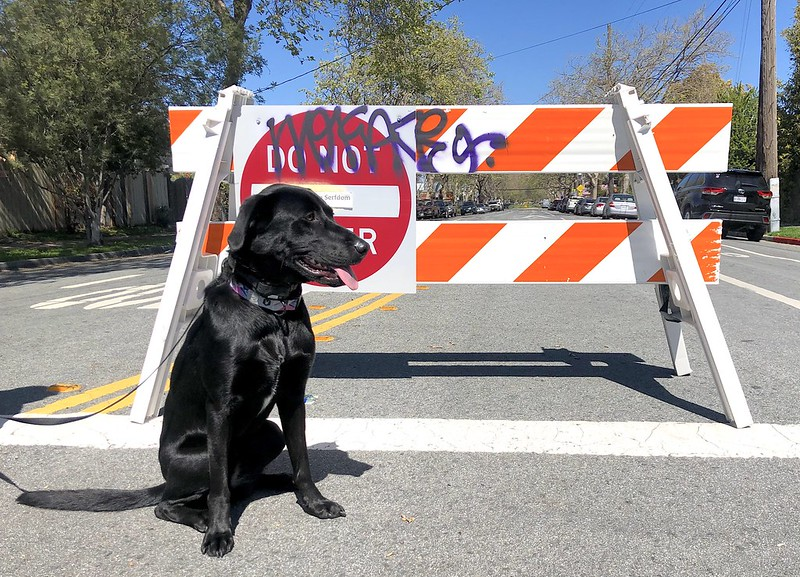
print("Input image:")
display(image)
'coco.jpg' already exists.
Pipeline settings
Input text: amazing watercolor painting
Seed: 42
Number of steps: 20
Strength: 0.4
Input image:
import PIL
import numpy as np


def scale_fit_to_window(dst_width: int, dst_height: int, image_width: int, image_height: int):
    """
    Preprocessing helper function for calculating image size for resize with peserving original aspect ratio
    and fitting image to specific window size

    Parameters:
      dst_width (int): destination window width
      dst_height (int): destination window height
      image_width (int): source image width
      image_height (int): source image height
    Returns:
      result_width (int): calculated width for resize
      result_height (int): calculated height for resize
    """
    im_scale = min(dst_height / image_height, dst_width / image_width)
    return int(im_scale * image_width), int(im_scale * image_height)


def preprocess(image: PIL.Image.Image):
    """
    Image preprocessing function. Takes image in PIL.Image format, resizes it to keep aspect ration and fits to model input window 512x512,
    then converts it to np.ndarray and adds padding with zeros on right or bottom side of image (depends from aspect ratio), after that
    converts data to float32 data type and change range of values from [0, 255] to [-1, 1].
    The function returns preprocessed input tensor and padding size, which can be used in postprocessing.

    Parameters:
      image (PIL.Image.Image): input image
    Returns:
       image (np.ndarray): preprocessed image tensor
       meta (Dict): dictionary with preprocessing metadata info
    """
    src_width, src_height = image.size
    dst_width, dst_height = scale_fit_to_window(512, 512, src_width, src_height)
    image = np.array(image.resize((dst_width, dst_height), resample=PIL.Image.Resampling.LANCZOS))[None, :]
    pad_width = 512 - dst_width
    pad_height = 512 - dst_height
    pad = ((0, 0), (0, pad_height), (0, pad_width), (0, 0))
    image = np.pad(image, pad, mode="constant")
    image = image.astype(np.float32) / 255.0
    image = 2.0 * image - 1.0
    return image, {"padding": pad, "src_width": src_width, "src_height": src_height}


def postprocess(image: PIL.Image.Image, orig_width: int, orig_height: int):
    """
    Image postprocessing function. Takes image in PIL.Image format and metrics of original image. Image is cropped and resized to restore initial size.

    Parameters:
      image (PIL.Image.Image): input image
      orig_width (int): original image width
      orig_height (int): original image height
    Returns:
       image (PIL.Image.Image): postprocess image
    """
    src_width, src_height = image.size
    dst_width, dst_height = scale_fit_to_window(src_width, src_height, orig_width, orig_height)
    image = image.crop((0, 0, dst_width, dst_height))
    image = image.resize((orig_width, orig_height))
    return image
preprocessed_image, meta_data = preprocess(image)

np.random.seed(seed_i2i.value)

processed_image = ov_pipe_i2i(text_prompt_i2i.value, preprocessed_image, num_inference_steps=num_steps_i2i.value, strength=strength.value)
0%| | 0/9 [00:00<?, ?steps/s]
final_image_i2i = postprocess(processed_image["images"][0], meta_data["src_width"], meta_data["src_height"])
final_image_i2i.save("result_i2i.png")
text_i2i = "\n\t".join(text_prompt_i2i.value.split("."))
print("Input text:")
print("\t" + text_i2i)
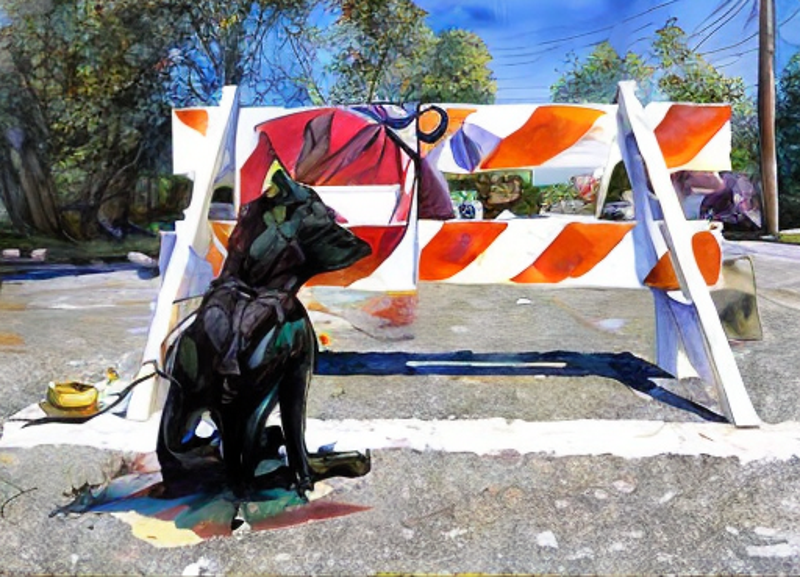
display(final_image_i2i)
Input text:
    amazing watercolor painting
Interactive image-to-image demo#
if not Path("gradio_helper.py").exists():
    download_file(url="https://raw.githubusercontent.com/openvinotoolkit/openvino_notebooks/latest/notebooks/stable-diffusion-text-to-image/gradio_helper.py")

from gradio_helper import make_demo

demo = make_demo(ov_pipe_i2i, preprocess, postprocess, default_image_path)

try:
    demo.queue().launch(debug=False)
except Exception:
    demo.queue().launch(share=True, debug=False)
# if you are launching remotely, specify server_name and server_port
# demo.launch(server_name='your server name', server_port='server port in int')
# Read more in the docs: https://gradio.app/docs/