Image-to-image generation using OpenVINO GenAI#
This Jupyter notebook can be launched after a local installation only.

Image-to-image is the task of transforming an input image through a variety of possible manipulations and enhancements, such as super-resolution, image inpainting, colorization, stylization and more.
One of the most popular use cases of image-to-image is style transfer. With style transfer models: * a regular photo can be transformed into a variety of artistic styles or genres, such as a watercolor painting, a comic book illustration and more. * new images can be generated using a text prompt, in the style of a reference input image.
Latent diffusion models can be used for performing image-to-image generation. Diffusion-based Image-to-image is similar to text-to-image, but in addition to a prompt, you can also pass an initial image as a starting point for the diffusion process. The initial image is encoded to latent space and noise is added to it. Then the latent diffusion model takes a prompt and the noisy latent image, predicts the added noise, and removes the predicted noise from the initial latent image to get the new latent image. Lastly, a decoder decodes the new latent image back into an image.
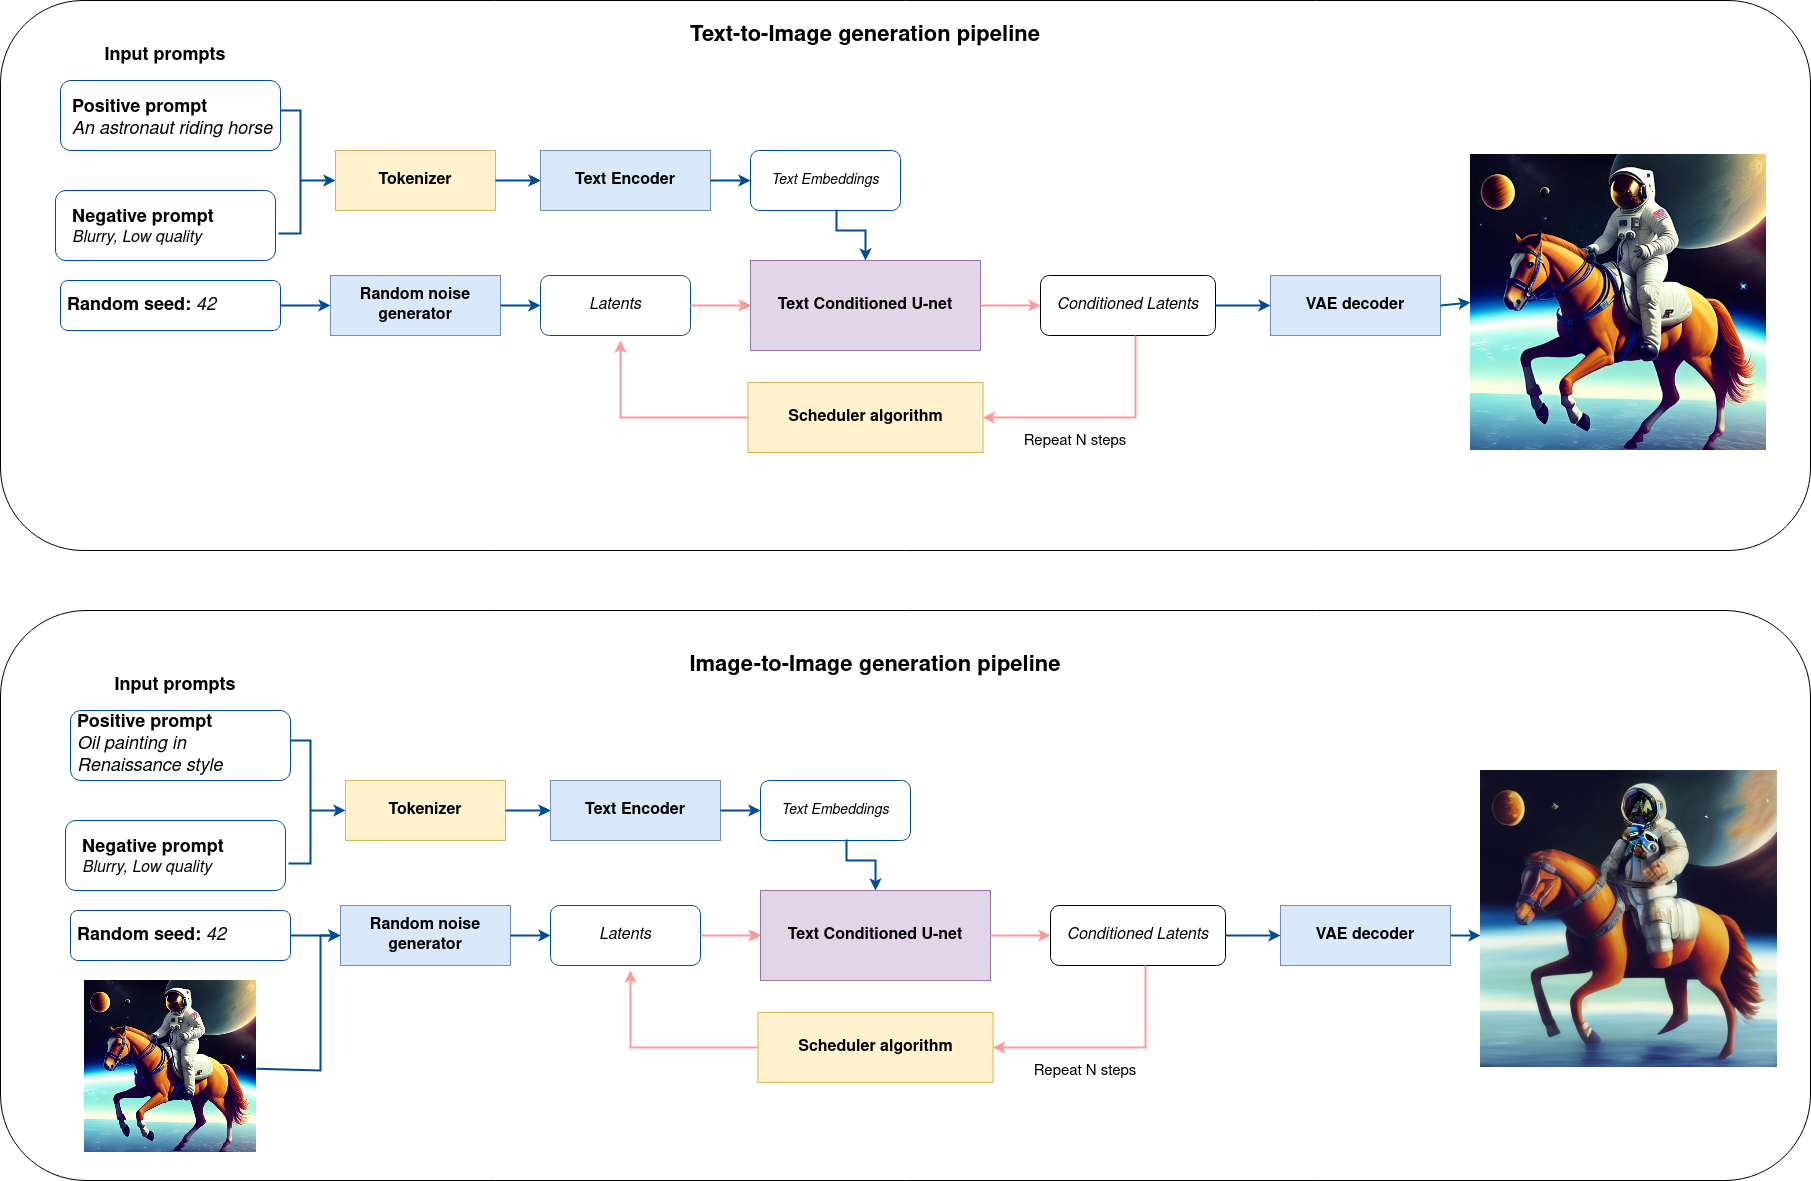
pipe.png#
In this tutorial, we consider how to use OpenVINO GenAI for performing image-to-image generation.
About OpenVINO GenAI#
OpenVINO™ GenAI is a library of the most popular Generative AI model pipelines, optimized execution methods, and samples that run on top of highly performant OpenVINO Runtime.
This library is friendly to PC and laptop execution, and optimized for resource consumption. It requires no external dependencies to run generative models as it already includes all the core functionality (e.g. tokenization via openvino-tokenizers).
OpenVINO GenAI supports popular diffusion models like Stable Diffusion or SDXL for performing image generation. You can find supported models list in OpenVINO GenAI documentation. Previously, we considered how to run text-to-image generation with OpenVINO GenAI and apply multiple LoRA adapters, now is image-to-image turn.
Table of contents:
Installation Instructions#
This is a self-contained example that relies solely on its own code.
We recommend running the notebook in a virtual environment. You only need a Jupyter server to start. For details, please refer to Installation Guide.
Prerequisites#
import platform
import requests
from pathlib import Path


%pip install -q "git+https://github.com/huggingface/optimum-intel.git" --extra-index-url https://download.pytorch.org/whl/cpu
%pip install -q -U --pre --extra-index-url https://storage.openvinotoolkit.org/simple/wheels/nightly "openvino>=2024.5" "openvino-tokenizers>=2024.5" "openvino-genai>=2024.5"
%pip install -q Pillow "diffusers>=0.30.3" "gradio>=4.19" "typing_extensions>=4.9" "tqdm" huggingface-hub "nncf>=2.14.0" --extra-index-url https://download.pytorch.org/whl/cpu
if platform.system() == "Darwin":
    %pip install -q "numpy<2.0.0"

if not Path("notebook_utils.py").exists():
    r = requests.get(
        url="https://raw.githubusercontent.com/openvinotoolkit/openvino_notebooks/latest/utils/notebook_utils.py",
    )
    open("notebook_utils.py", "w").write(r.text)

if not Path("cmd_helper.py").exists():
    r = requests.get(
        url="https://raw.githubusercontent.com/openvinotoolkit/openvino_notebooks/latest/utils/cmd_helper.py",
    )
    open("cmd_helper.py", "w").write(r.text)

# Read more about telemetry collection at https://github.com/openvinotoolkit/openvino_notebooks?tab=readme-ov-file#-telemetry
from notebook_utils import collect_telemetry

collect_telemetry("image-to-image-genai.ipynb")
Prepare model#
For starting working with OpenVINO GenAI pipelines, we should prepare models for inference. OpenVINO GenAI image generation pipelines accepts diffusers-compatible models converted to OpenVINO Intermediate Representation format using Optimum Intel Interface.
Export OpenVINO IR format model using the Hugging Face Optimum library accelerated by OpenVINO integration.#
Optimum Intel is the interface between the Transformers and Diffusers libraries and OpenVINO to accelerate end-to-end pipelines on Intel architectures. It provides ease-to-use cli interface for exporting models to OpenVINO Intermediate Representation (IR) format.
The command bellow demonstrates basic command for model export with
optimum-cli
optimum-cli export openvino --model <model_id_or_path> --task <task> <out_dir>
where --model argument is model id from HuggingFace Hub or local
directory with model (saved using .save_pretrained method),
--task is one of supported
task
that exported model should solve. For image generation models,
text-to-image or image-to-image should be used (as pipeline
components are the same, you can use converted models for both
text-to-image and image-to-image generation. There is no need to convert
models twice). If model initialization requires to use remote code,
--trust-remote-code flag additionally should be passed. You can also
apply fp16, 8-bit or 4-bit weight compression on the Linear,
Convolutional and Embedding layers when exporting your model with the
CLI by setting --weight-format to respectively fp16, int8 or int4.
This type of optimization allows to reduce the memory footprint and
inference latency.
We will use optimum_cli from our helper cmd_helper.py that is a
wrapper over cli-command.
Use optimized models provided on HuggingFace Hub#
For quick start, OpenVINO provides collection of optimized models that are ready to use with OpenVINO GenAI. You can download them using following command:
huggingface-cli download <model_id> --local-dir <output_dir>
import ipywidgets as widgets

use_preconverted = widgets.Checkbox(value=True, description="Use preconverted", disabled=False)

use_preconverted
Checkbox(value=True, description='Use preconverted')
from pathlib import Path

from cmd_helper import optimum_cli

ov_model_id = "OpenVINO/stable-diffusion-v1-5-int8-ov"
hf_model_id = "stable-diffusion-v1-5/stable-diffusion-v1-5"
model_dir = Path("stable-diffusion-v1-5-int8-ov")


if not model_dir.exists():
    if use_preconverted.value:
        !huggingface-cli download {ov_model_id} --local-dir {model_dir}
    else:
        optimum_cli(hf_model_id, model_dir, additional_args={"weight-format": "int8"})
Create inference pipeline#
For creation Image-to-Image generation pipeline
openvino_genai.Image2ImagePipeline should be used. The pipeline
accepts directory with converted model and inference device. Let’s
select execution device:
from notebook_utils import device_widget


device = device_widget("CPU", exclude=["NPU", "AUTO"])
device
Dropdown(description='Device:', options=('CPU', 'AUTO'), value='CPU')
import openvino_genai as ov_genai

pipe = ov_genai.Image2ImagePipeline(model_dir, device.value)
Prepare inputs#
The main inputs for image-to-image generation are input text prompt and
image. Input prompt is represented by text string that contains user’s
instructions for pipeline guidance. Input image should be provided as
ov.Tensor. The code bellow demonstrates how to convert image after
reading Pillow library to OpenVINO tensor. You also can pass some
additional advanced options for better controlling generation process.
We consider the most useful from them in next sections.
import openvino as ov
import numpy as np
from PIL import Image


def image_to_tensor(image: Image) -> ov.Tensor:
    pic = image.convert("RGB")
    image_data = np.array(pic.getdata()).reshape(1, pic.size[1], pic.size[0], 3).astype(np.uint8)
    return ov.Tensor(image_data)
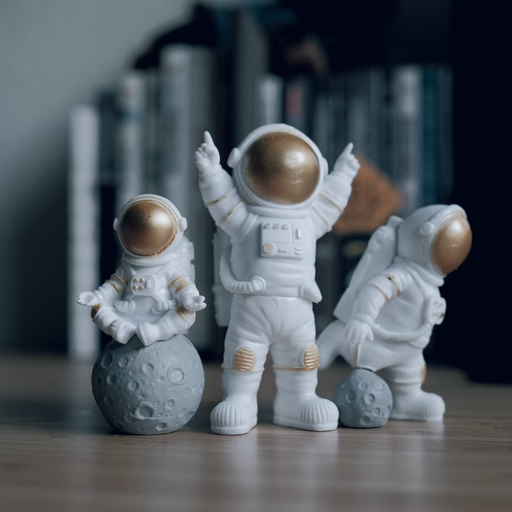
from PIL import Image
from diffusers.utils import load_image

init_image_url = "https://huggingface.co/datasets/huggingface/documentation-images/resolve/main/diffusers/img2img-init.png"
init_image_path = Path("astronauts.png")

if not init_image_path.exists():
    image = load_image(init_image_url)
    image.save(init_image_path)

init_image = Image.open(init_image_path)
init_image_tensor = image_to_tensor(init_image)

init_image
Run inference pipeline#
For starting generation process, generate method should be used.
Together with input prompt and image, we also provided generator,
pseudo-random numbers generator that responsible for results
reproducibility. We will use ov_genai.TorchGenerator helper, the
behavior of this generator is aligned with PyTorch. It means you can get
result as much close to original diffusion pipeline as possible.
callback argument allows early stopping generation if we decided
that we are satisfied generation results when num_inference_steps
has not been not reached yet, but it also can be useful for some other
cases as well. In this tutorial, we will use it for adding interactive
progress bar.
from tqdm.notebook import tqdm
import sys
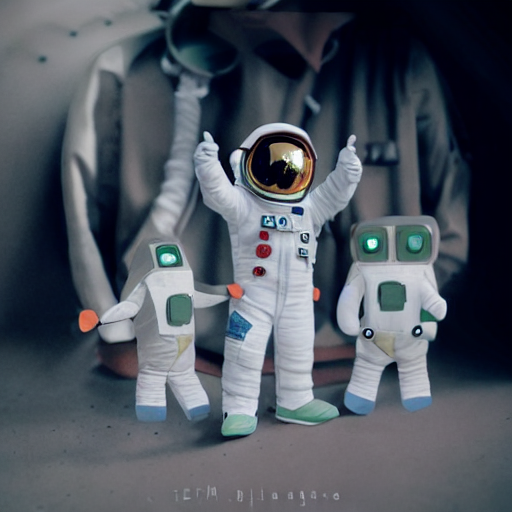
prompt = "Astronaut in a jungle, cold color palette, muted colors, detailed, 8k"
random_generator = ov_genai.TorchGenerator(42)
pbar = tqdm(total=31)
def callback(step, num_steps, latent):
pbar.update(1)
sys.stdout.flush()
return False
image_tensor = pipe.generate(prompt, init_image_tensor, callback=callback, generator=random_generator, strength=0.6)
pbar.close()
out_image = Image.fromarray(image_tensor.data[0])
out_image
0%| | 0/31 [00:00<?, ?it/s]
Configure pipeline parameters#
There are several important parameters you can configure in the pipeline that’ll affect the image generation process and image quality. Let’s take a closer look at what these parameters do and how changing them affects the output.
Strength#
strength is one of the most important parameters to consider and
it’ll have a huge impact on your generated image. It determines how much
the generated image resembles the initial image. In other words: * 📈 a
higher strength value gives the model more “creativity” to generate an
image that’s different from the initial image; a strength value of 1.0
means the initial image is more or less ignored * 📉 a lower strength
value means the generated image is more similar to the initial image
The strength and num_inference_steps parameters are related
because strength determines the number of noise steps to add. For
example, if the num_inference_steps is 50 and strength is 0.8, then this
means adding 40 (50 * 0.8) steps of noise to the initial image and then
denoising for 40 steps to get the newly generated image.
Guidance scale#
The guidance_scale parameter is used to control how closely aligned
the generated image and text prompt are. A higher guidance_scale
value means your generated image is more aligned with the prompt, while
a lower guidance_scale value means your generated image has more
space to deviate from the prompt.
You can combine guidance_scale with strength for even more
precise control over how expressive the model is. For example, combine a
high strength + guidance_scale for maximum creativity or use a
combination of low strength and low guidance_scale to generate
an image that resembles the initial image but is not as strictly bound
to the prompt.
guidance_scale#
Negative prompt#
A negative prompt conditions the model to not include things in an image, and it can be used to improve image quality or modify an image. For example, you can improve image quality by including negative prompts like “poor details” or “blurry” to encourage the model to generate a higher quality image. Or you can modify an image by specifying things to exclude from an image.
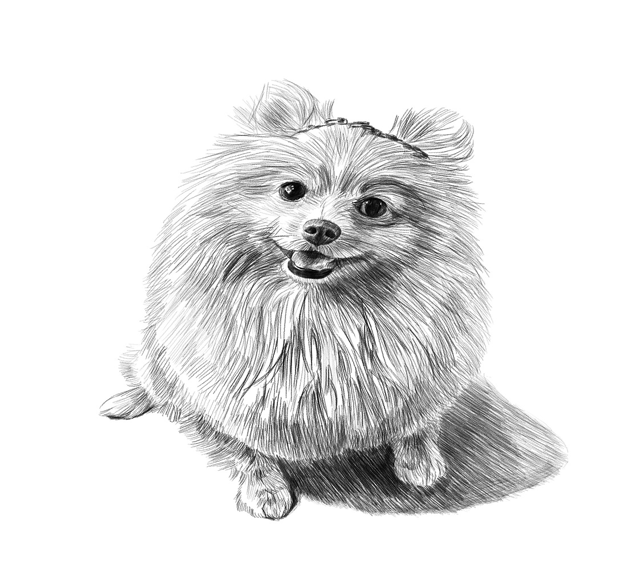
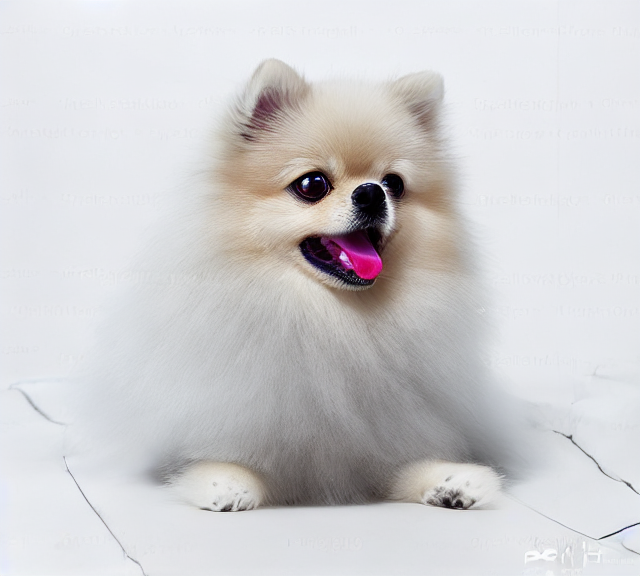
Let’s try to apply these parameters for making pencil drawing to realistic photo.
input_image_path = Path("dog_drawing.png")

if not input_image_path.exists():
    image = load_image("https://github.com/user-attachments/assets/501f88f6-97d9-4a48-8c6e-603fbee15a5b").resize((640, 578))
    image.save(input_image_path)

init_image = Image.open(input_image_path)
init_image
import math

strength = 0.75

num_inference_steps = 20

random_generator = ov_genai.TorchGenerator(426)

prompt = "professional photo of pomeranian spitz, bright realistic colours, highly detailed, hyper realistic, bright cinematic lighting, gopro"
negative_prompt = "blurry, poor quality, low res, worst quality, cropped, ugly, nude, naked, grayscale"

pbar = tqdm(total=math.ceil((num_inference_steps + 1) * strength))

init_image_tensor = image_to_tensor(init_image)


def callback(step, num_steps, latent):
    pbar.update(1)
    sys.stdout.flush()
    return False


image_tensor = pipe.generate(
    prompt, init_image_tensor, strength=strength, num_inference_steps=20, num_images_per_prompt=1, generator=random_generator, callback=callback
)

pbar.close()

out_image = Image.fromarray(image_tensor.data[0])
out_image
0%| | 0/16 [00:00<?, ?it/s]
Interactive demo#
if not Path("gradio_helper.py").exists():
    r = requests.get("https://raw.githubusercontent.com/openvinotoolkit/openvino_notebooks/latest/notebooks/image-to-image-genai/gradio_helper.py")

    with open("gradio_helper.py", "w") as f:
        f.write(r.text)
from gradio_helper import make_demo

demo = make_demo(pipe, ov_genai.TorchGenerator, image_to_tensor)

try:
    demo.launch(debug=True)
except Exception:
    demo.launch(share=True, debug=True)
# if you are launching remotely, specify server_name and server_port
# demo.launch(server_name='your server name', server_port='server port in int')
# Read more in the docs: https://gradio.app/docs/