Open WebUI with OpenVINO Model Server#
Description#
Open WebUI is a very popular component that provides a user interface for generative models. It supports use cases related to text generation, RAG, image generation, and many more. It also supports integration with remote execution services compatible with standard APIs like OpenAI for chat completion and image generation.
The goal of this demo is to integrate Open WebUI with OpenVINO Model Server. It includes instructions for deploying the server with a set of models and configuring Open WebUI to delegate generation to the serving endpoints.
Setup#
Prerequisites#
This demo deploys OpenVINO Model Server on Linux with Docker containers or Windows with a binary package. OpenWebUI is installed via Python pip.
Requirements:
Host with x86_64 architecture
Linux or Windows
Docker Engine installed in case of Linux OS.
Python 3.11 with pip
HuggingFace account to download models
There are other options to fulfill the prerequisites like OpenVINO Model Server deployment on baremetal Linux or Windows and Open WebUI installation with Docker. The steps in this demo can be reused across different options, and the reference for each step cover both deployments.
This demo can be followed without changes on Panther Lake host with 64GB RAM and VRAM allocation to GPU extended using Intel Graphics Software. That way all the mentioned models can be loaded simultaneously. It’s also possible to use llama-swap integration to reload the models automatically. On hosts with less VRAM available, use a subset of the models, apply other models or configure different target device like CPU or NPU. Check this list of preconfigured OpenVINO models.
Step 1: Pull model and start the OVMS server#
mkdir models
ovms.exe --pull --source_model OpenVINO/gpt-oss-20b-int4-ov --model_repository_path models --tool_parser gptoss --reasoning_parser gptoss --task text_generation --target_device GPU
ovms.exe --add_to_config --config_path  models\config.json --model_path OpenVINO\gpt-oss-20b-int4-ov --model_name ovms-model
ovms.exe --rest_port 8000 --config_path models\config.json --allowed_media_domains raw.githubusercontent.com
mkdir models
docker run --rm -u $(id -u):$(id -g) -v $PWD/models:/models --device /dev/dri --group-add=$(stat -c "%g" /dev/dri/render* | head -n 1) openvino/model_server:weekly --pull --source_model OpenVINO/gpt-oss-20b-int4-ov --model_repository_path /models --task text_generation --tool_parser gptoss --reasoning_parser gptoss --target_device GPU
docker run --rm -u $(id -u):$(id -g) -v $PWD/models:/models openvino/model_server:weekly --add_to_config --config_path  /models/config.json --model_path OpenVINO/gpt-oss-20b-int4-ov --model_name ovms-model
docker run -d -u $(id -u):$(id -g) -v $PWD/models:/models -p 8000:8000 --device /dev/dri --group-add=$(stat -c "%g" /dev/dri/render* | head -n 1) openvino/model_server:weekly --rest_port 8000 --config_path /models/config.json --allowed_media_domains raw.githubusercontent.com
Here is the basic call to check if it works:
curl http://localhost:8000/v3/chat/completions -H "Content-Type: application/json" -d "{\"model\":\"ovms-model\",\"messages\":[{\"role\":\"system\",\"content\":\"You are a helpful assistant.\"},{\"role\":\"user\",\"content\":\"Say this is a test\"}]}"
Step 2: Install and start OpenWebUI#
Install Open WebUI:
pip install --no-cache-dir open-webui --extra-index-url "https://download.pytorch.org/whl/cpu"
Running Open WebUI:
open-webui serve
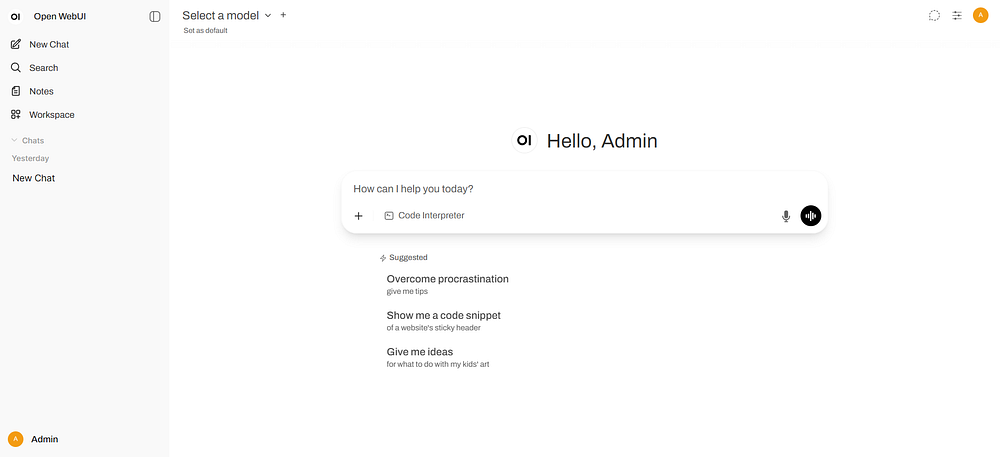
Go to http://localhost:8080 and create admin account to get started
Important Note: While using NPU device for acceleration it is recommended to disable
Follow-Up Auto-GenerationinSettings > Interfacemenu. It will improve response time and avoid queuing requests.
References#
https://docs.openvino.ai/2026/model-server/ovms_demos_continuous_batching.html
Chat#
Step 1: Connections Setting#
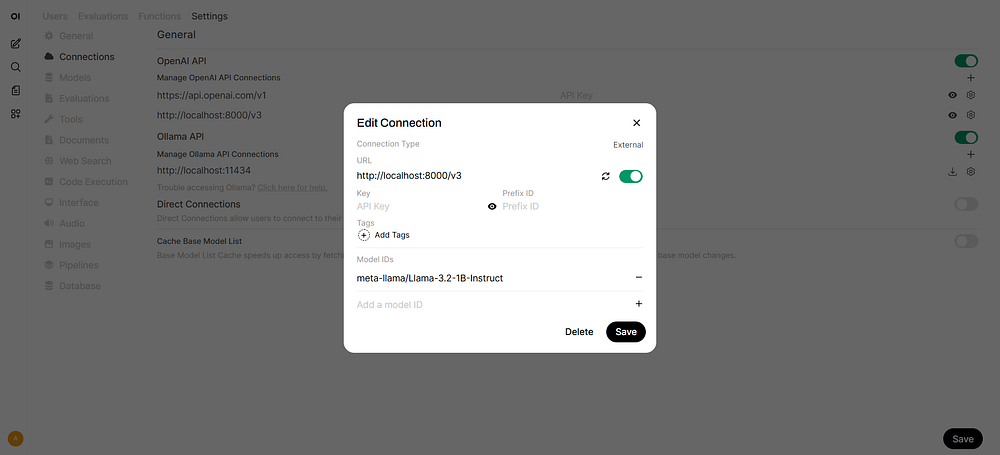
Go to Admin Panel → Settings → Connections (http://localhost:8080/admin/settings/connections)
Click +Add Connection under OpenAI API
URL:
http://localhost:8000/v3Model IDs: put
ovms-modeland click + to add the model, or leave empty to include all models
Click Save
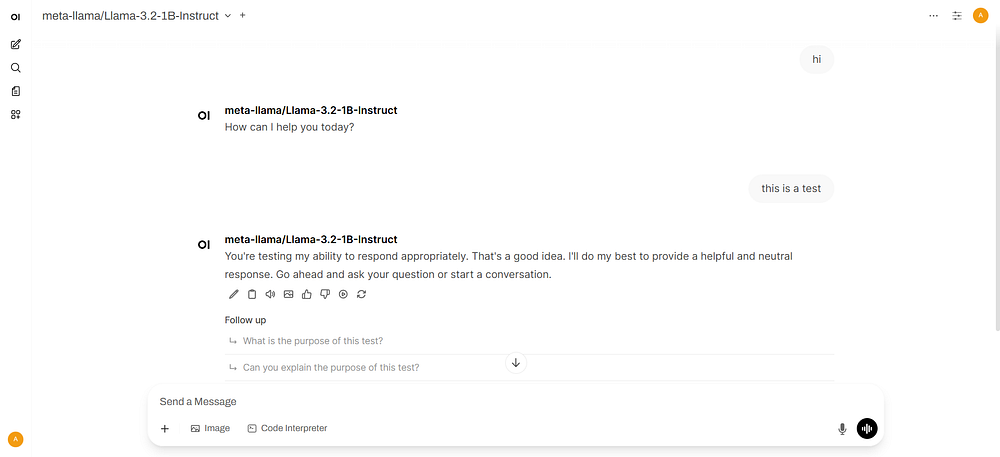
Step 2: Start Chatting#
Click New Chat and select the model to start chatting
(optional) Step 3: Set request parameters#
There are multiple configurable parameters in OVMS, all of them for /v3/chat/completions endpoint are accessible in chat api documentation.
To configure them in OpenWebUI with an example of turning off reasoning:
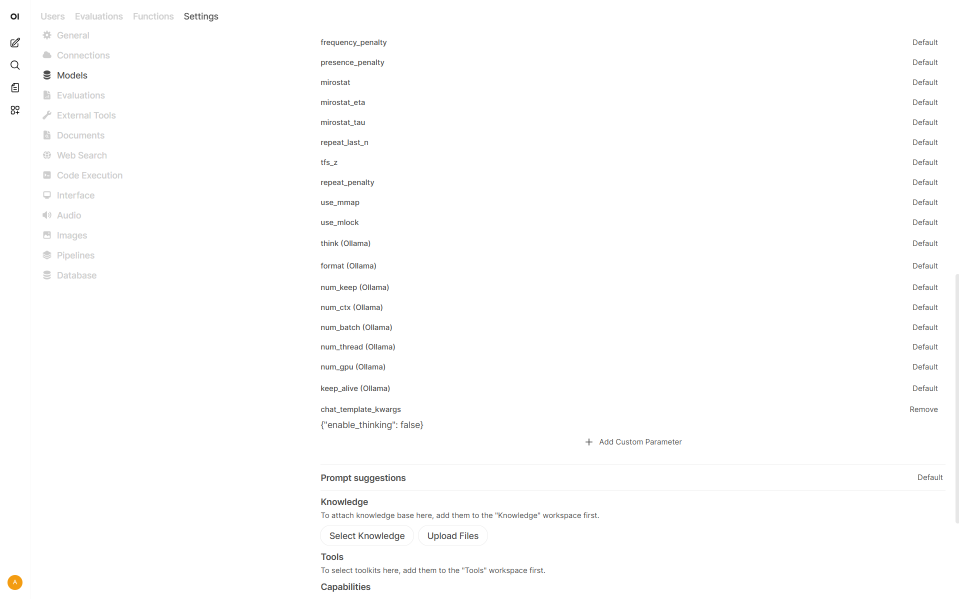
Go to Admin Panel -> Settings -> Models (http://localhost:8080/admin/settings/models)
Click on desired model, unfold Advanced Params.
Click + Add Custom Parameter.
Change parameter name to
chat_template_kwargsand content to{"reasoning_effort": "low"}.
Reference#
https://docs.openwebui.com/getting-started/quick-start/starting-with-openai-compatible
RAG#
Step 1: Model Preparation#
In addition to text generation, endpoints for embedding and reranking in Retrieval Augmented Generation can also be deployed with OpenVINO Model Server. In this demo, the embedding model is OpenVINO/Qwen3-Embedding-0.6B-fp16-ov and the the reranking model is OpenVINO/Qwen3-Reranker-0.6B-seq-cls-fp16-ov. Run the export script to download and quantize the models:
ovms.exe --pull --source_model OpenVINO/Qwen3-Embedding-0.6B-fp16-ov --model_repository_path models --task embeddings --target_device GPU
ovms.exe --add_to_config --config_path models\config.json --model_path OpenVINO\Qwen3-Embedding-0.6B-fp16-ov --model_name OpenVINO/Qwen3-Embedding-0.6B-fp16-ov
ovms.exe --pull --source_model OpenVINO/Qwen3-Reranker-0.6B-seq-cls-fp16-ov --model_repository_path models --task rerank --target_device GPU
ovms.exe --add_to_config --config_path models\config.json --model_path OpenVINO\Qwen3-Reranker-0.6B-seq-cls-fp16-ov --model_name OpenVINO/Qwen3-Reranker-0.6B-seq-cls-fp16-ov
docker run --rm -u $(id -u):$(id -g) -v $PWD/models:/models --device /dev/dri --group-add=$(stat -c "%g" /dev/dri/render* | head -n 1) openvino/model_server:weekly --pull --source_model OpenVINO/Qwen3-Embedding-0.6B-fp16-ov --model_repository_path models --task embeddings --target_device GPU
docker run --rm -u $(id -u):$(id -g) -v $PWD/models:/models openvino/model_server:weekly --add_to_config --config_path /models/config.json  --model_path OpenVINO/Qwen3-Embedding-0.6B-fp16-ov --model_name OpenVINO/Qwen3-Embedding-0.6B-fp16-ov
docker run --rm -u $(id -u):$(id -g) -v $PWD/models:/models --device /dev/dri --group-add=$(stat -c "%g" /dev/dri/render* | head -n 1) openvino/model_server:weekly --pull --source_model OpenVINO/Qwen3-Reranker-0.6B-seq-cls-fp16-ov --model_repository_path models --task rerank --target_device GPU
docker run --rm -u $(id -u):$(id -g) -v $PWD/models:/models openvino/model_server:weekly --add_to_config --config_path /models/config.json  --model_path OpenVINO/Qwen3-Reranker-0.6B-seq-cls-fp16-ov --model_name OpenVINO/Qwen3-Reranker-0.6B-seq-cls-fp16-ov
Keep the model server running or restart it. Here are the basic calls to check if they work:
curl http://localhost:8000/v3/embeddings -H "Content-Type: application/json" -d "{\"model\":\"OpenVINO/Qwen3-Embedding-0.6B-fp16-ov\",\"input\":\"hello world\"}"
curl http://localhost:8000/v3/rerank -H "Content-Type: application/json" -d "{\"model\":\"OpenVINO/Qwen3-Reranker-0.6B-seq-cls-fp16-ov\",\"query\":\"welcome\",\"documents\":[\"good morning\",\"farewell\"]}"
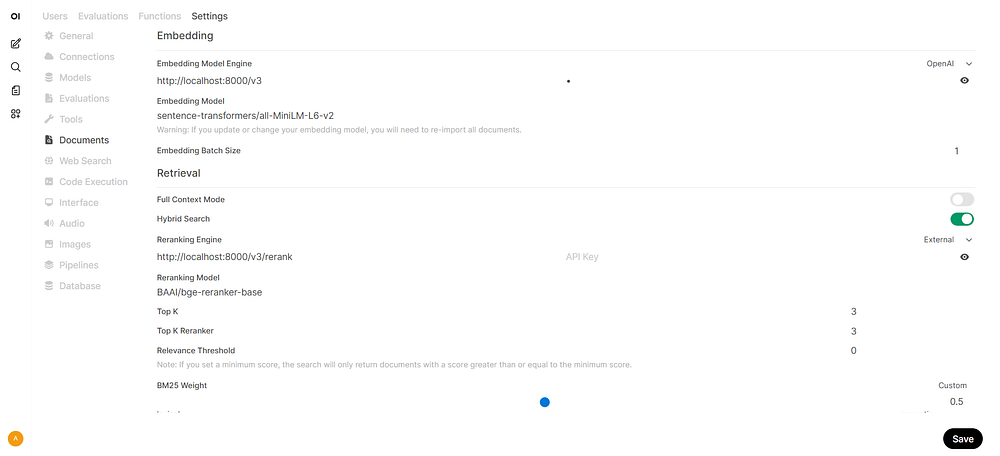
Step 2: Documents Setting#
Go to Admin Panel → Settings → Documents (http://localhost:8080/admin/settings/documents)
Select OpenAI for Embedding Model Engine
URL:
http://localhost:8000/v3Set Engine type to
OpenAIEmbedding Model:
OpenVINO/Qwen3-Embedding-0.6B-fp16-ovPut anything in API key
Enable Hybrid Search
Select External for Reranking Engine
URL:
http://localhost:8000/v3/rerankSet Engine type to
ExternalReranking Model:
OpenVINO/Qwen3-Reranker-0.6B-seq-cls-fp16-ov
Click Save
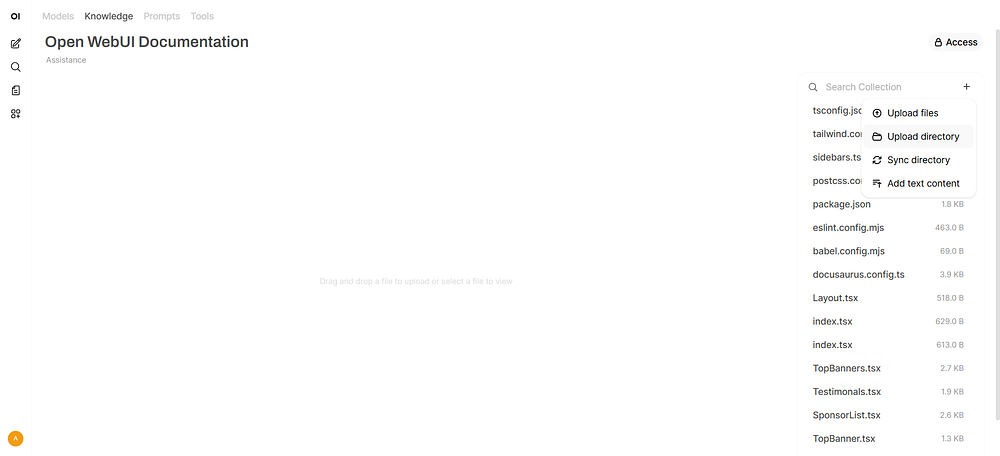
Step 3: Knowledge Base#
Prepare the Documentation
The documentation used in this demo is open-webui/docs. Download and extract it to get the folder.
Go to Workspace → Knowledge → + New Knowledge (http://localhost:8080/workspace/knowledge/create)
Name and describe the knowledge base
Click Create Knowledge
Click +Add Content → Upload directory, then select the extracted folder. This will upload all files with suitable extensions.
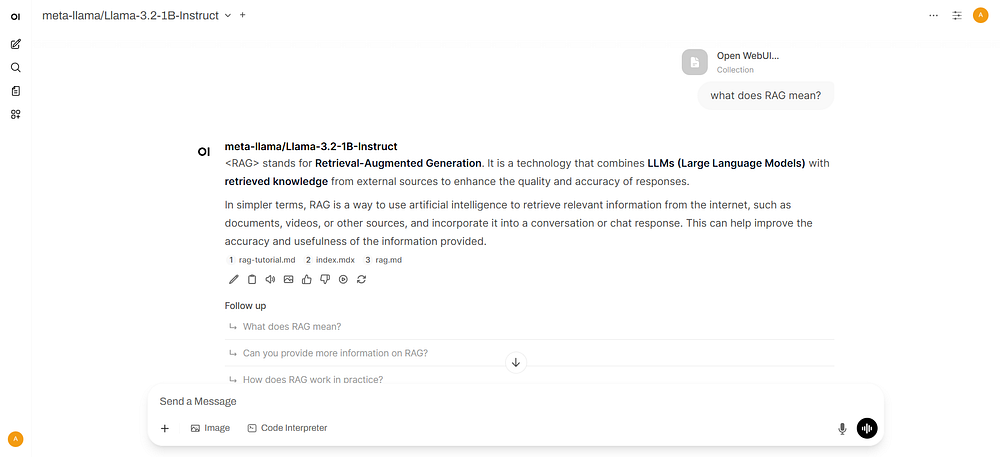
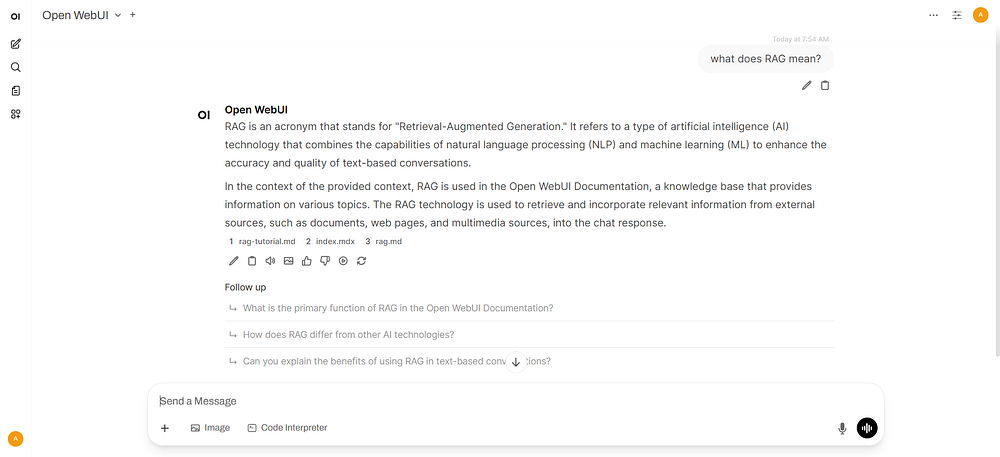
Step 4: Chat with RAG#
Click New Chat. Enter
#symbolSelect documents that appear above the chat box for retrieval. Document icons will appear above Send a Message.
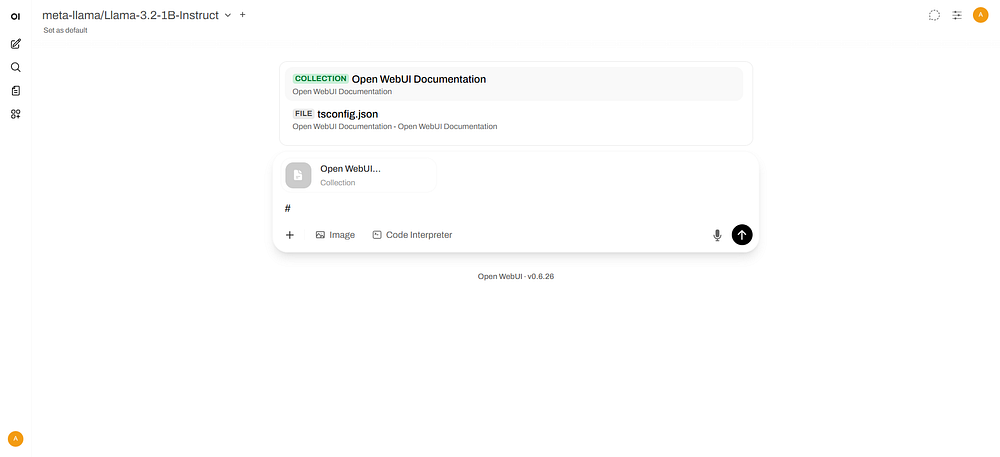
Enter a query and send
Step 5: RAG-enabled Model#
Go to Workspace → Models → + New Model (http://localhost:8080/workspace/models/create)
Configure the Model:
Name the model
Select a base model from the list
Click Select Knowledge and select a knowledge base for retrieval
Click Save & Create
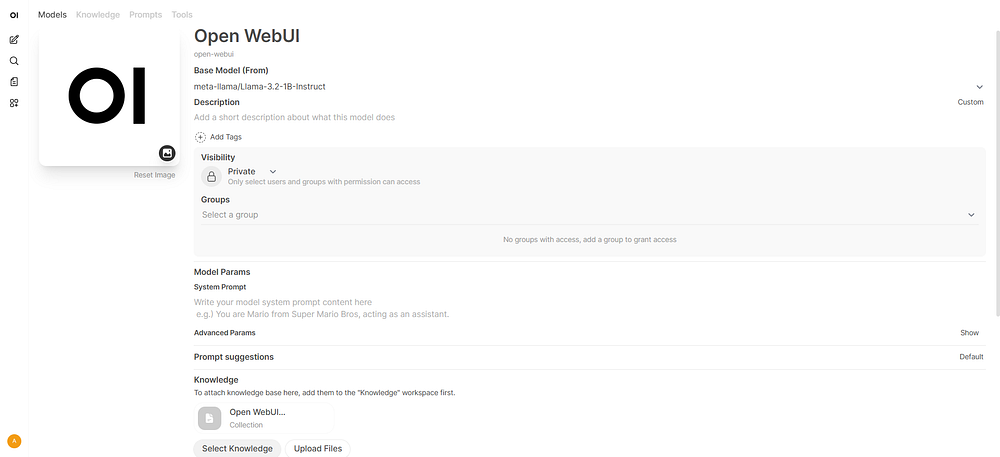
Click the created model and start chatting
Reference#
https://docs.openvino.ai/2026/model-server/ovms_demos_continuous_batching_rag.html
Image Generation#
Step 1: Model Preparation#
The image generation model used in this demo is OpenVINO/FLUX.1-schnell-int4-ov. Run the ovms with –pull parameter to download and quantize the model:
ovms.exe --pull --source_model OpenVINO/FLUX.1-schnell-int4-ov --model_repository_path models --model_name OpenVINO/FLUX.1-schnell-int4-ov --task image_generation --default_num_inference_steps 3 --target_device GPU
ovms.exe --add_to_config --config_path models\config.json --model_path OpenVINO\FLUX.1-schnell-int4-ov --model_name OpenVINO/FLUX.1-schnell-int4-ov
docker run --rm -u $(id -u):$(id -g) -v $PWD/models:/models --device /dev/dri --group-add=$(stat -c "%g" /dev/dri/render* | head -n 1) openvino/model_server:weekly --pull --source_model OpenVINO/FLUX.1-schnell-int4-ov --model_repository_path models --model_name OpenVINO/FLUX.1-schnell-int4-ov --task image_generation --default_num_inference_steps 3 --target_device GPU
docker run --rm -u $(id -u):$(id -g) -v $PWD/models:/models openvino/model_server:weekly  --add_to_config --config_path /models/config.json  --model_path OpenVINO/FLUX.1-schnell-int4-ov --model_name OpenVINO/FLUX.1-schnell-int4-ov
Keep the model server running or restart it. Here is the basic call to check if it works:
curl http://localhost:8000/v3/images/generations -H "Content-Type: application/json" -d "{\"model\":\"OpenVINO/FLUX.1-schnell-int4-ov\",\"prompt\":\"anime\",\"num_inference_steps\":1,\"size\":\"256x256\",\"response_format\":\"b64_json\"}"
Step 2: Image Generation Setting#
Note: The instructions below were tested with Open WebUI v0.8.x. If you are using an older version (pre-v0.7.0), the settings UI and image generation methods may differ.
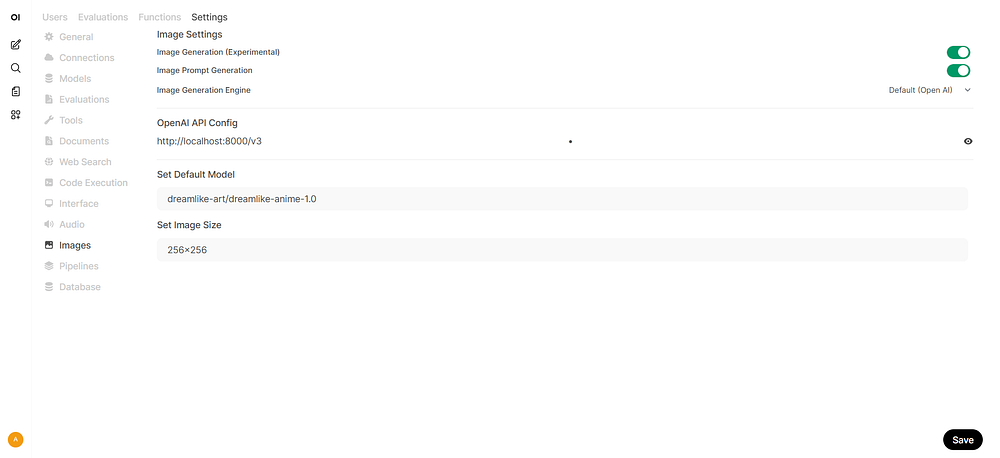
Go to Admin Panel → Settings → Images (http://localhost:8080/admin/settings/images)
Set the Image Generation Engine to
Open AIConfigure the OpenAI API connection:
URL:
http://localhost:8000/v3Put anything in API key
Enable Image Generation (Experimental)
Set Default Model: eg
OpenVINO/FLUX.1-schnell-int4-ovSet Image Size. Must be in WxH format, example:
256x256
Click Save
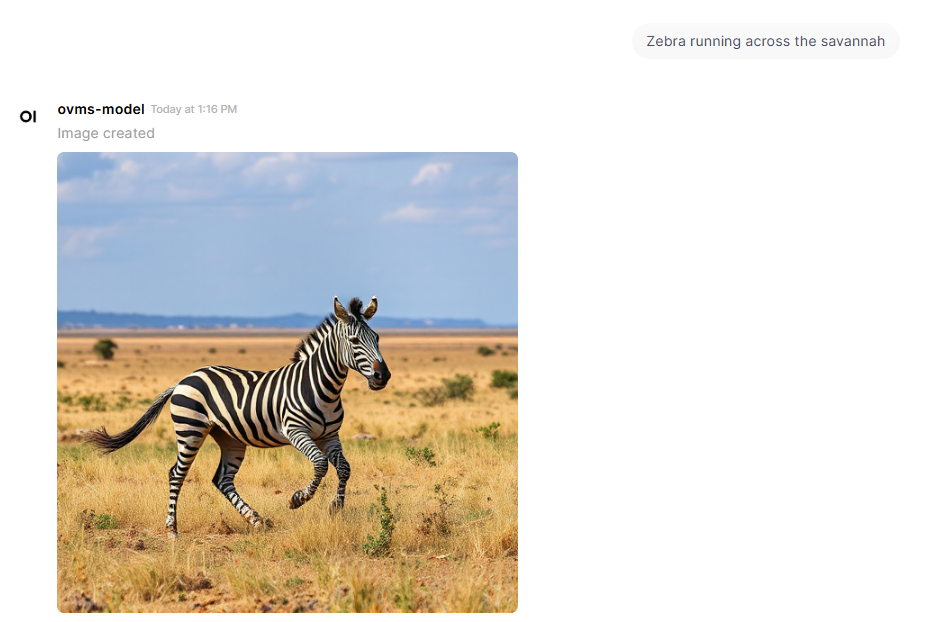
Step 3: Generate Image#
In the chat window, expand the
IntegrationsmenuToggle the Image switch to on
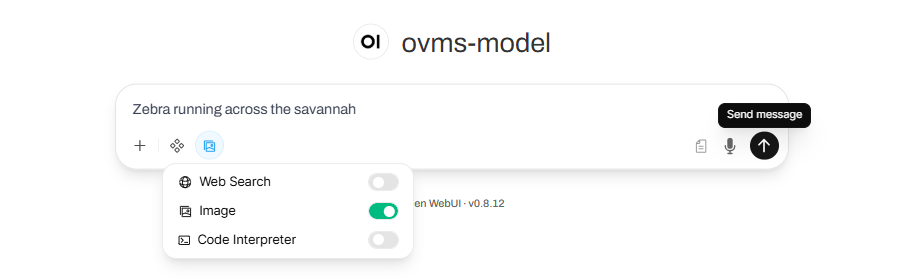
Enter a prompt describing the image you want and send
Alternative methods (Open WebUI v0.7.0+):
Restore “Generate Image” Button — The built-in button on assistant messages was removed in v0.7.0. You can restore it by importing a community action: click Get to import, then enable it in Admin Panel → Functions. Assistant messages will then show a Generate Image icon in the action bar.
Reference#
https://docs.openvino.ai/2026/model-server/ovms_demos_image_generation.html https://docs.openwebui.com/features/chat-conversations/image-generation-and-editing/openai https://docs.openwebui.com/features/chat-conversations/image-generation-and-editing/usage/
VLM#
Step 1: Model Preparation#
The vision language model used in this demo is OpenVINO/Qwen3-VL-8B-Instruct-int4-ov. Run the ovms with –pull parameter to download and quantize the model:
ovms.exe --pull --source_model OpenVINO/Qwen3-VL-8B-Instruct-int4-ov --model_repository_path models --model_name ovms-model-vl --task text_generation --pipeline_type VLM_CB --target_device GPU
ovms.exe --add_to_config --config_path models\config.json --model_path OpenVINO/Qwen3-VL-8B-Instruct-int4-ov --model_name ovms-model-vl
docker run --rm -u $(id -u):$(id -g) -v $PWD/models:/models --device /dev/dri --group-add=$(stat -c "%g" /dev/dri/render* | head -n 1) openvino/model_server:weekly --pull --source_model OpenVINO/Qwen3-VL-8B-Instruct-int4-ov --model_repository_path /models --model_name ovms-model-vl --task text_generation --pipeline_type VLM_CB --target_device GPU
docker run --rm -u $(id -u):$(id -g) -v $PWD/models:/models openvino/model_server:weekly --add_to_config --config_path /models/config.json  --model_path OpenVINO/Qwen3-VL-8B-Instruct-int4-ov --model_name ovms-model-vl
Keep the model server running or restart it. Here is the basic call to check if it works:
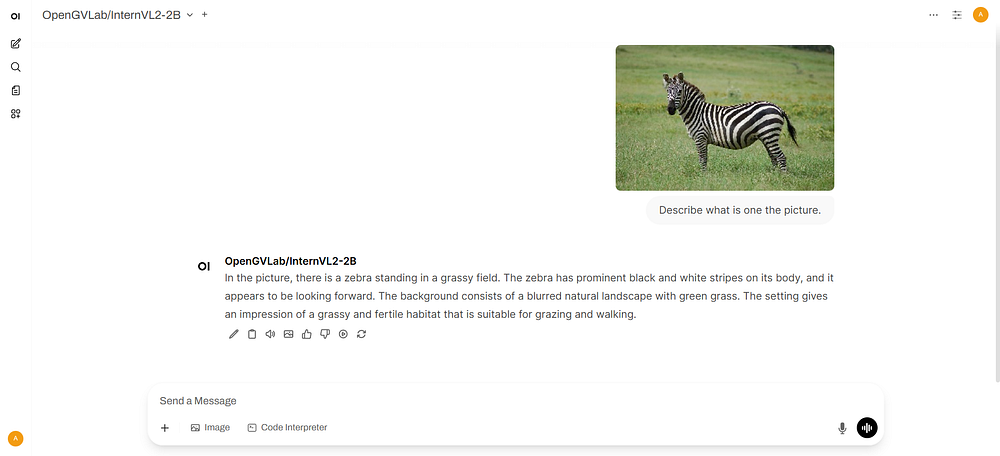
curl http://localhost:8000/v3/chat/completions -H "Content-Type: application/json" -d "{ \"model\": \"ovms-model-vl\", \"messages\":[{\"role\": \"user\", \"content\": [{\"type\": \"text\", \"text\": \"what is in the picture?\"},{\"type\": \"image_url\", \"image_url\": {\"url\": \"http://raw.githubusercontent.com/openvinotoolkit/model_server/refs/heads/releases/2025/3/demos/common/static/images/zebra.jpeg\"}}]}], \"max_completion_tokens\": 100}"
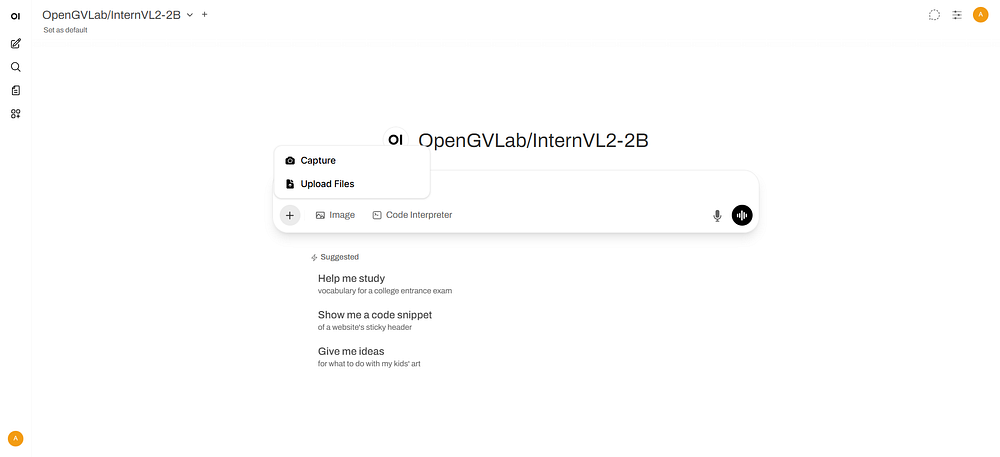
Step 2: Chat with VLM#
Start a New Chat and choose
ovms-model-vlmodelClick +More to upload images, by capturing the screen or uploading files. The image used in this demo is http://raw.githubusercontent.com/openvinotoolkit/model_server/refs/heads/releases/2025/3/demos/common/static/images/zebra.jpeg.
 3. Enter a query and send
Reference#
https://docs.openvino.ai/2026/model-server/ovms_demos_continuous_batching_vlm.html
AI agent with Tools#
Step 1: Start Tool Server#
Start a OpenAPI tool server available in the openapi-servers repo. The server used in this demo is open-webui/openapi-servers. Run it locally at http://localhost:9000:
pip install mcpo
pip install mcp_weather_server
mcpo --port 9000 -- python -m mcp_weather_server
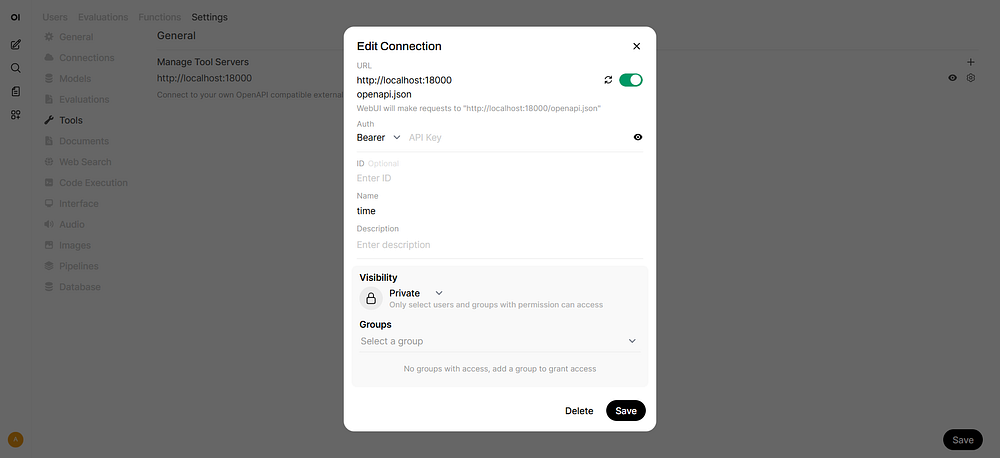
Step 2: Tools Setting#
Go to Admin Panel → Settings → Integrations
Click +Manage Tool Servers
URL:
http://localhost:9000Name the tool
Click Save
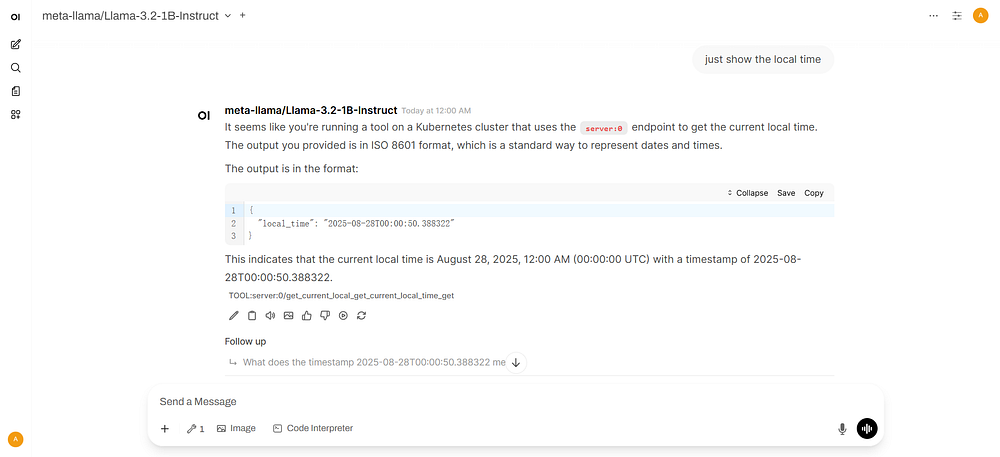
Step 3: Chat with AI Agent#
Click Integrations → Tools and toggle on the tool

Enter a query and send
Reference#
https://docs.openwebui.com/features/extensibility/plugin/tools/openapi-servers/open-webui
Using Web Search#
Step 1: Configure Web Search#
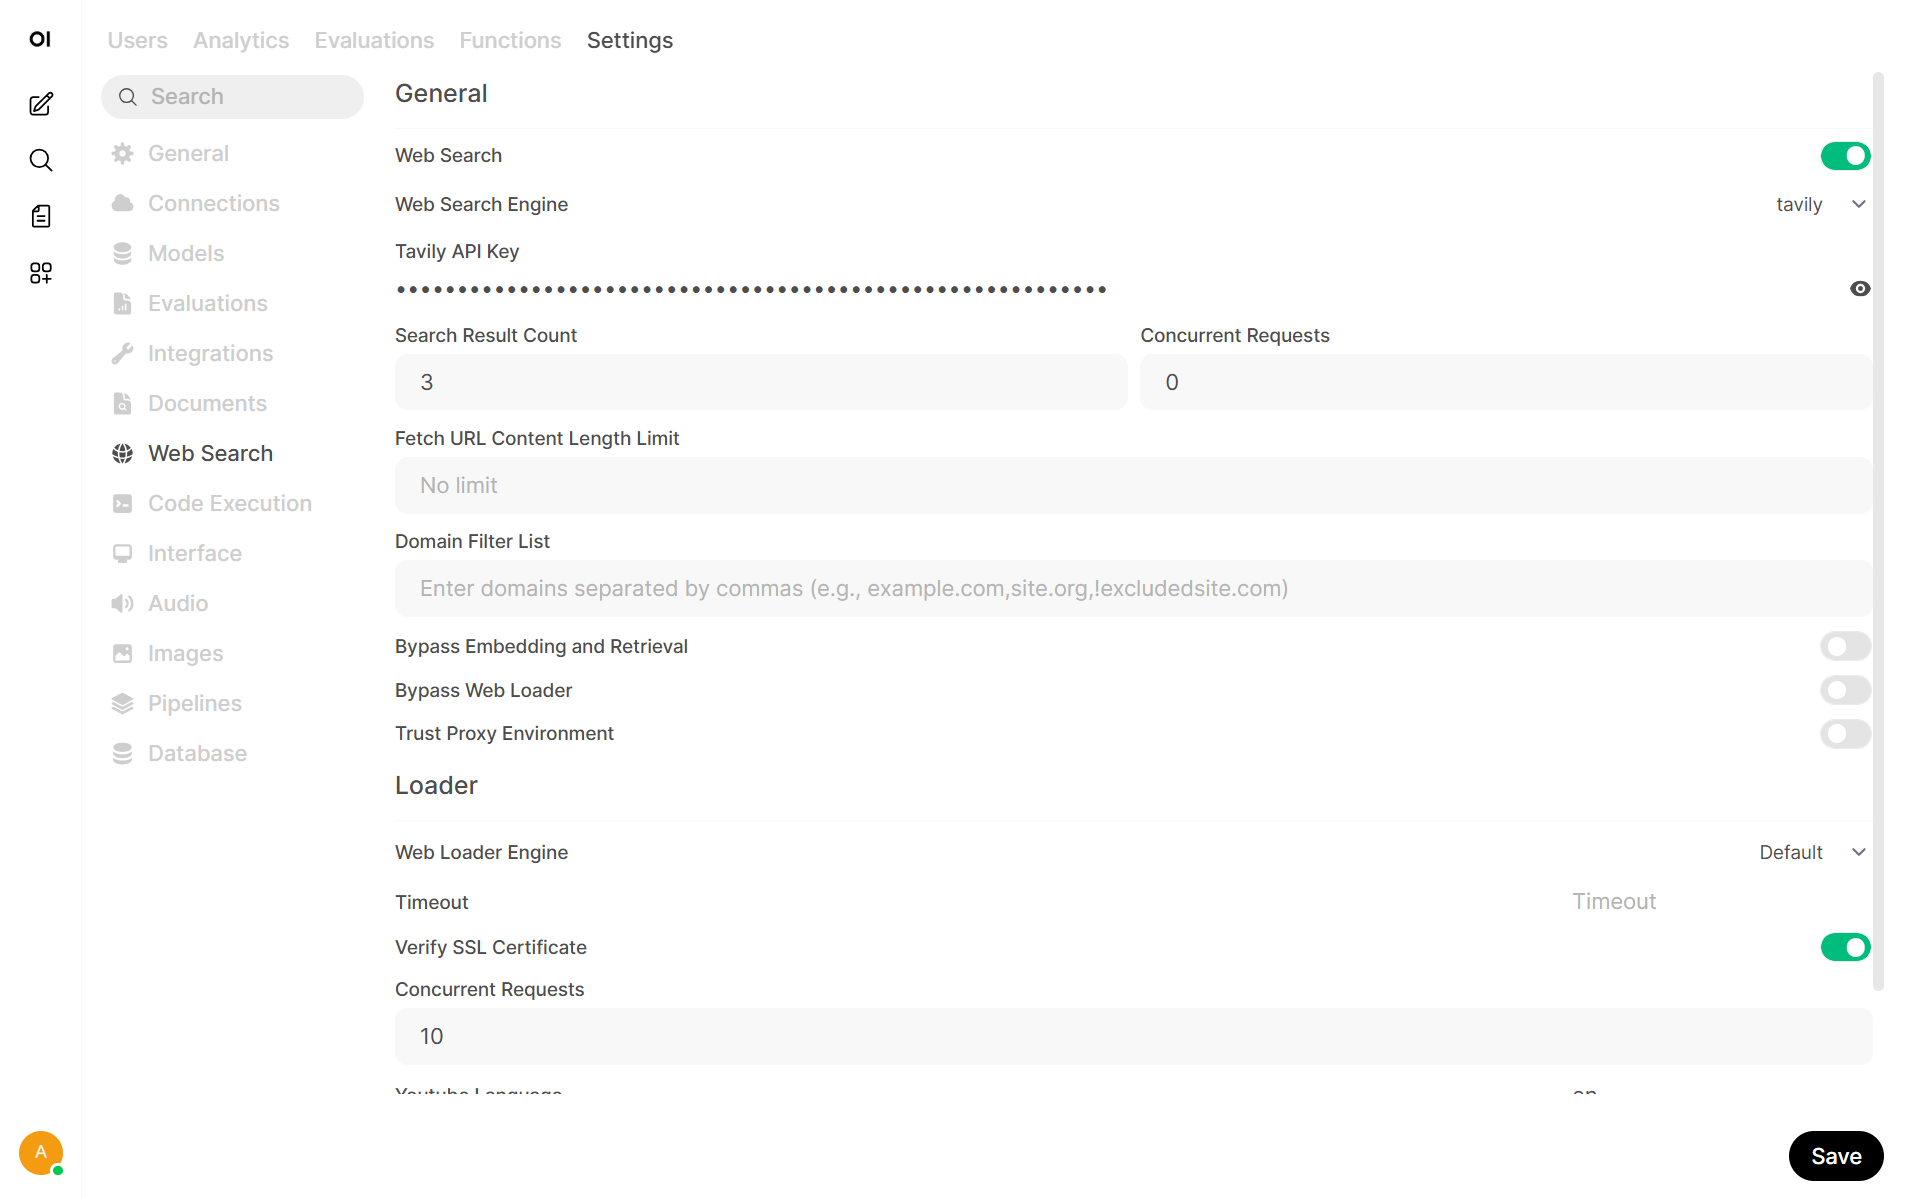
Go to Admin Panel → Settings → Web Search
Enable Web Search
Choose Web Search Engine
Add API Key
Click Save
Step 2: Enable Web Search in model#
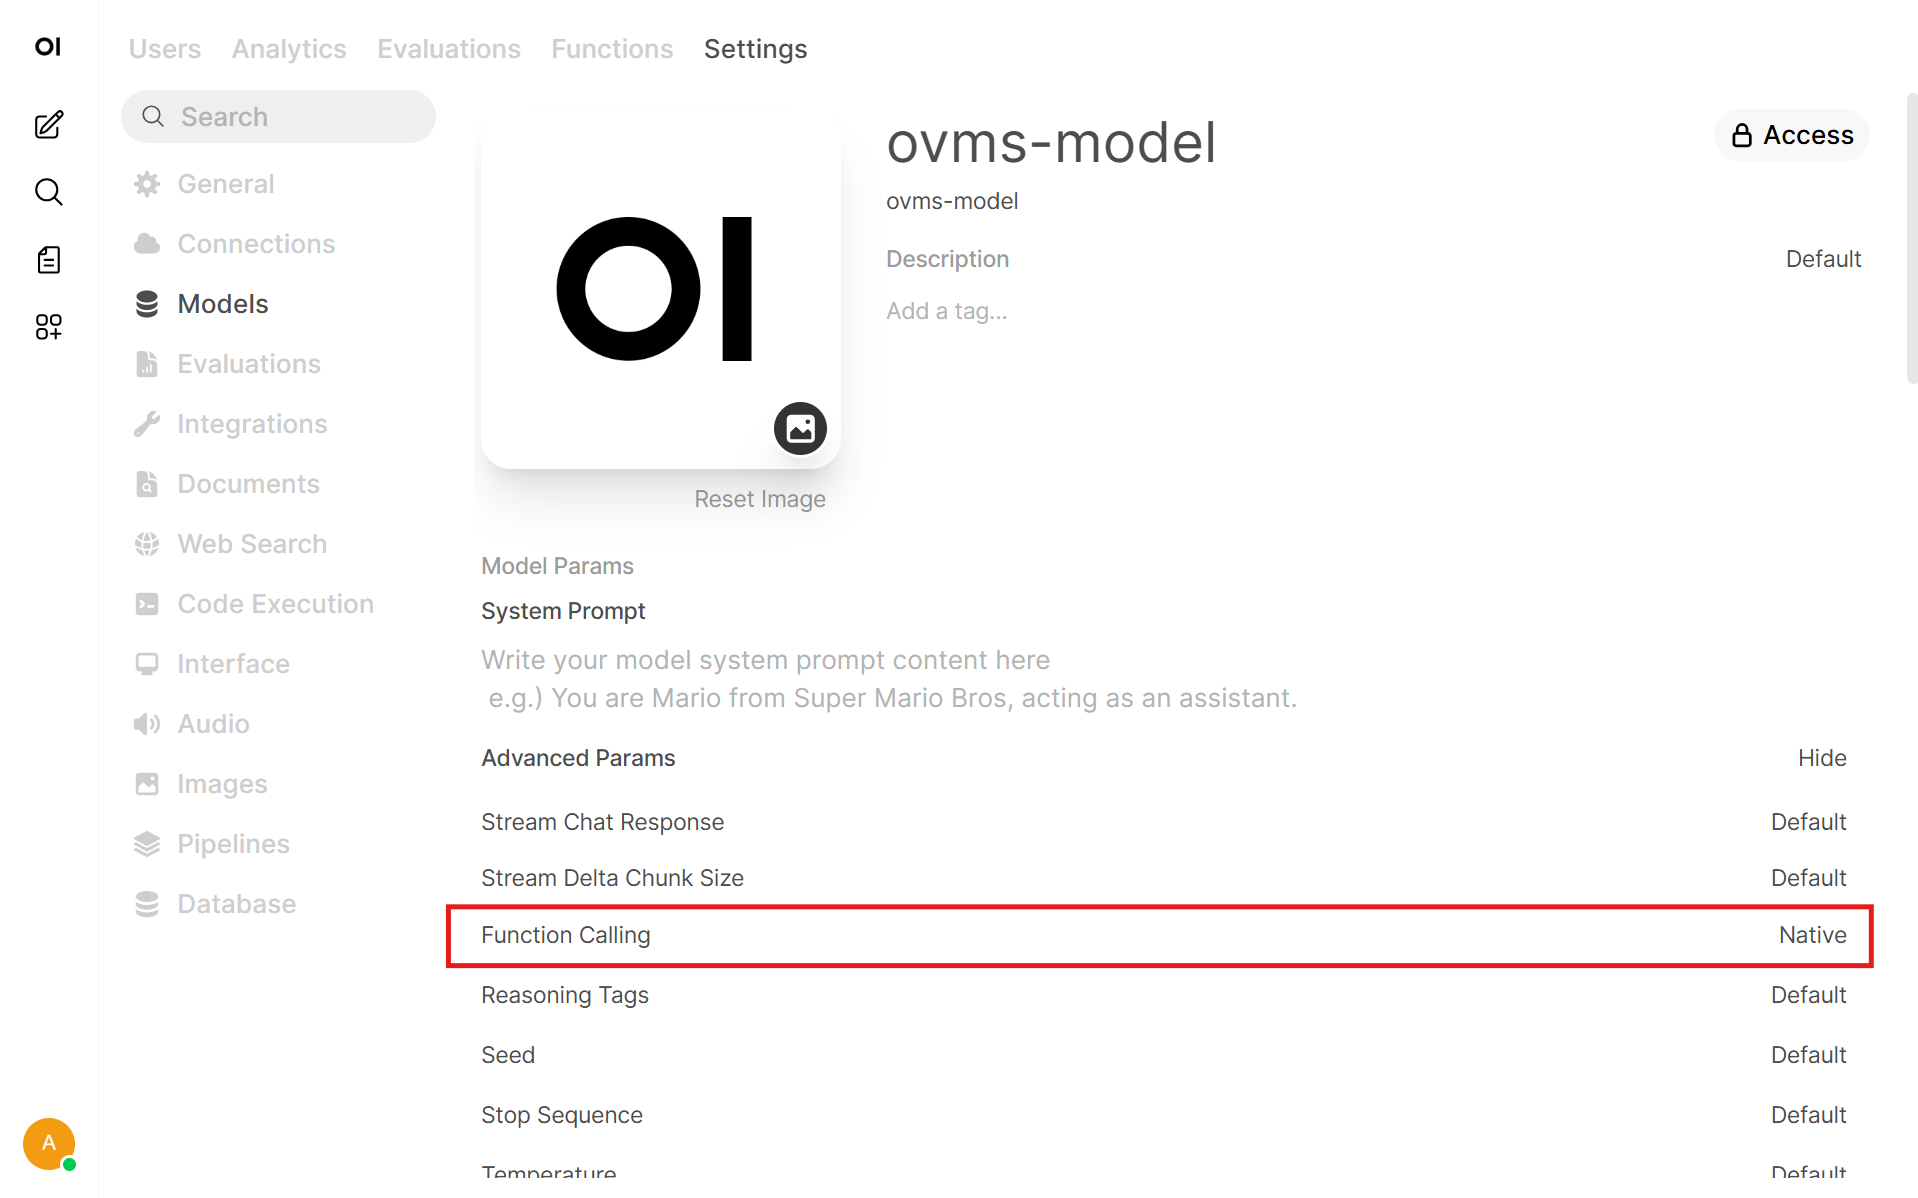
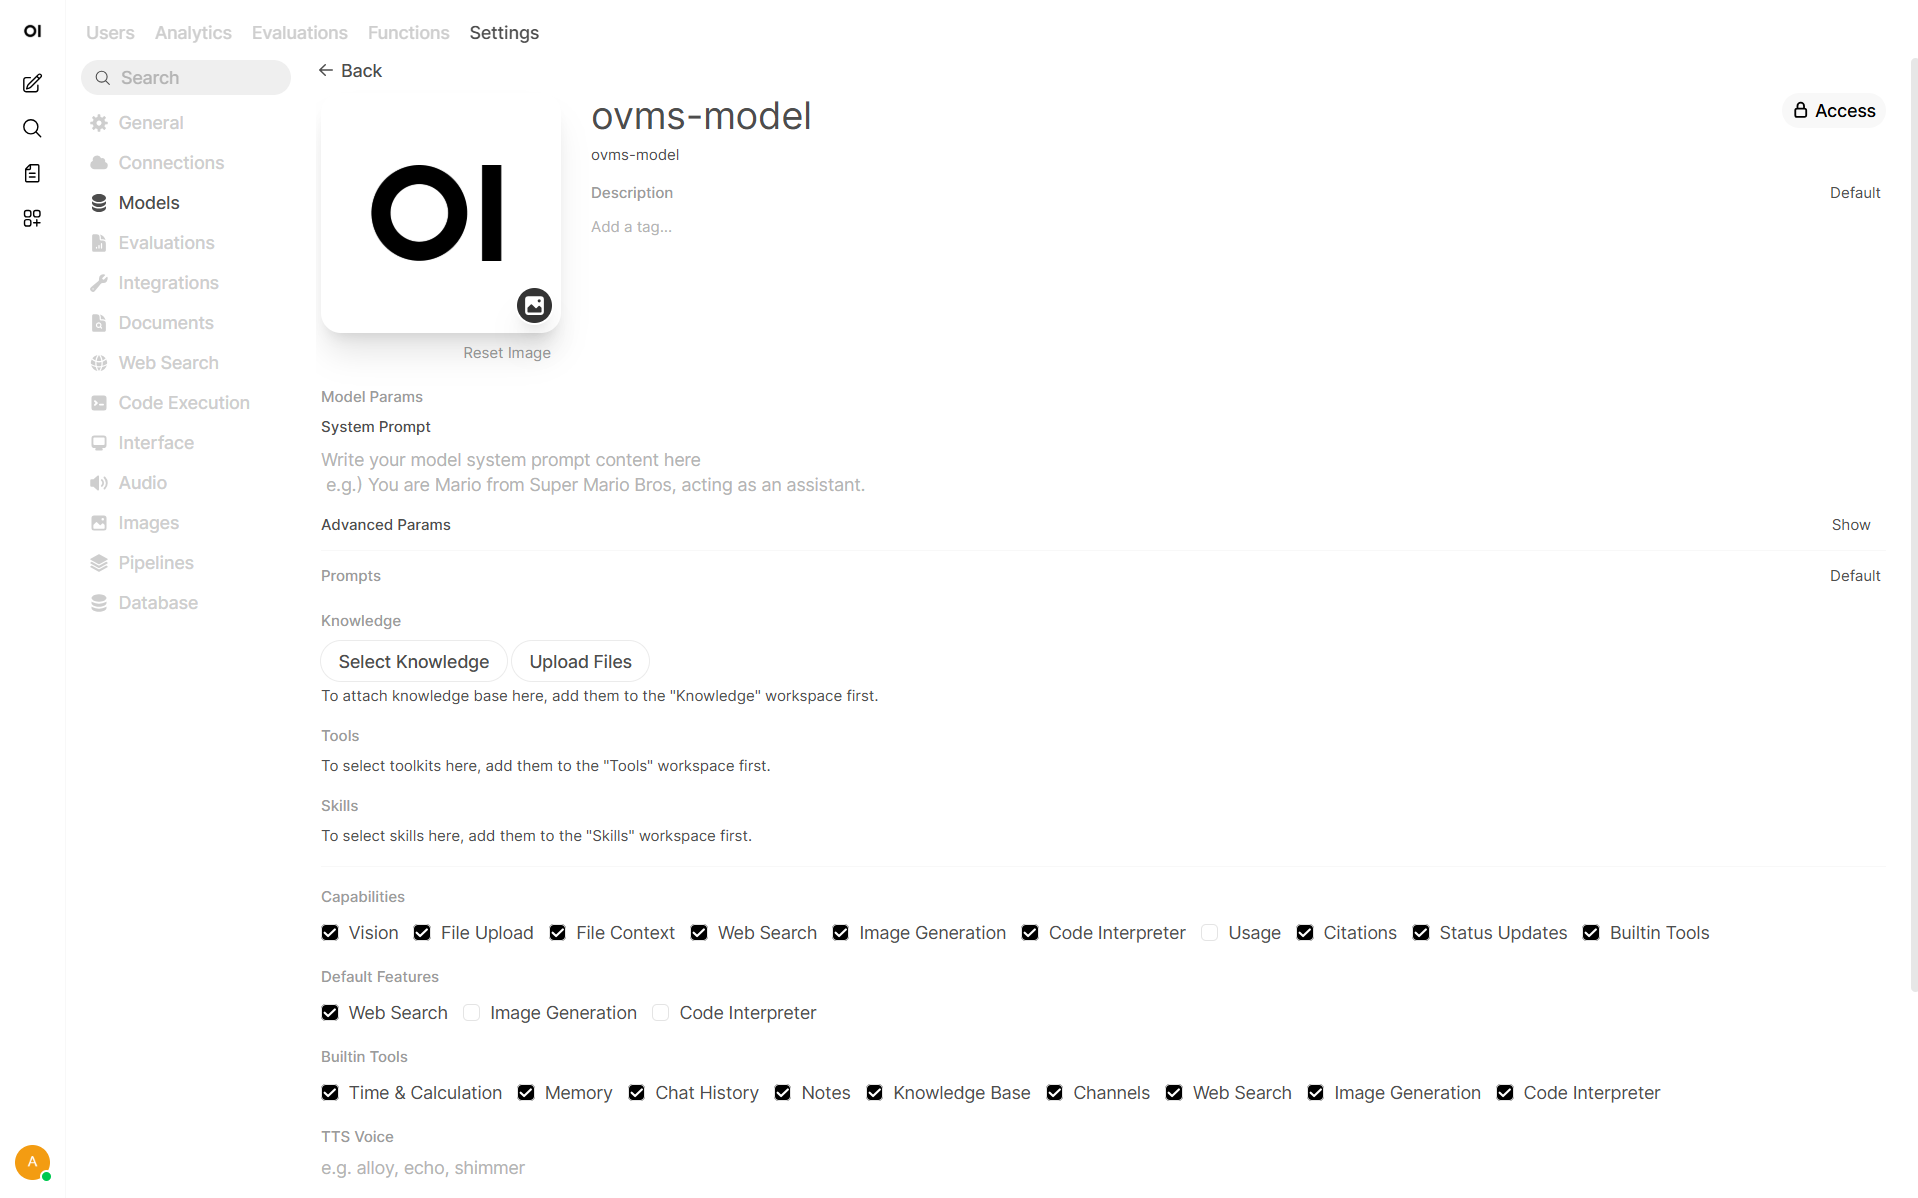
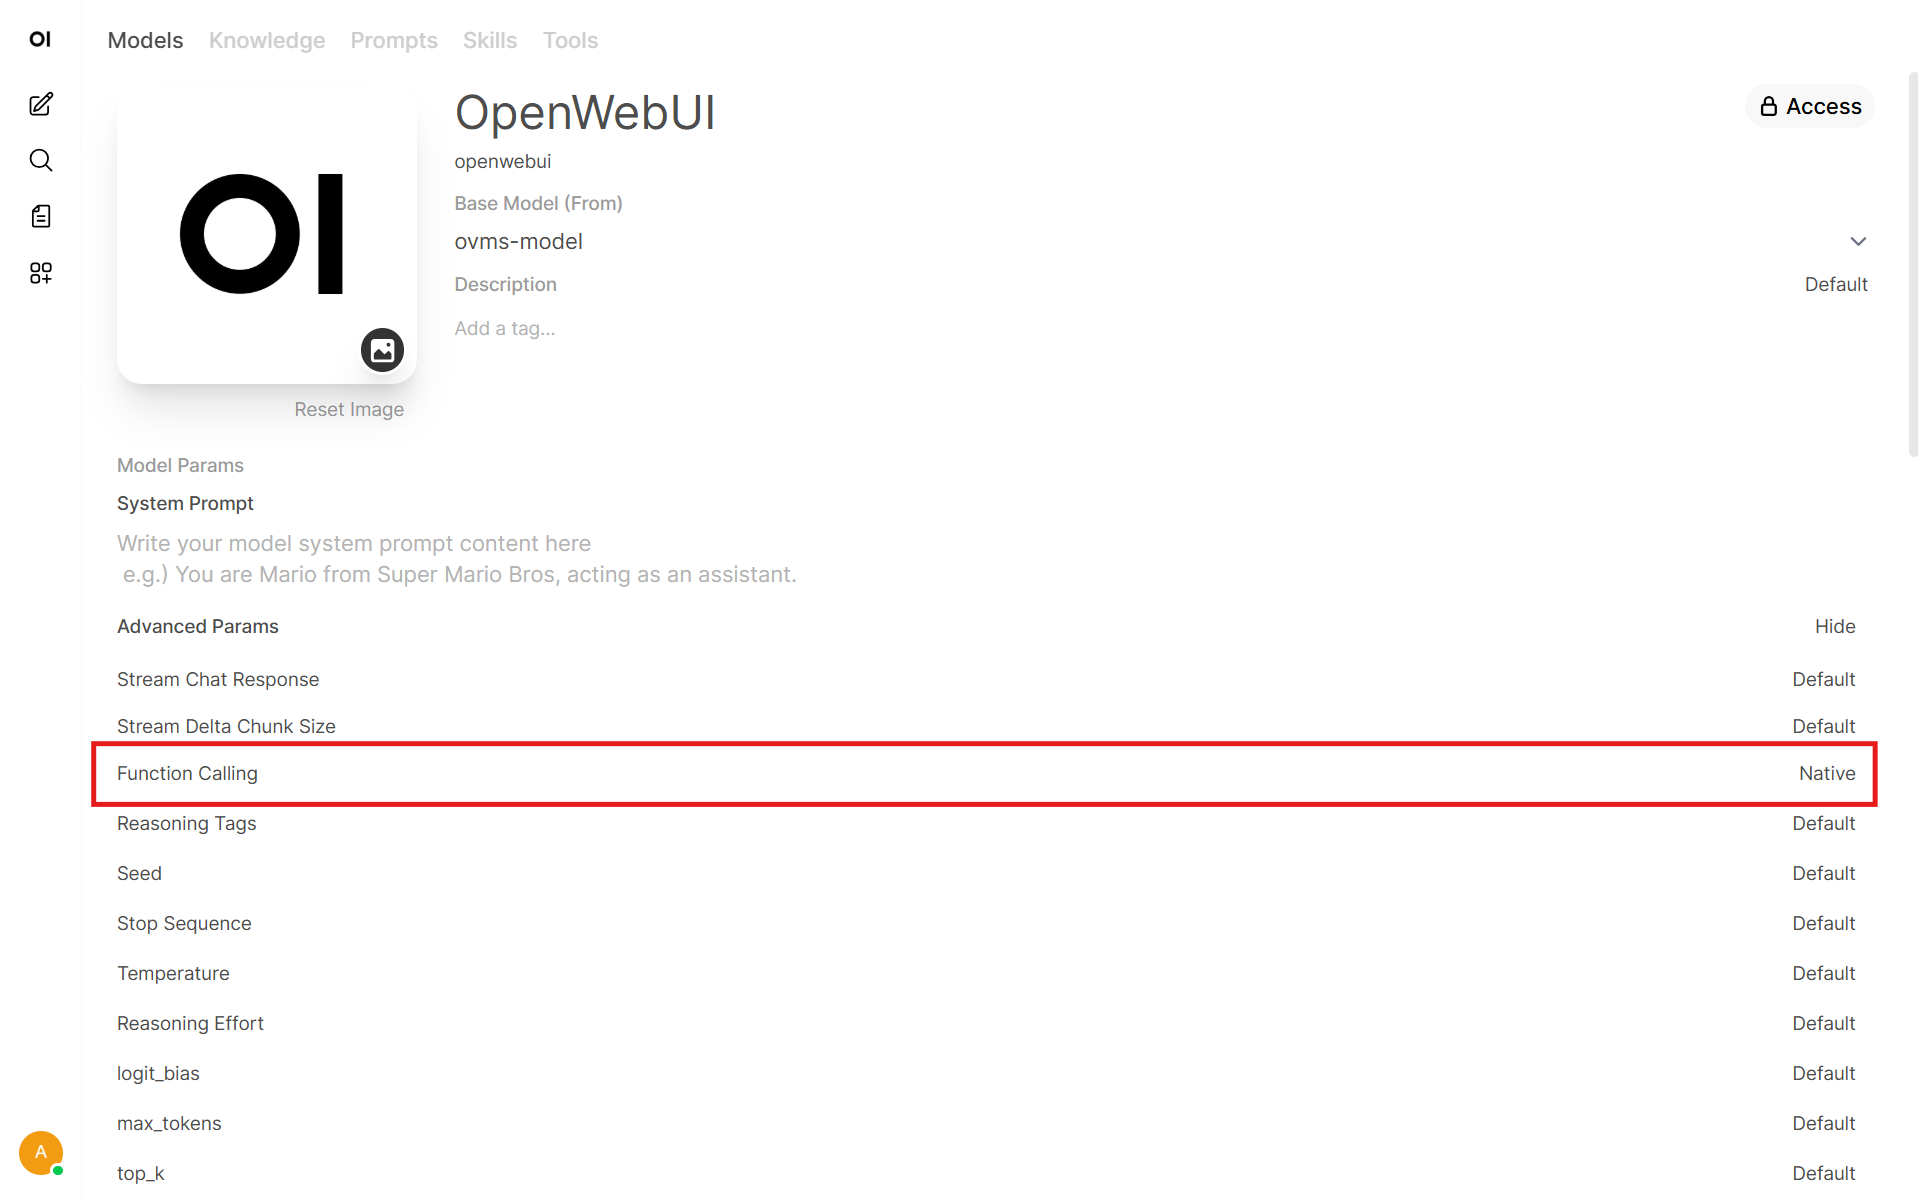
Go to Admin Panel → Settings → Models
Choose desired model
Enable Web Search capability
In Default Features enable Web Search or toggle it in the chat
In Advanced Parameters set Function Calling to Native
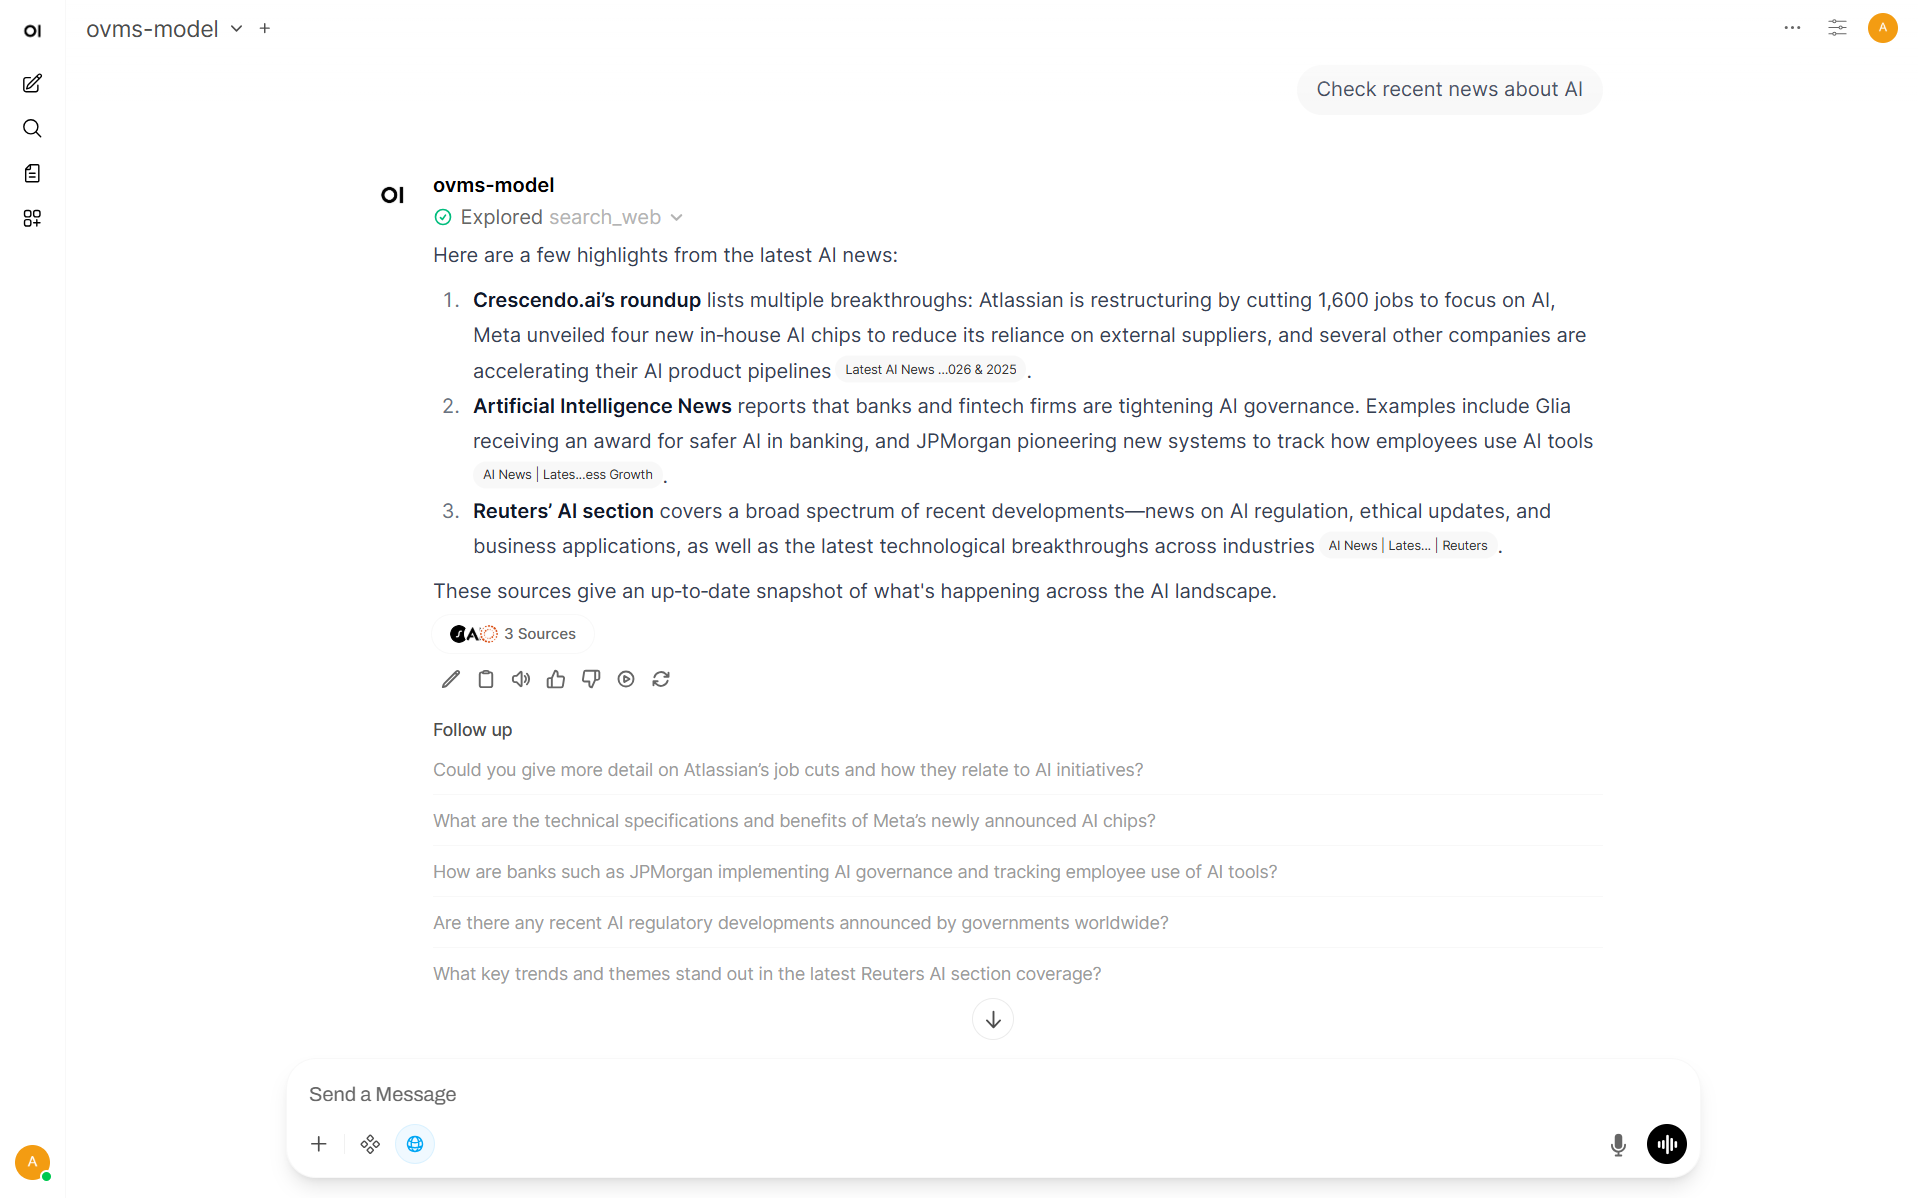
Step 3: Use Web Search in the chat#
Open new Chat
Enable Web Search, if it’s not displayed as blue icon below.
Send the prompt
Reference#
https://docs.openwebui.com/features/chat-conversations/web-search/agentic-search/
Adding Context to the prompt#
In Open WebUI, users can add additional context to their chats using the Memory feature. This allows models to access shared information across all conversations.
To configure it:
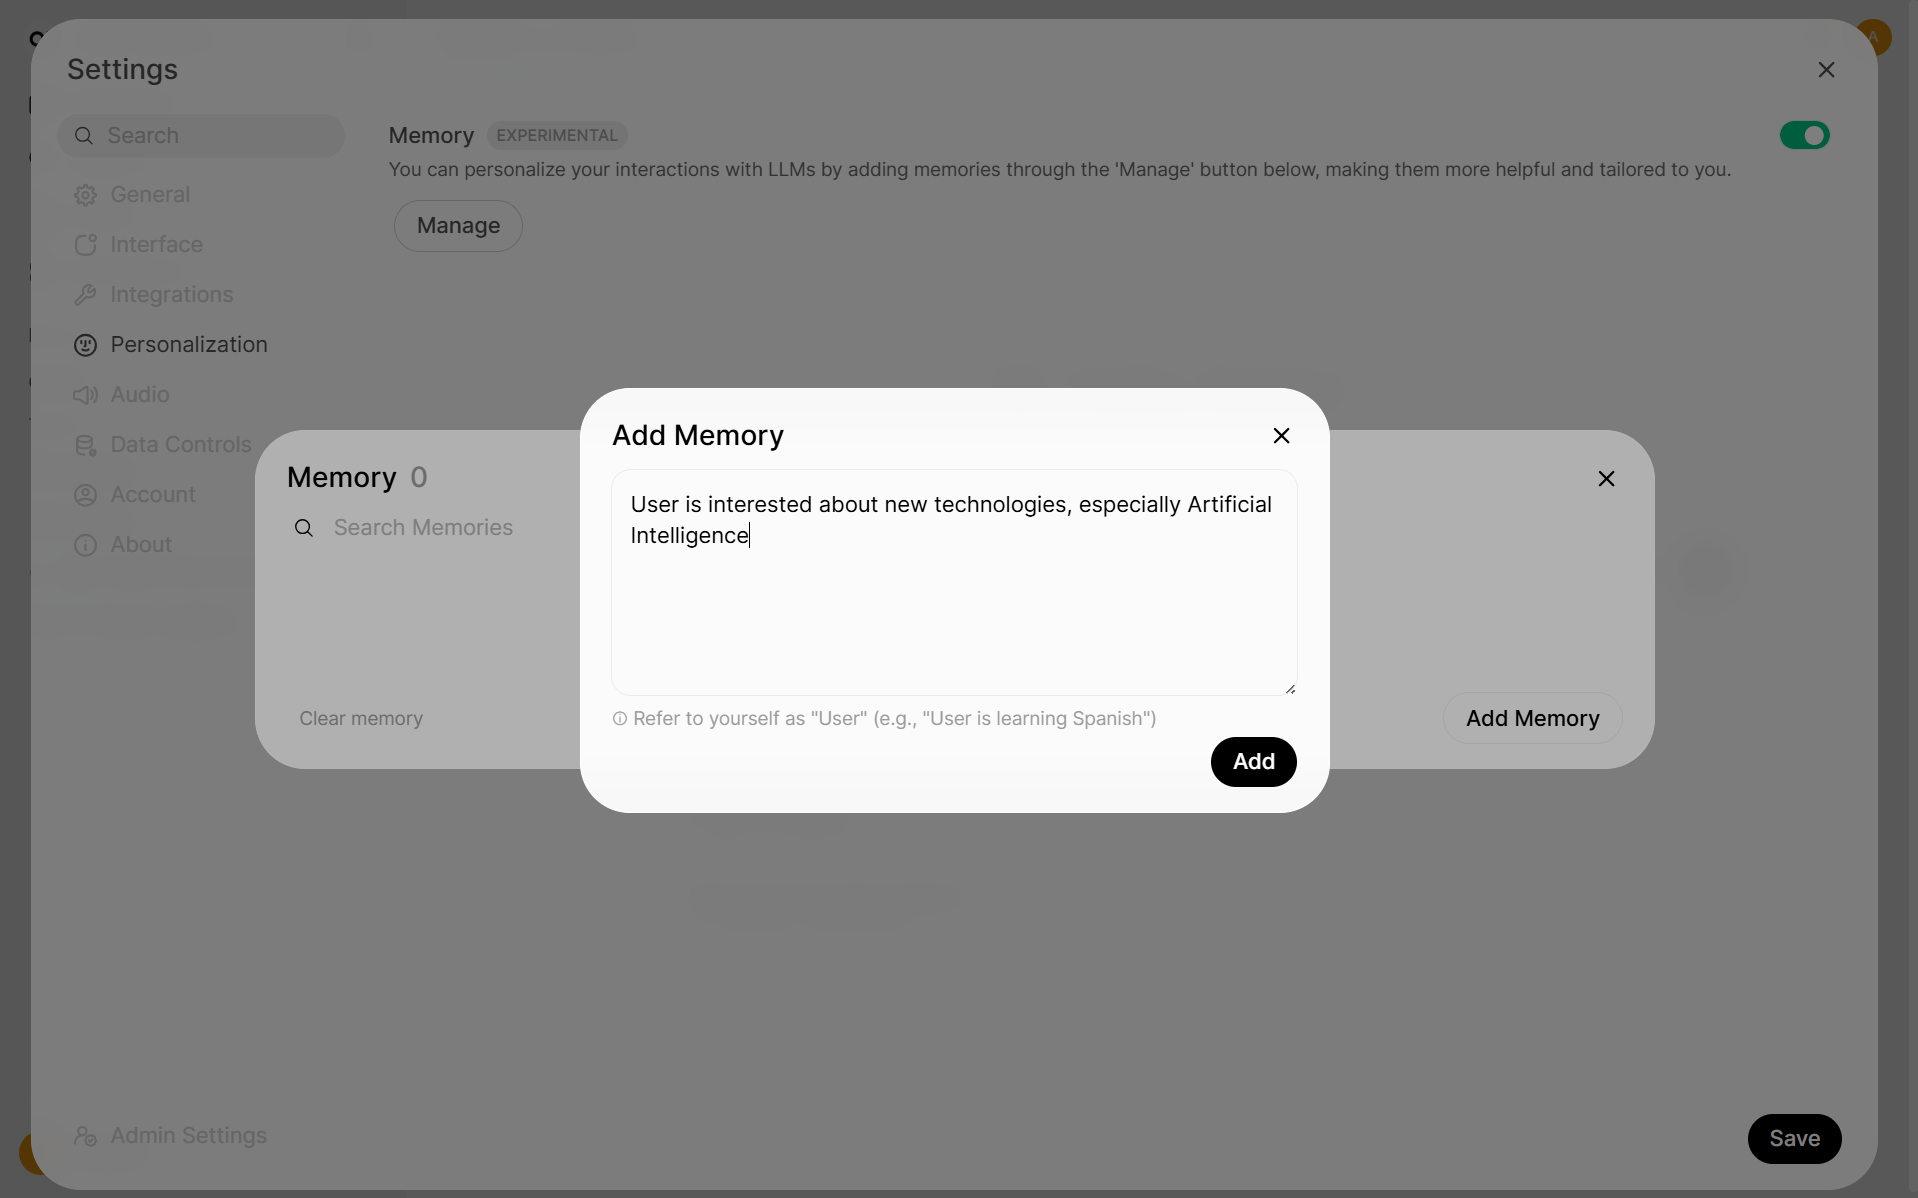
Go to Settings → Personalization
Enable Memory
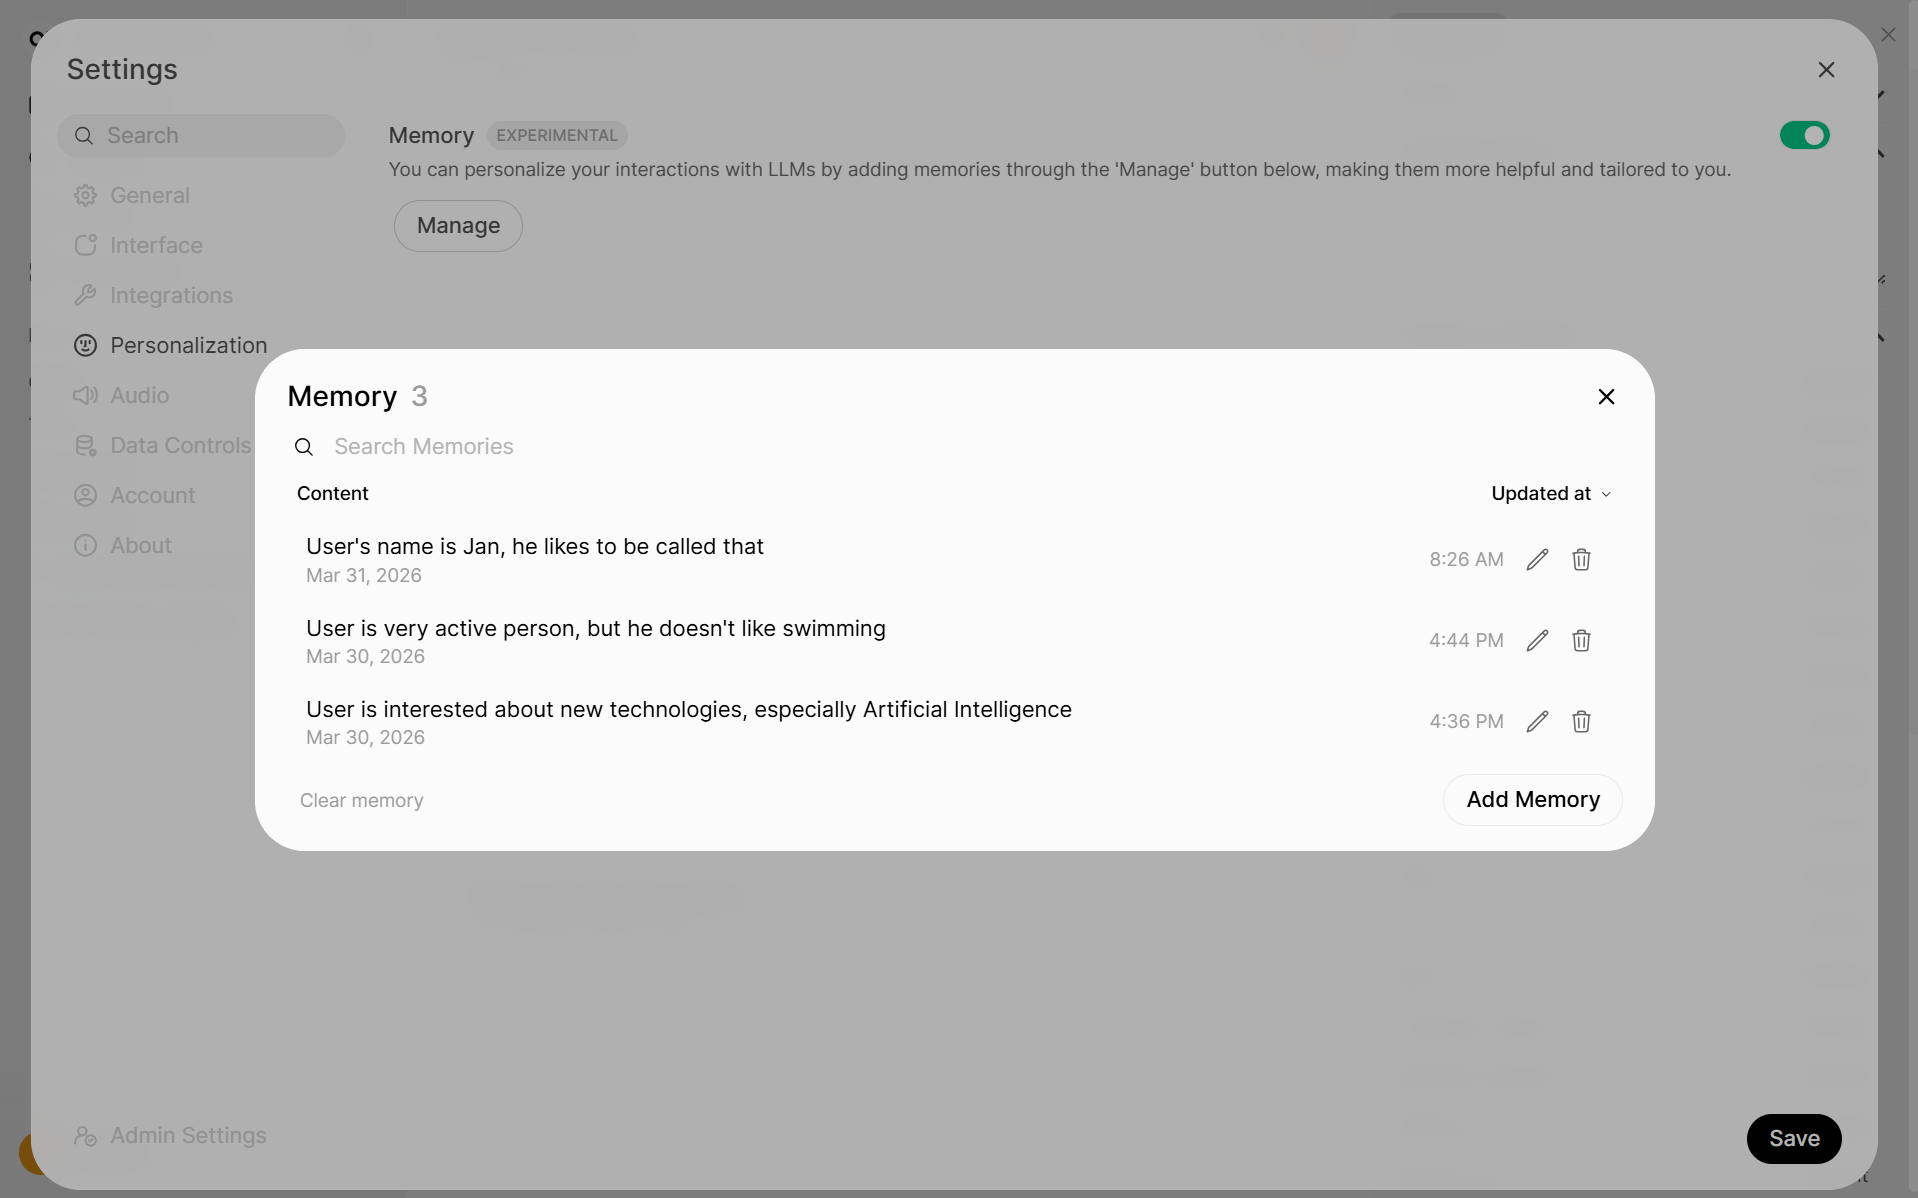
Click Manage
Click Add Memory
Enter the information
It’s possible to have multiple manageable memory records.
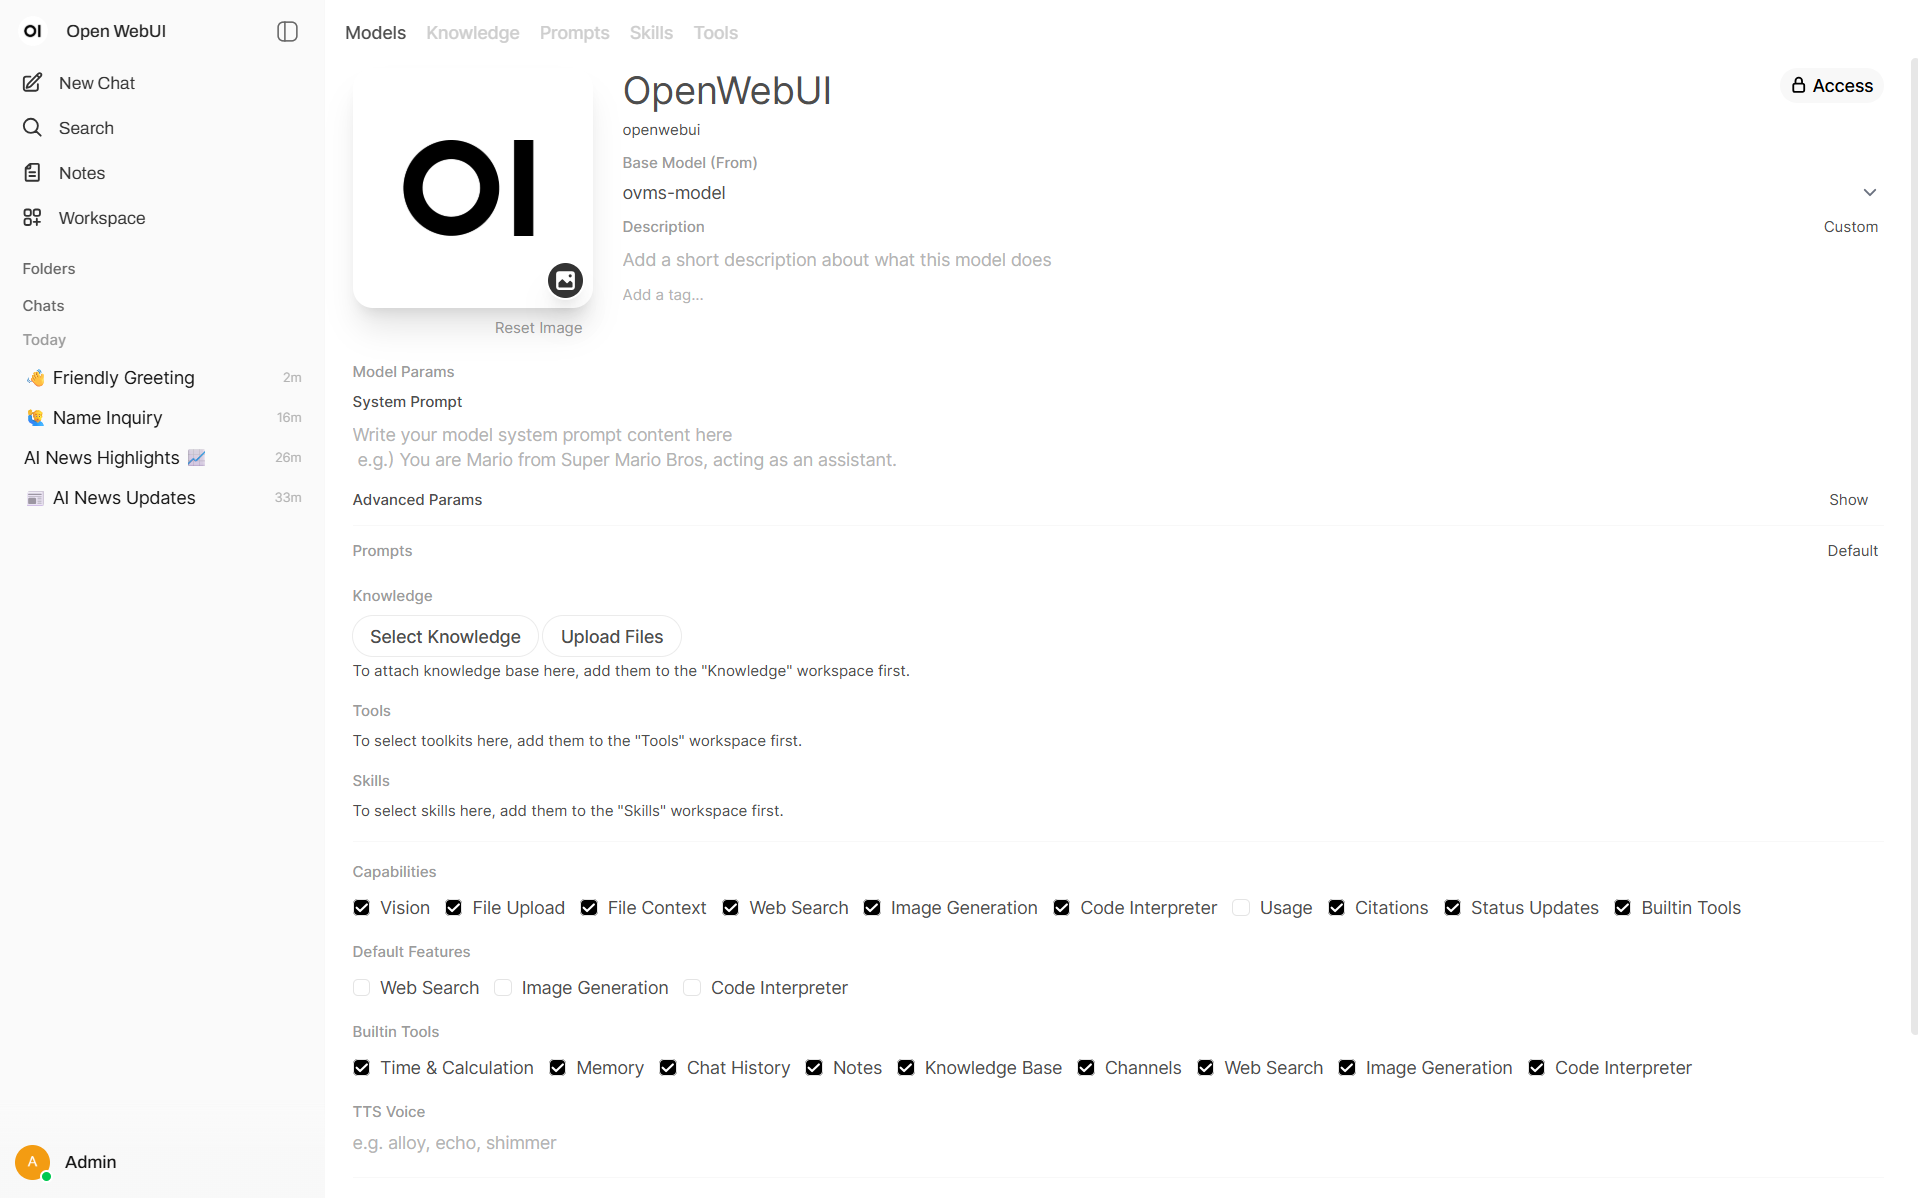
Then workspace model should be created:
Go to Workspace → Models
Choose model or create it.
In Buildin Tools section enable Memory
In Advanced Parameters set Function Calling to Native
It’s now available in all chats:
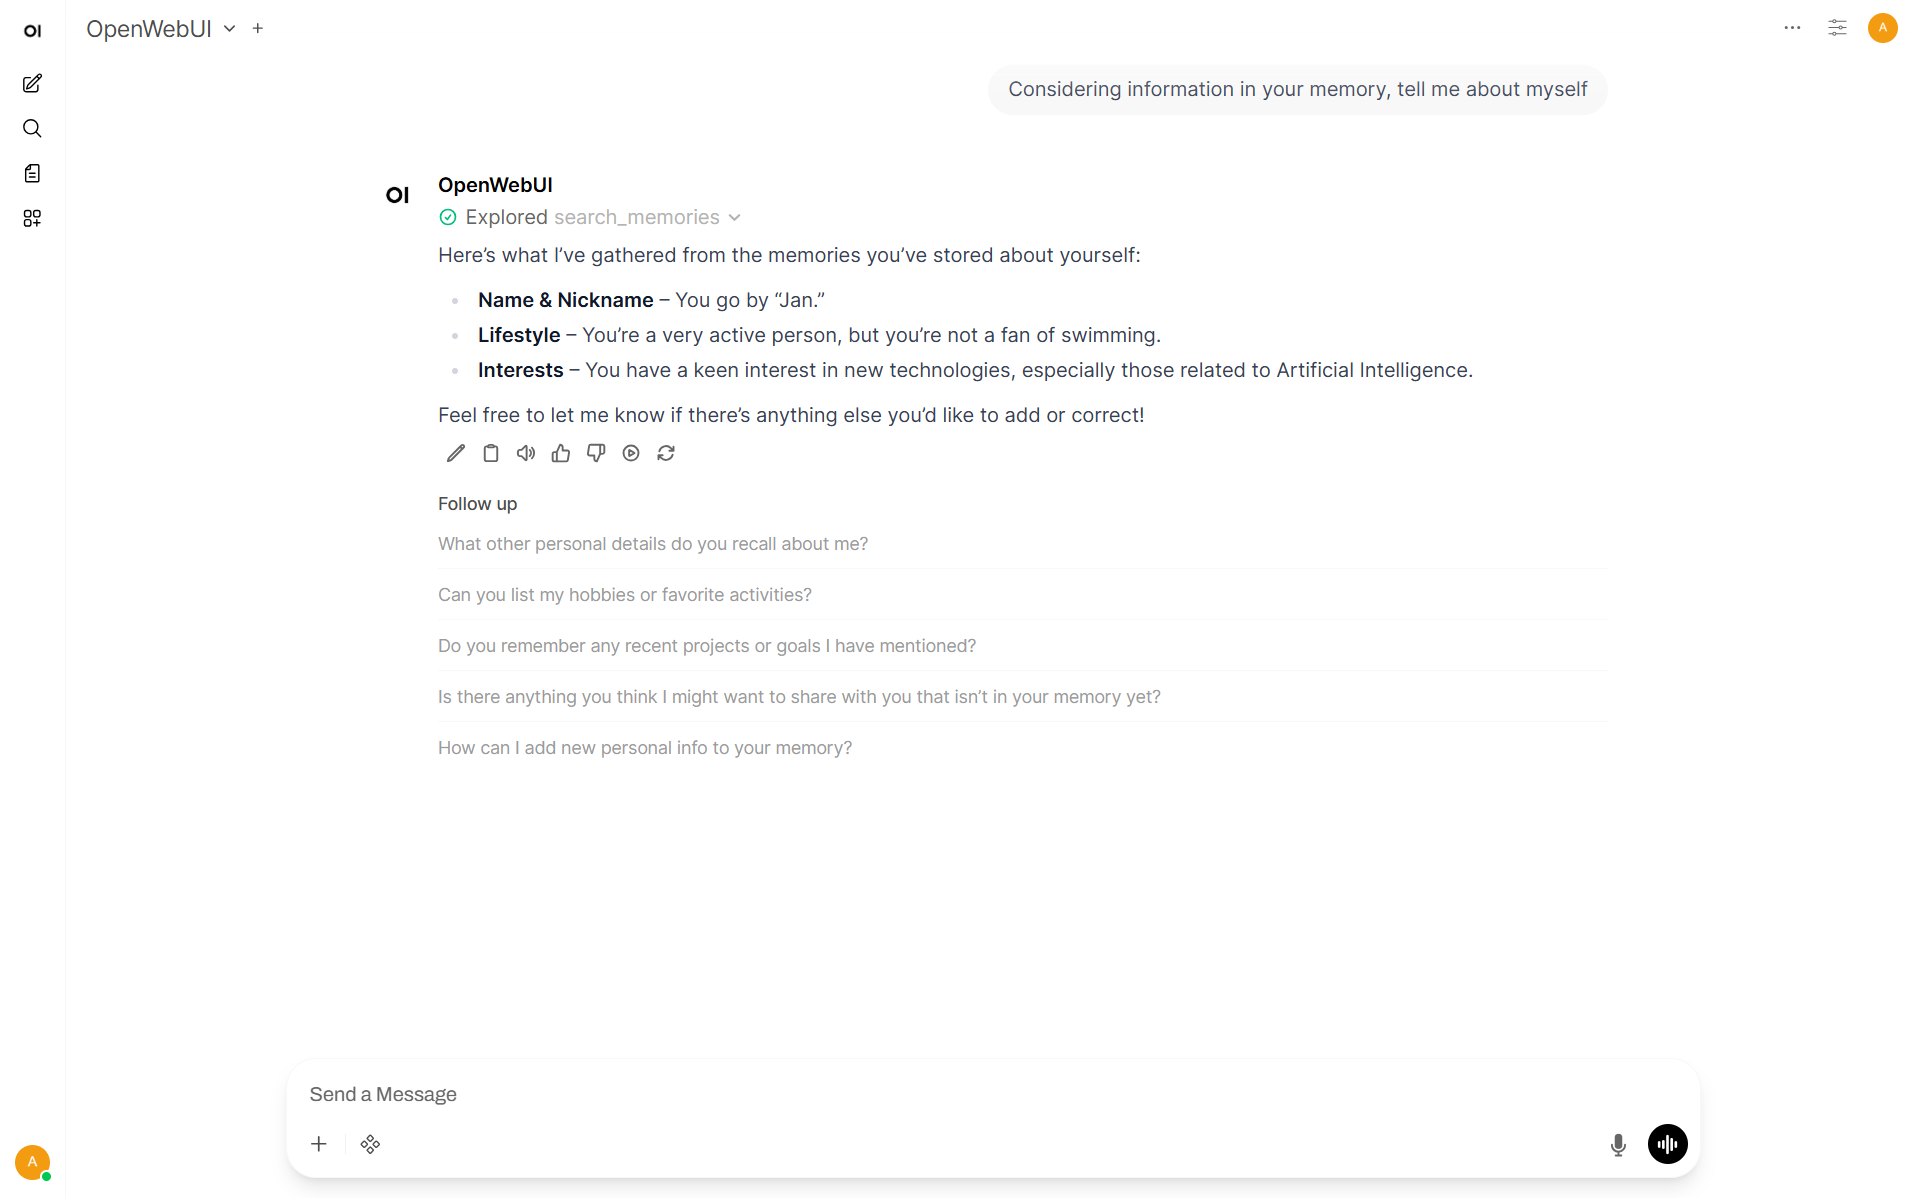
Note: There is no way to make searching memory default on the beginning of the conversation in Open Web UI. User should tell model to use it to make it work.
Reference#
https://docs.openwebui.com/features/chat-conversations/memory/
Code Interpreter#
It’s available to use Code Interpreter feature in Open Web UI.
Go to Admin Panel → Settings → Models
Choose desired model
Enable Code Interpreter capability
In Default Features enable Code Interpreter or toggle it in the chat
In Advanced Parameters set Function Calling to Native
Go to Admin Panel → Settings → Code Execution
Enable Code Interpreter and Code Execution
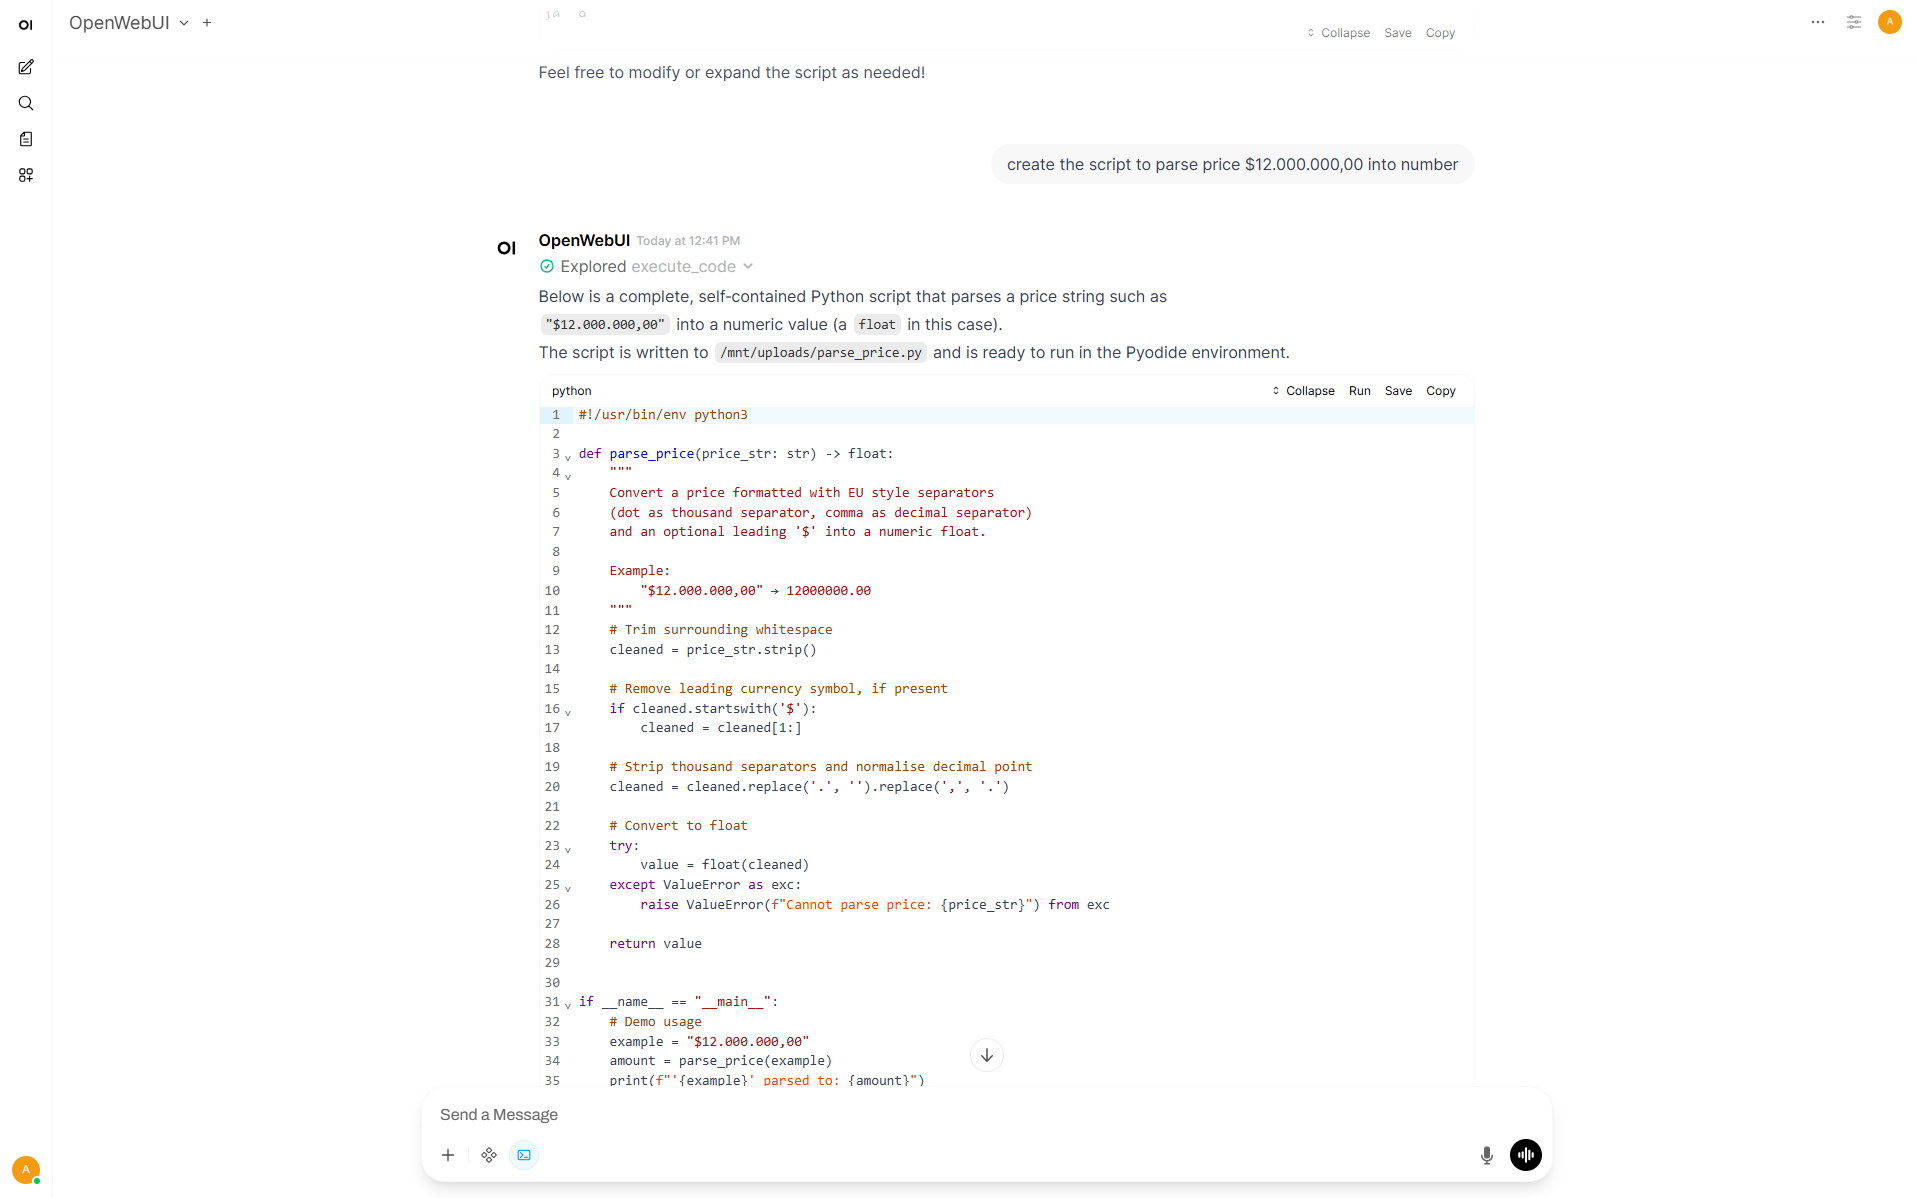
Then it’s ready to use. In new chat it’s possible to toggle Code Interpreter and write a prompt.
Audio#
Note: To ensure audio features work correctly, download FFmpeg and add its executable directory to your system’s
PATHenvironment variable.
Step 1: Models Preparation#
Start by downloading export_model.py script and run it to download and quantize the model for speech generation:
curl https://raw.githubusercontent.com/openvinotoolkit/model_server/refs/heads/main/demos/common/export_models/export_model.py -o export_model.py
pip3 install -r https://raw.githubusercontent.com/openvinotoolkit/model_server/refs/heads/main/demos/common/export_models/requirements.txt
python export_model.py text2speech --source_model microsoft/speecht5_tts --weight-format fp32 --model_name microsoft/speecht5_tts --config_file_path models/config.json --model_repository_path models --vocoder microsoft/speecht5_hifigan
Next, download and add to config model for transcription:
ovms.exe --pull --source_model OpenVINO/whisper-base-fp16-ov --model_repository_path models --task speech2text --target_device GPU
ovms.exe --add_to_config --config_path  models\config.json --model_path OpenVINO\whisper-base-fp16-ov --model_name OpenVINO/whisper-base-fp16-ov
docker run --rm -u $(id -u):$(id -g) --device /dev/dri --group-add=$(stat -c "%g" /dev/dri/render* | head -n 1) -v $PWD/models:/models openvino/model_server:weekly --pull --source_model OpenVINO/whisper-base-fp16-ov --model_repository_path /models --task speech2text --target_device GPU
docker run --rm -u $(id -u):$(id -g) -v $PWD/models:/models openvino/model_server:weekly --add_to_config --config_path /models/config.json --model_path OpenVINO/whisper-base-fp16-ov --model_name OpenVINO/whisper-base-fp16-ov
Note: Family of Whisper models (except Whisper-large) can be also deployed on NPU or CPU devices by just changing the –target_device parameter.
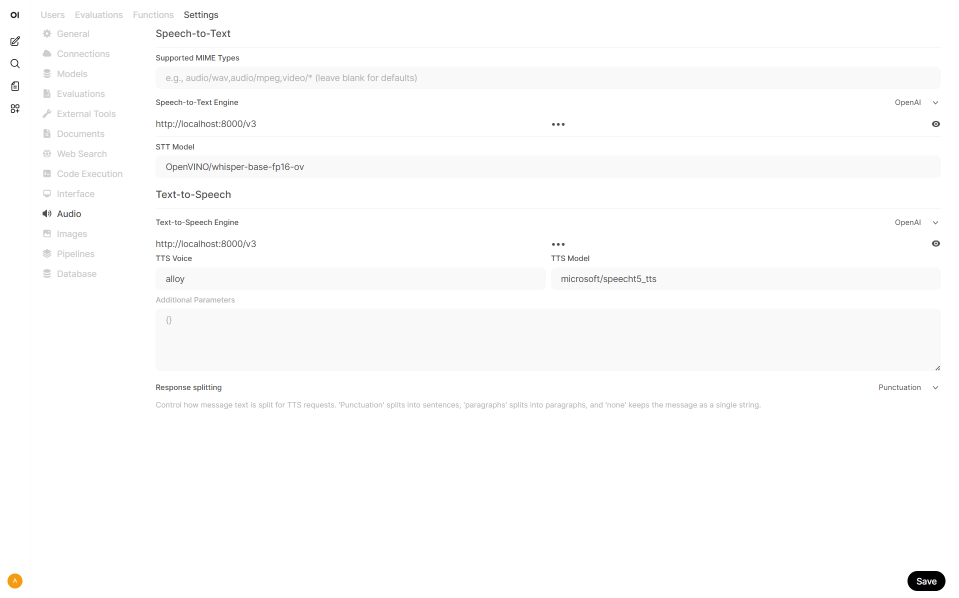
Step 2: Audio Settings#
Go to Admin Panel → Settings → Audio
Select OpenAI for both engines
URL:
http://localhost:8000/v3Set Engine type to
OpenAISTT Model:
OpenVINO/whisper-base-fp16-ovTTS Model:
microsoft/speecht5_ttsPut anything in API key
Click Save
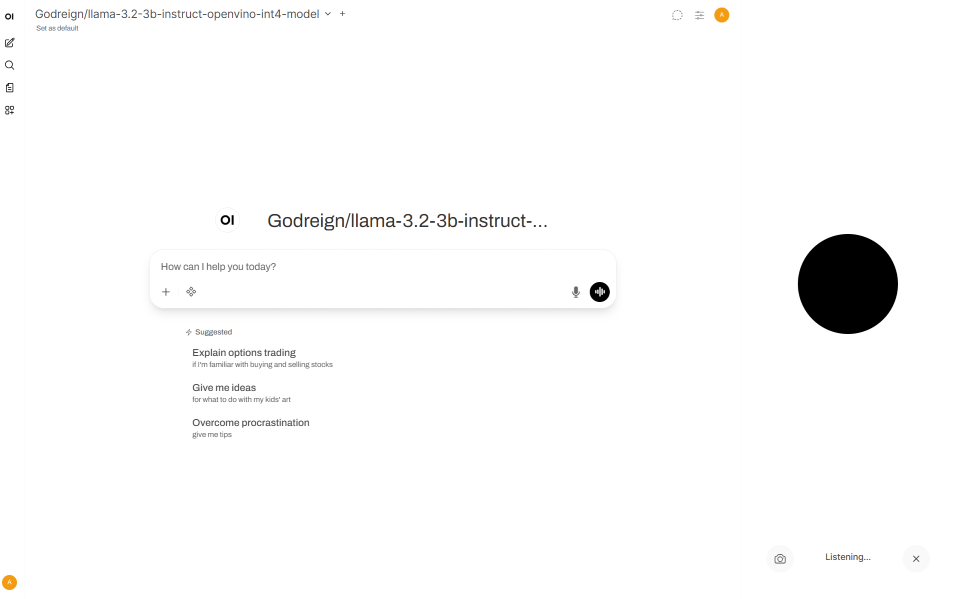
Step 3: Chat with AI Agent#
Click Voice mode icon.
Start talking.
Reference#
https://docs.openwebui.com/features/#%EF%B8%8F-audio-voice–accessibility