Import Darknet* YOLOv4 Model
The tutorial follows the recommendations on importing an original model and shows how to import an original Darknet* YOLOv4 model of object detection use case, and Darknet* framework.
Model |
Use Case |
Framework |
Source |
|---|---|---|---|
1. Obtain Model
Darknet model is represented as .weights and .cfg files. Download a pretrained model file yolov4.weights from the Github repository.
2. Convert Model to Supported Format
Convert the model to one of the input formats supported in the DL Workbench, for example, TensorFlow*, ONNX*, OpenVINO™ Intermediate Representation (IR), and others.
2.1 Find Similar Model Topology in the Open Model Zoo
Since the model is not supported directly in OpenVINO and DL Workbench, according to the model import recommendations, you need to convert it to a supported format. To do that, look for a similar topology in the Open Model Zoo repository.
Go to the Open Model Zoo (OMZ) documentation, find YOLOv4 model, and use the provided information to get the required model description:
which input format should be used for the model of your framework
how to convert the model to this format
how to configure accuracy of the model
2.2 Find Converter Parameters
Open model.yml file in the OMZ repository, and find the information on the model input format. Here you can see that the required format for the YOLOv4 model is SavedModel:
Open the pre-convert.py file, and find the parameters required to use the converter: the configuration file, the weights file, and the path to the converted model.
2.3 Download Darknet*-to-TensorFlow* Converter
Go to the converter repository and clone it:
git clone https://github.com/david8862/keras-YOLOv3-model-set.git
git clone https://github.com/david8862/keras-YOLOv3-model-set.git
2.4 Optional. Prepare Virtual Environment
Install Virtual Environment
python3 -m pip install virtualenv
python -m pip install virtualenv
Create Virtual Environment
python3 -m virtualenv venv
python -m virtualenv venv
Activate Virtual Environment
source venv/bin/activate
venv\Scripts\activate
2.5 Install Requirements
Go to the requirements.txt file to find the converter dependencies. Adjust it for your system, if necessary. For example, if you do not have a GPU device, change tensorflow-gpu dependency to tensorflow. Install the requirements:
python3 -m pip install -r ./keras-YOLOv3-model-set/requirements.txt
python -m pip install -r .\keras-YOLOv3-model-set\requirements.txt
2.6 Convert Darknet* Model to TensorFlow*
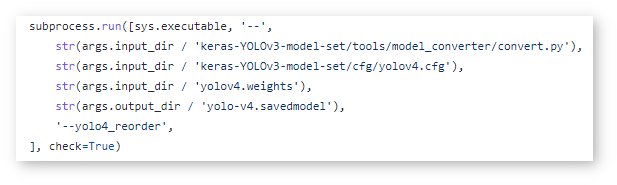
Run the converter by providing the paths to the configuration file, the pretrained model file, and the converted model.
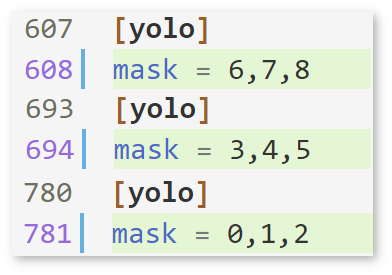
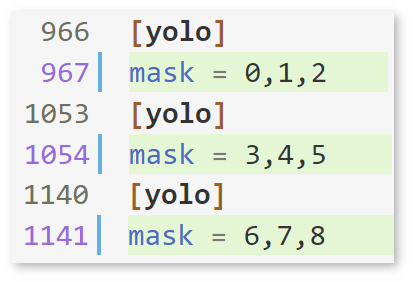
In case you fine-tuned your model based on the publicly available configuration file of the Yolov4, you also need to use --yolo4_reorder flag. If you did not, open the configuration file yolov4.cfg and check the order of yolo layers. If the yolo layers are described in ascending order, then you can proceed without this flag. Otherwise, you need to use it.
Does not require reordering:
Requires reordering:
Organize the folders and files as follows and execute the code in the terminal or PowerShell:
|-- keras-YOLOv3-model-set
    |-- tools
        |-- model_converter
            |-- convert.py
    |-- cfg
       |-- yolov4.cfg
|-- yolov4.weights
|-- saved_model
Run the converter:
python keras-YOLOv3-model-set/tools/model_converter/convert.py keras-YOLOv3-model-set/cfg/yolov4.cfg yolov4.weights yolov4.savedmodel --yolo4_reorder
python keras-YOLOv3-model-set\tools\model_converter\convert.py keras-YOLOv3-model-set\cfg\yolov4.cfg yolov4.weights yolov4.savedmodel --yolo4_reorder
3. Import Model
Go to the DL Workbench and click Create Project and Import Model.

Select TensorFlow framework and 2.X TensorFlow version.
Click Select Folder and provide the folder with the model in SavedModel format. Make sure you selected the folder, not the files it contains, and click Import :

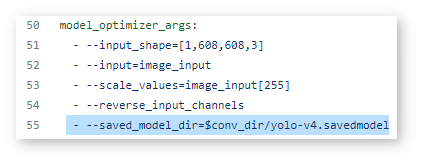
Specify model inputs
Select RGB color space in General Parameters since it was used during model training
Specify Input Shape. Set 1 as the first dimension, the number of batches, and fill the rest according to the
yolov4.cfgmodel configuration file: width = 608, height = 608, channels = 3Set scales to 255 as specified in the Darknet sources

Click Convert
4. Optional. Visualize Model
To check how your model works and explore its properties, click Open under the Actions column.

Upload your image and check the prediction boxes to evaluate the model:

Note
If the imported model predicts the right classes, but the boxes are not aligned with the objects in the image, you might have missed scales and means parameters during import. Refer to the documentation and try to import the model again.
Congratulations, you have imported the Darknet* YOLOv4 model. Your next step is to Import a dataset to create a project. Then use one of the recommended ways to accelerate your model performance and learn how to perform 8-bit integer (INT8) calibration in the Optimize YOLOv4 model tutorial.