This demo shows how to run Im2LaTeX models. Im2LaTeX models allow to get a LaTeX formula markup from the image.
NOTE: Only batch size of 1 is supported.
The demo application expects an im2latex model that is split into two parts. Every model part must be in the Intermediate Representation (IR) format.
The First model is Encoder which extracts features from an image and prepares first steps of the decoder.
imgs for input imagerow_enc_out) extracts features from the imagehidden andcontext are intermediate states of the LSTMinit_0 - first state of the encoderSecond model is Decoder that takes as input:
row_enc_out - extracted images features from the encoderdec_st_c) anddec_st_h) - current states of the LSTMoutput_prev - previous output of the Decode Step (for the first time it is init_0 of the encoder)tgt) - previous token (for the first time it is START_TOKEN ) Second model is being executed until current decoded token is END_TOKEN or length of the formula is less then --max_formula_len producing one token per each decode step.The demo application takes an input with the help of the -i argument. This could be:
* Integer identifier of the device (e.g. web-camera), typically 0.In this Case non-interactive mode would be triggered. This means that demo will run the model over the input image(s) and will try to predict the formula. The output would be stored in the console or in the output file (if specified)
Vocabulary files are provided under corresponding model configuration directory.This will trigger interactive mode, which would be explained in detail later.
Non-interactive mode assumes that demo processes inputs sequentially. The demo workflow in non-interactive mode is the following:
imgs). Crop and pad is used to keep size of the font.--max_formula_len or current token is not END_TOKEN Decode Step produces new tokens.-o parameter specified or into the console and (optionally) renders predicted formula into image.User has an option to render the LaTeX formula predicted by the demo application into an image. Regardless of what mode is selected (interactive or non-interactive) the process of the rendering of the formula is the same.
Sympy python package is used for rendering. To install it, please, run: pip install -r requirements.txt Sympy package needs LaTeX system installed in the operating system. For Windows you can use MiKTeX (just download and install it), for Ubuntu/MacOS you can use TeX Live: Ubuntu: apt-get update && apt-get install texlive MacOS: brew install texlive
Note: Other LaTeX systems should also work.
The example of the interface: 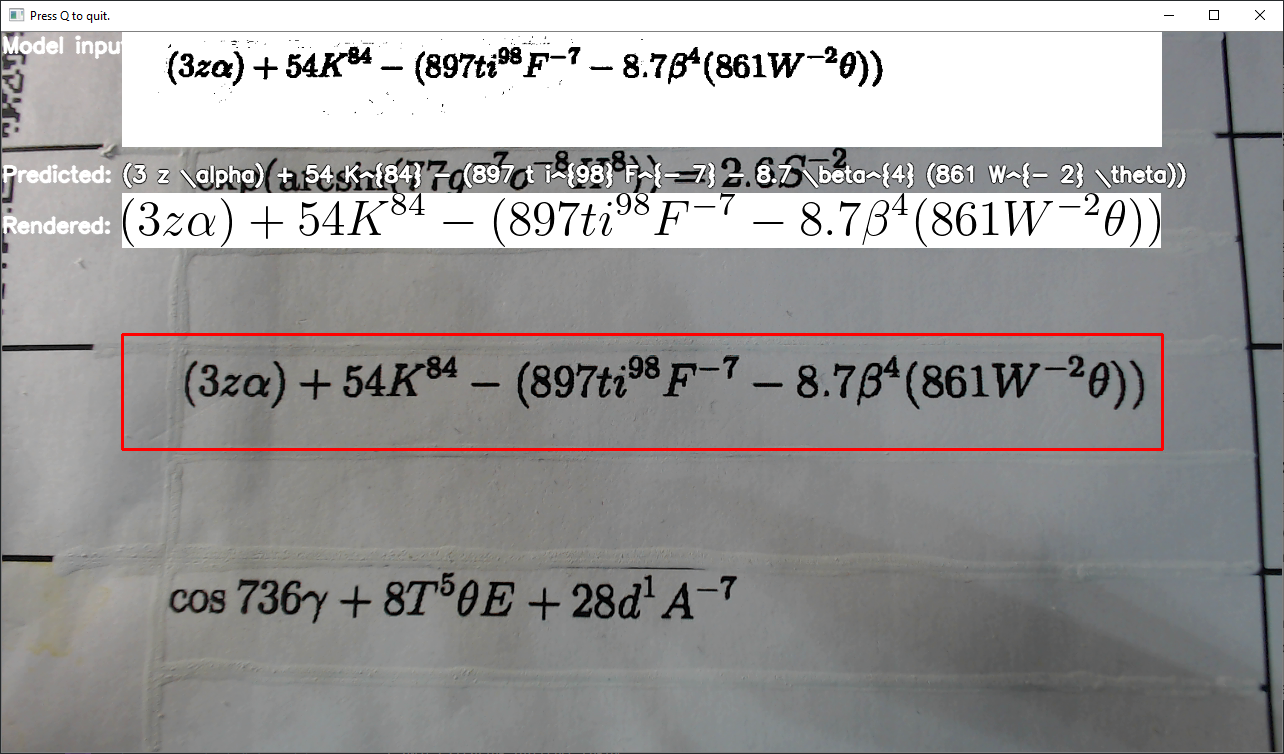
When User runs demo application with the -i option and passes video or number of the web-camera device as an argument (typically 0), window with the image simillar to above should pop up.
Example of usage of the interactive mode:
or
The window has four main sections:
Model input label)Predicted label)Rendered label.Navigation keys:
q button to quit from programo to decrease the size of the input (red) windowp to increase the size of the input windowThe overall process is simillar to the Non-interactive mode with the exception that it runs asynchronously. This means model inference and rendering of the formula do not block main thread, so the image from the web camera can move smoothly.
NOTE: By default, Open Model Zoo demos expect input with BGR channels order. If you trained your model to work with RGB order, you need to manually rearrange the default channels order in the demo application or reconvert your model using the Model Optimizer tool with
--reverse_input_channelsargument specified. For more information about the argument, refer to When to Reverse Input Channels section of Converting a Model Using General Conversion Parameters.
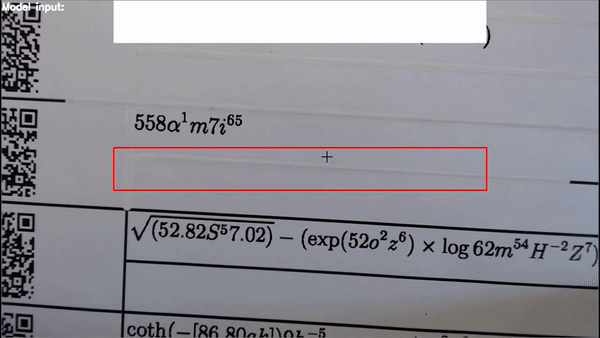
The demo has two preprocessing types: Crop and Pad to target shape and Resize and pad to target shape. Two preprocessing types are used for two different datasets as model trained with concrete font size, so if one wants to run the model on inputs with bigger font size (e.g. if input is photographed in 12Mpx, while model trained to imitate scans in ~3Mpx) they should first resize the input to make font size like in train set. Example of the target font size: 
Run the application with the -h option to see the following usage message:
Running the application with an empty list of options yields the short version of the usage message and an error message.
To run the demo, you can use public or pre-trained models. To download the pre-trained models, use the OpenVINO Model Downloader. The list of models supported by the demo is in the models.lst file in the demo's directory.
NOTE: Before running the demo with a trained model, make sure the model is converted to the Inference Engine format (
*.xml+*.bin) using the Model Optimizer tool.
To run the demo, please provide paths to the model in the IR format and to an input video or folder with images:
The application outputs recognized formula into the console or into the file.