NOTE: The Intel® Distribution of OpenVINO™ toolkit was formerly known as the Intel® Computer Vision SDK.
This guide applies to Apple macOS*. If you are using the Intel® Distribution of OpenVINO™ toolkit on Windows* OS, see the Installation Guide for Windows*. If you are using the Intel® Distribution of OpenVINO™ toolkit on Linux*, see the Installation Guide for Linux*.
Introduction
IMPORTANT:
- All steps in this guide are required unless otherwise stated.
- In addition to the downloaded package, you must install dependencies and complete configuration steps.
Your installation is complete when these are all completed:
- Installed the OpenVINO core components.
- Installed the external software dependencies:
- Set the OpenVINO environment variables and (optional) update
.bash_profile. - Configured the Model Optimizer.
- Ran two demos.
About the Intel® Distribution of OpenVINO™ toolkit
The Intel® Distribution of OpenVINO™ toolkit quickly deploys applications and solutions that emulate human vision. Based on Convolutional Neural Networks (CNN), the toolkit extends computer vision (CV) workloads across Intel® hardware, maximizing performance. The Intel® Distribution of OpenVINO™ toolkit includes the Intel® Deep Learning Deployment Toolkit (Intel® DLDT).
Included with the Installation
The following components are installed by default:
| Component | Description |
|---|---|
| Model Optimizer | This tool imports, converts, and optimizes models, which were trained in popular frameworks, to a format usable by Intel tools, especially the Inference Engine. Popular frameworks include Caffe*, TensorFlow*, MXNet*, and ONNX*. |
| Inference Engine | This is the engine that runs a deep learning model. It includes a set of libraries for an easy inference integration into your applications. |
| OpenCV* | OpenCV* community version compiled for Intel® hardware. Includes PVL libraries for computer vision. |
| Sample Applications | A set of simple console applications demonstrating how to use the Inference Engine in your applications. |
System Requirements
Hardware
- 6th-8th Generation Intel® Core™
- Intel® Xeon® v5 family
- Intel® Xeon® v6 family
Operating Systems
- macOS* 10.14
Installation Steps
This guide assumes you downloaded the OpenVINO toolkit for macOS*. If you do not have a copy of the toolkit package file, download the latest version and then return to this guide to proceed with the installation.
Install the Intel® Distribution of OpenVINO™ toolkit Core Components
If you have a previous version of the Intel® Distribution of OpenVINO™ toolkit installed, rename or delete two directories:
/home/<user>/inference_engine_samples/home/<user>/openvino_models
To install the OpenVINO toolkit core components:
- Go to the directory in which you downloaded the Intel® Distribution of OpenVINO™ toolkit. This document assumes this is your
Downloadsdirectory. By default, the disk image file is saved asm_openvino_toolkit_p_<version>.dmg. - Double-click the
m_openvino_toolkit_p_<version>.dmgfile to mount. The disk image is mounted to/Volumes/m_openvino_toolkit_p_<version>and automatically opened in a separate window. - Run the installation wizard application
m_openvino_toolkit_p_<version>.app -
On the User Selection screen, choose a user account for the installation:
- Root
- Administrator
- Current user
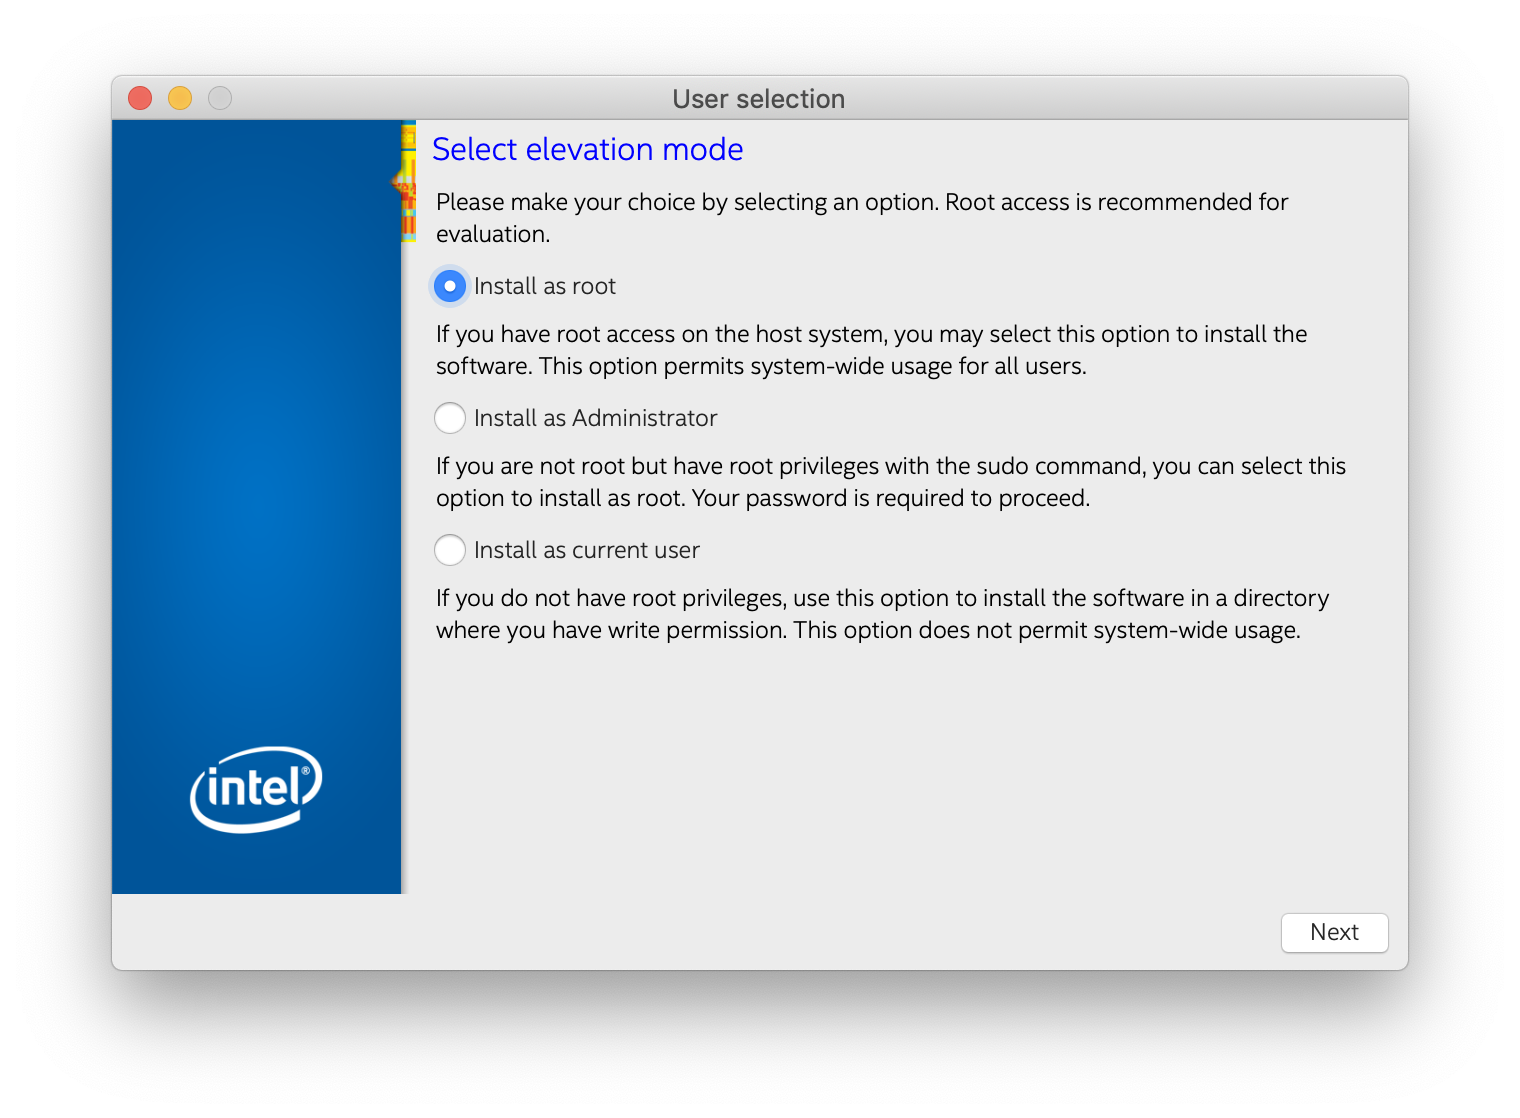
The default installation directory path depends on the privileges you choose for the installation.
- Click Next and follow the instructions on your screen.
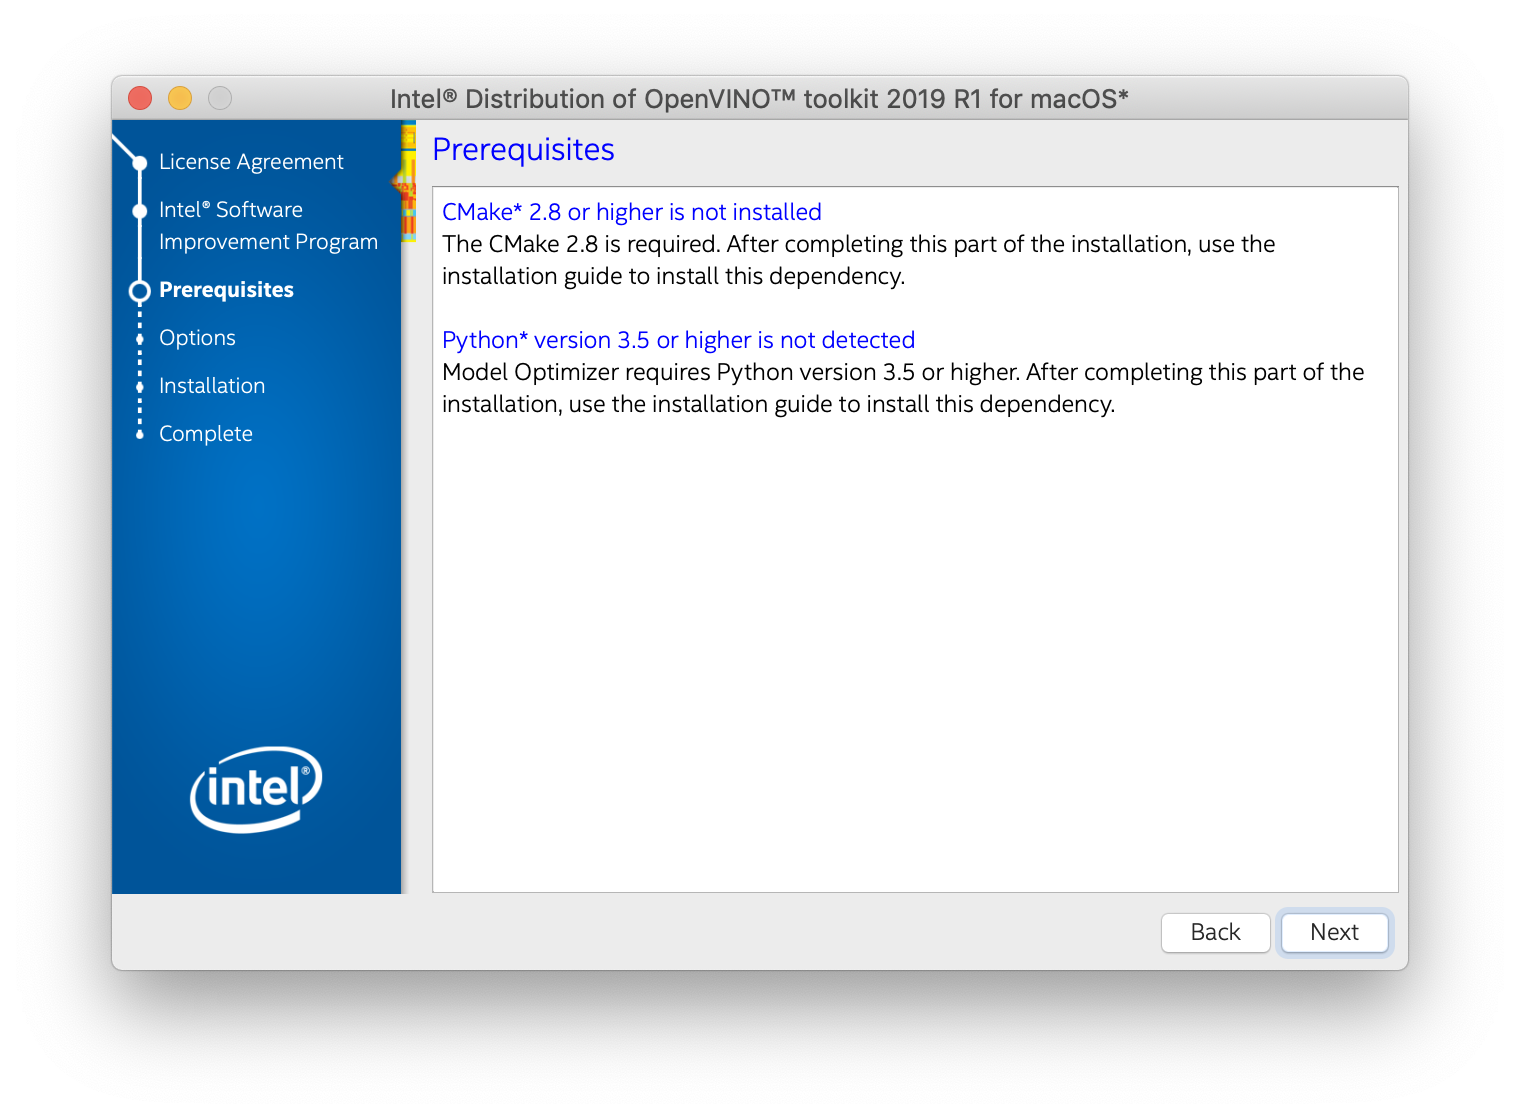
- If you are missing external dependencies, you will see a warning screen. Write down the dependencies you are missing. You need to take no other action at this time. After installing the Intel® Distribution of OpenVINO™ toolkit core components, you will be provided instructions to install the missing dependencies. The screen example below indicates you are missing two dependencies:
- Click Next.
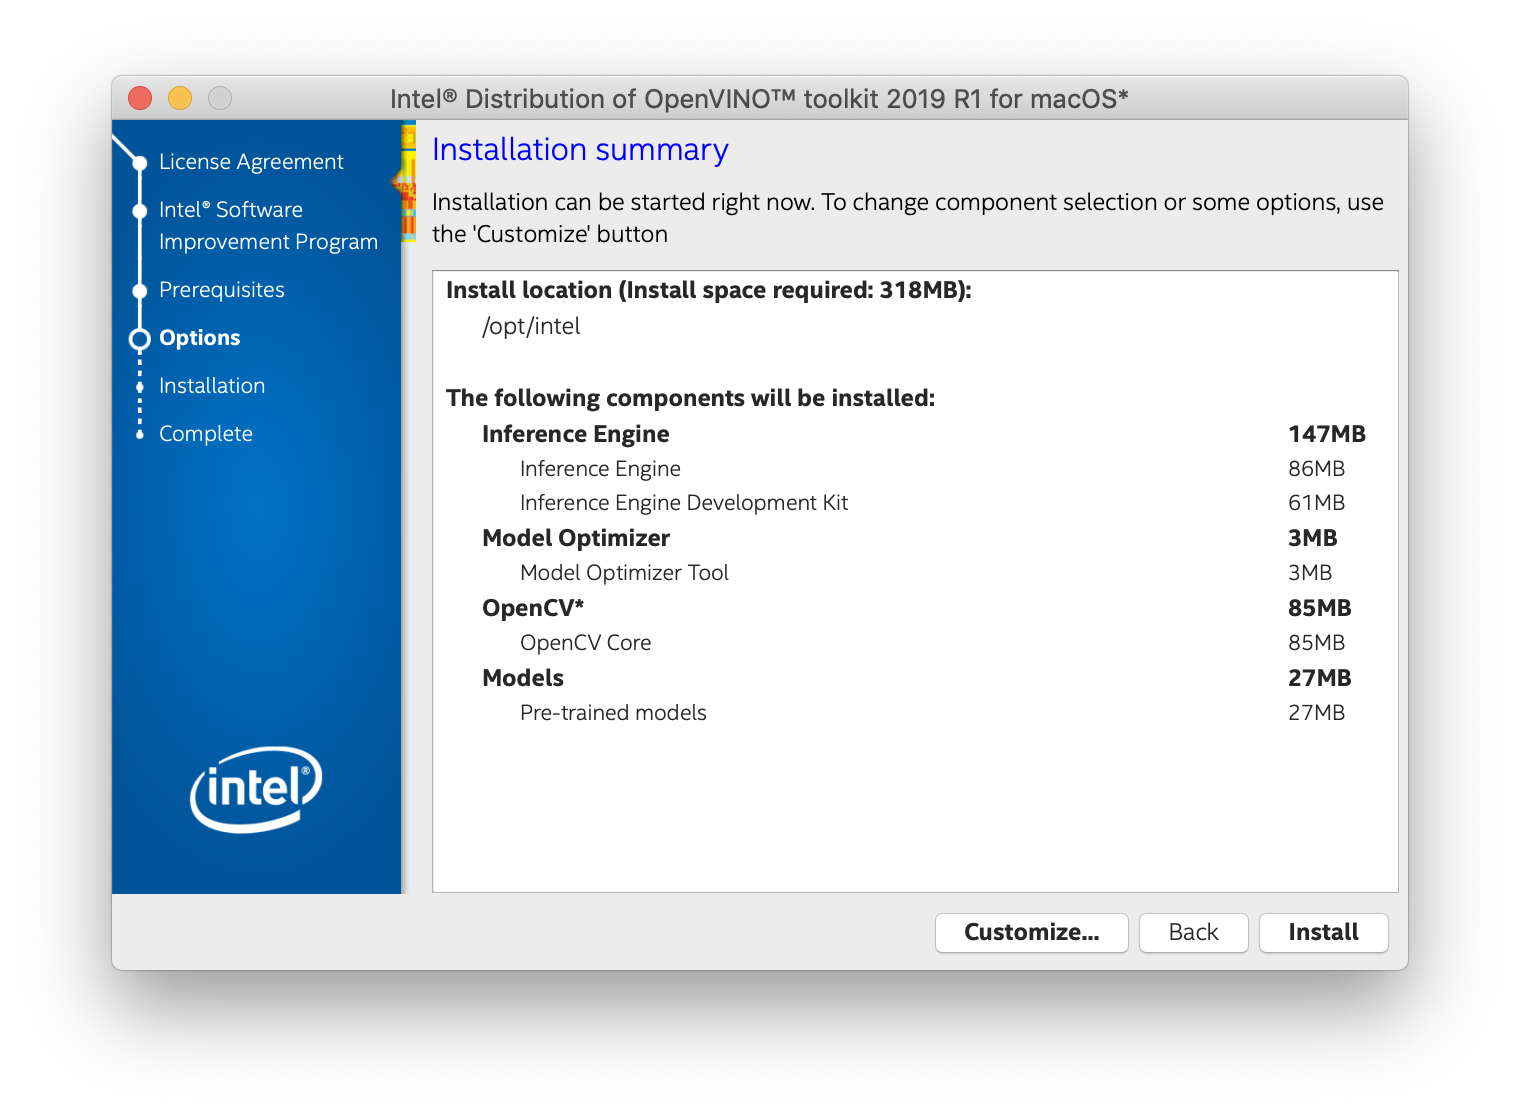
- The Installation summary screen shows you the default component set to install:
-
If you used root or administrator privileges to run the installer, it installs the OpenVINO toolkit to
/opt/intel/openvino_<version>/For simplicity, a symbolic link to the latest installation is also created:
/opt/intel/openvino/ -
If you used regular user privileges to run the installer, it installs the OpenVINO toolkit to
/home/<user>/intel/openvino_<version>/For simplicity, a symbolic link to the latest installation is also created:
/home/<user>/intel/openvino/
-
-
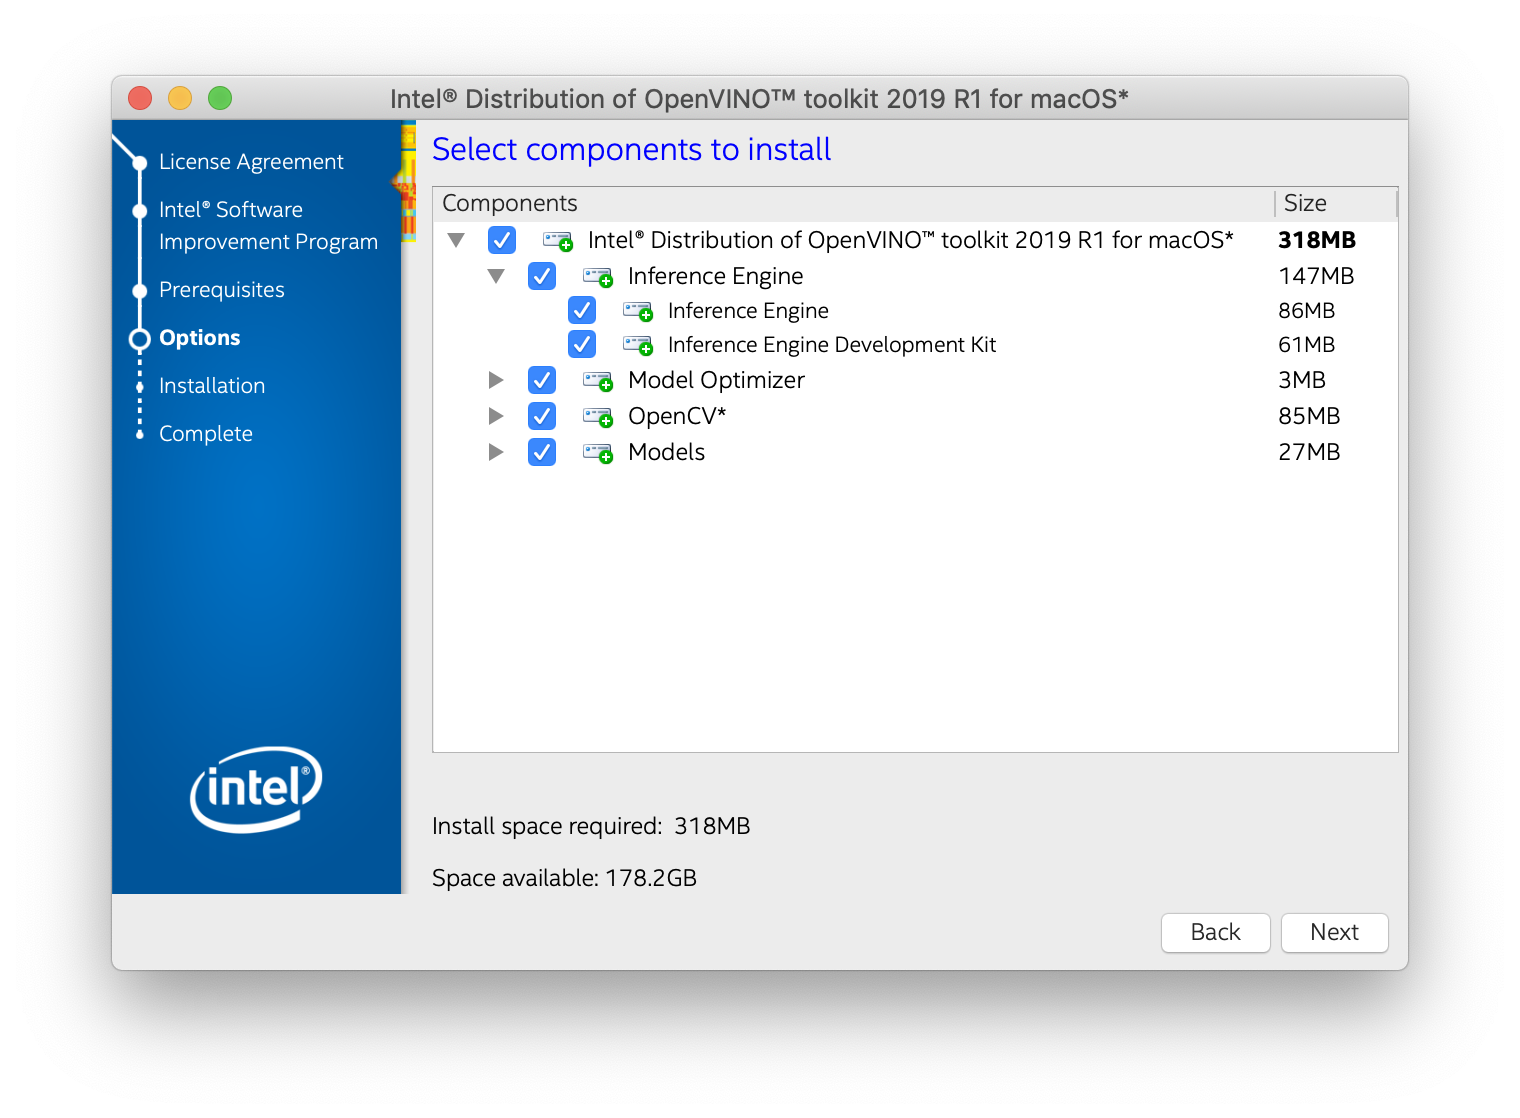
If needed, click Customize to change the installation directory or the components you want to install:
Click Next to save the installation options and show the Installation summary screen.
- On the Installation summary screen, press Install to begin the installation.
- When the first part of installation is complete, the final screen informs you that the core components have been installed and additional steps still required:
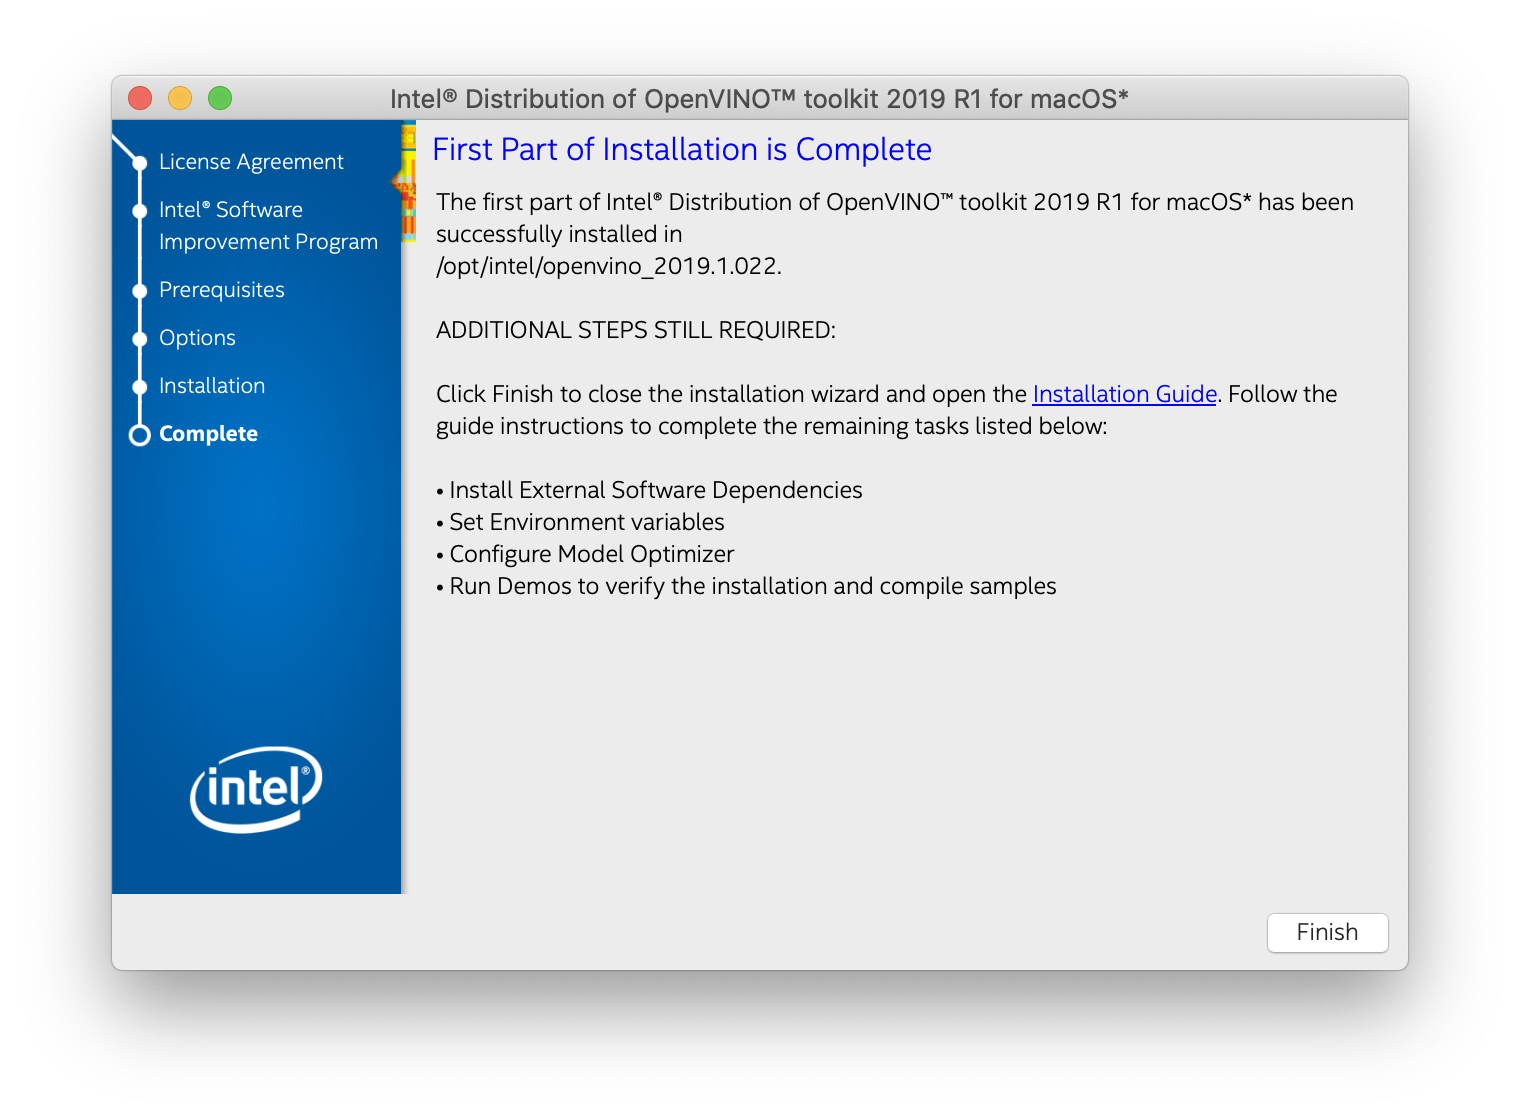
- Click Finish to close the installation wizard. A new browser window opens to the next section of the Installation Guide to set the environment variables. You are in the same document. The new window opens in case you ran the installation without first opening this installation guide. If the installation did not indicate you must install dependencies, you can skip ahead to Set the Environment Variables.
Install External Software Dependencies
If the installation process indicated if you are missing dependencies, you must install each missing dependency. Click the link for the first dependency you must install:
Install CMake*
These steps guide you through installing CMake 3.4 or higher, which is required to build the Intel® Distribution of OpenVINO™ toolkit samples.
- Go to the CMake download site.
- Under the heading Get the Software, click the link for latest stable in the first paragraph. Your screen displays Latest Release information.
- Scroll down to the line Mac OS X 10.7 or later.
- Click the associated
.dmgfile name to download the installer image. The file is saved to yourDownloadsfolder. - Go to the
Downloadsfolder. - Double-click the CMake
.dmgfile to launch the installer. - Click Agree button to continue the installation.
- Drag the CMake icon to the
Applicationfolder. - Add CMake to the
PATHenvironment variable. Open a Terminal window and run the following command:sudo "/Applications/CMake.app/Contents/bin/cmake-gui" --install - To verify the installation was successful, run the command: The command should prints a path to the CMake installed:which cmake/usr/local/bin/cmake
Install Python*
Python with pip is required to run the Model Optimizer. Use these steps to install the correct version of the Python software.
- Go to the Python download page.
- Under the heading Python Releases for Mac OS X, in the Stable Releases section, find a proper version and click the download link to download the installation package file. For example, for the 3.7.2 version, the file is saved as
python-3.7.2-macosx10.9.pkgin yourDownloadsfolder. - Double-click the file to launch the installation.
- On the Welcome screen, click Continue and follow the instructions on the screen to complete the installation. and let the installation complete.
- When the installation finishes, click Close.
The dependencies are installed. Continue to the next section to to set environment variables.
NOTE: The Model Optimizer has additional prerequisites that are addressed later in this document.
Install Apple Xcode*
Apple Xcode* IDE is required for building the Intel® Deep Learning Deployment Toolkit С++ samples and demonstration applications.
- Get Xcode from the Apple App Store*. It will be downloaded into your
/Applicationdirectory. - Launch Xcode from the
Applicationsdirectory. - Enter your password and user name to allow Xcode to install additional components including the Apple* Command Line Tools.
- The Installing components... window with the progress bar comes up.
- After the installation is complete, Xcode starts.
IMPORTANT:
Command Line Tools are required to install. MAKE SURE YOU INSTALL THEM.
Set the Environment Variables
You must update several environment variables before you can compile and run OpenVINO™ applications. Open the macOS Terminal* or a command-line interface shell you prefer and run the following script to temporarily set your environment variables:
(Optional): The OpenVINO environment variables are removed when you close the shell. As an option, you can permanently set the environment variables as follows:
- Open the
.bash_profilefile in the current user home directory:vi ~/.bash_profile - Press the 'i' key to switch to the insert mode.
- Add this line to the end of the file: source /opt/intel/openvino/bin/setupvars.sh
- Save and close the file: press the Esc key and type
:wq. - To test your change, open a new terminal. You will see
[setupvars.sh] OpenVINO environment initialized.
The environment variables are set. Continue to the next section to configure the Model Optimizer.
Configure the Model Optimizer
IMPORTANT: This section is required. You must configure the Model Optimizer for at least one framework. The Model Optimizer will fail if you do not complete the steps in this section.
The Model Optimizer is a key component of the OpenVINO toolkit. You cannot do inference on your trained model without running the model through the Model Optimizer. When you run a pre-trained model through the Model Optimizer, your output is an Intermediate Representation (IR) of the network. The IR is a pair of files that describe the whole model:
-
.xml: Describes the network topology -
.bin: Contains the weights and biases binary data
The Inference Engine reads, loads, and infers the IR files, using a common API across the CPU, GPU, or VPU hardware.
The Model Optimizer is a Python*-based command line tool (mo.py), which is located in /opt/intel/openvino/deployment_tools/model_optimizer.
Use this tool on models trained with popular deep learning frameworks such as Caffe*, TensorFlow*, MXNet*, and ONNX* to convert them to an optimized IR format that the Inference Engine can use.
This section explains how to use scripts to configure the Model Optimizer either for all of the supported frameworks at the same time or for individual frameworks. If you want to manually configure the Model Optimizer instead of using scripts, see the Using Manual Configuration Process section in the Configuring the Model Optimizer document.
For more information about the Model Optimizer, see the Model Optimizer Developer Guide.
Model Optimizer Configuration Steps
You can either configure the Model Optimizer for all supported frameworks at once, or for one framework at a time. Choose the option that best suits your needs. If you see error messages, make sure you installed all dependencies.
IMPORTANT: The Internet access is required to execute the following steps successfully. If you have access to the Internet through the proxy server only, please make sure that it is configured in your environment.
NOTE: If you installed OpenVINO to the non-default installation directory, replace
/opt/intel/with the directory where you installed the software to.
Option 1: Configure the Model Optimizer for all supported frameworks at the same time:
- Go to the Model Optimizer prerequisites directory: cd /opt/intel/openvino/deployment_tools/model_optimizer/install_prerequisites
- Run the script to configure the Model Optimizer for Caffe, TensorFlow, MXNet, Kaldi*, and ONNX: sudo ./install_prerequisites.sh
Option 2: Configure the Model Optimizer for each framework separately:
- Go to the Model Optimizer prerequisites directory: cd /opt/intel/openvino/deployment_tools/model_optimizer/install_prerequisites
- Run the script for your model framework. You can run more than one script:
- For Caffe: sudo ./install_prerequisites_caffe.sh
- For TensorFlow: sudo ./install_prerequisites_tf.sh
- For MXNet: sudo ./install_prerequisites_mxnet.sh
- For ONNX: sudo ./install_prerequisites_onnx.sh
- For Kaldi: sudo ./install_prerequisites_kaldi.sh
- For Caffe:
The Model Optimizer is configured for one or more frameworks. You are ready to use two short demos to see the results of running the OpenVINO toolkit and to verify your installation was successful. The demo scripts are required since they perform additional configuration steps. Continue to the next section.
Use the Demo Scripts to Verify Your Installation
IMPORTANT: This section is required. In addition to confirming that your installation was successful, the demo scripts perform additional steps, such as setting up your computer to use the Model Optimizer samples.
To learn more about the demo applications, see README.txt in /opt/intel/openvino/deployment_tools/demo/.
For detailed description of the pre-trained object detection and object recognition models, go to the Overview of OpenVINO toolkit Pre-Trained Models page.
NOTES:
- The paths in this section assume you used the default installation directory to install the OpenVINO toolkit. If you installed the software to a directory other than
/opt/intel/, update the directory path with the location where you installed the toolkit to.
- If you installed the product as a root user, you must switch to the root mode before you continue:
sudo -i.
Run the Image Classification Demo
- Go to the Inference Engine demo directory: cd /opt/intel/openvino/deployment_tools/demo
- Run the Image Classification demo: ./demo_squeezenet_download_convert_run.sh
The Image Classification demo uses the Model Optimizer to convert a SqueezeNet model to .bin and .xml Intermediate Representation (IR) files. The Inference Engine component uses these files.
For a brief description of the Intermediate Representation .bin and .xml files, see Configuring the Model Optimizer.
This demo creates the directory /home/<user>/inference_engine_samples/, builds the Image Classification Sample application and run it with the car.png image located in the demo directory. When the verification script completes, you will have the label and confidence for the top-10 categories:
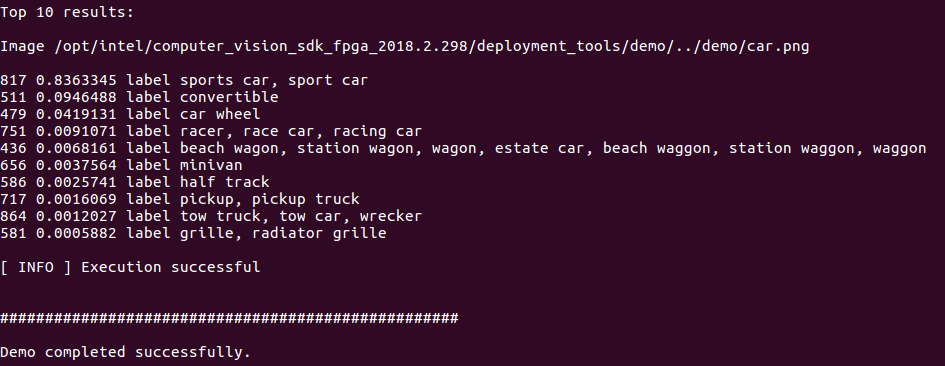
This demo is complete. Continue to the next section to run the Inference Pipeline demo.
Run the Inference Pipeline Demo
- While still in
/opt/intel/openvino/deployment_tools/demo/, run the Inference Pipeline demo:This demo uses./demo_security_barrier_camera.shcar_1.bmpin/opt/intel/openvino/deployment_tools/demo/to show an inference pipeline. This demo uses three pre-trained models. The demo uses vehicle recognition in which vehicle attributes build on each other to narrow in on a specific attribute. The demo works as follows:
- An object is identified as a vehicle.
- This identification is used as input to the next model, which identifies specific vehicle attributes, including the license plate.
- The attributes identified as the license plate are used as input to the third model, which recognizes specific characters in the license plate.
For more information about the demo, see the Security Barrier Camera Sample.
- When the demo completes, two windows are open:
- A console window that displays information about the tasks performed by the demo
-
An image viewer window that displays a picture similar to the following:
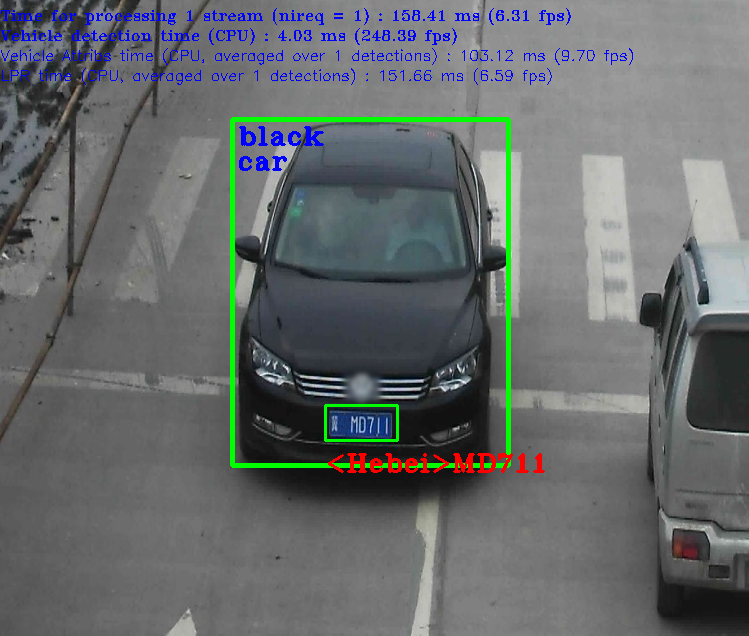
- Close the image viewer screen to end the demo.
In this section, you saw a preview of the OpenVINO toolkit capabilities.
Your have completed all the required installation, configuration, and build steps to work with your trained models using CPU.
Read the Summary for your next steps.
Summary
In this document, you installed the Intel® Distribution of OpenVINO™ toolkit and the external dependencies. In addition, you might have installed software and drivers that will let you use GPU or VPU to infer your models.
After the software was installed, you ran two demo applications to compile the extensions library and configured the Model Optimizer for one or more frameworks.
You are now ready to learn more about converting models trained with popular deep learning frameworks to the Inference Engine format, following the links below, or you can move on to running the sample applications.
To learn more about converting models, go to:
- Convert Your Caffe* Model
- Convert Your TensorFlow* Model
- Convert Your MXNet* Model
- Convert Your ONNX* Model
Additional Resources
- Intel Distribution of OpenVINO Toolkit home page
- Intel Distribution of OpenVINO Toolkit documentation
- Intel Distribution of OpenVINO Toolkit Hello World Activities, see the Inference Tutorials for Face Detection and Car Detection Exercises