NOTES:
- For a first-time installation, use all steps.
- Use steps 1 and 2 only after receiving a new FPGA card.
- Repeat steps 2-5 when installing a new version of the Intel® Distribution of OpenVINO™ toolkit.
- Use steps 3-5 when a Neural Network topology used by an Intel® Distribution of OpenVINO™ toolkit application changes.
1. Configure and Install the Intel® Vision Accelerator Design with an Intel® Arria® 10 FPGA
- Download
fpga_support_files.tgzfrom the Intel Registration Center. The files in this.tgzarchive are required to ensure your FPGA card and the Intel® Distribution of OpenVINO™ toolkit work correctly. - Go to the directory where you downloaded the
fpga_support_files.tgzarchive. - Unpack the
.tgzfile:A directory namedtar -xvzf fpga_support_files.tgzfpga_support_filesis created. - Go to the
fpga_support_filesdirectory:cd fpga_support_files - Source
setup_env.shto set your environment variables:source /home/<user>/Downloads/fpga_support_files/setup_env.sh - Configure the FPGA Driver Blacklist: sudo mv config/blacklist-altera-cvp.conf /etc/modprobe.d
- Switch to superuser: sudo su
- Use the
setup_env.shscript fromfpga_support_files.tgzto set your environment variables:source /home/<user>/Downloads/fpga_support_files/setup_env.sh - Change directory to
Downloads/fpga_support_files/:cd /home/<user>/Downloads/fpga_support_files/ - Run the FPGA dependencies script, which allows OpenCL to support Ubuntu* and recent kernels: ./install_openvino_fpga_dependencies.sh
- When asked, select the FPGA card, Intel® GPU, and Intel® Movidius™ Neural Compute Stick, then you can install the correct dependencies.
- If you installed the 4.14 kernel as part of the installation script, you will need to reboot the machine and select the new kernel in the Ubuntu (grub) boot menu. You will also need to rerun
setup_env.shto set up your environmental variables again. - Install OpenCL™ devices. Enter Y when prompted to install: aocl install
- Reboot the machine: reboot
- Use the
setup_env.shscript fromfpga_support_files.tgzto set your environment variables:source /home/<user>/Downloads/fpga_support_files/setup_env.sh - Run
aocl diagnose:Your screen displaysaocl diagnoseDIAGNOSTIC_PASSED.
2. Set Up the Intel® Vision Accelerator Design with Intel® Arria® 10 FPGA for 2019R1
For the 2019R1 release, the Intel® Distribution of OpenVINO™ toolkit introduced a new board support package (BSP) a10_1150_sg1 for the Intel® Vision Accelerator Design with an Intel® Arria® 10 FPGA, which is included into the fpga_support_files.tgz archive. To program the bitstreams for the Intel® Distribution of OpenVINO™ toolkit 2019R1, you need to program the BSP into the board using the USB blaster.
NOTE: These steps apply only if you update to the Intel® Distribution of OpenVINO™ toolkit 2019R1. Otherwise, you can skip them.
- Go to the
configfolder of thefpga_support_filesdirectory where thea10_1150_sg1is located:cd /home/<user>/Downloads/fpga_support_files/config/ - Copy the
a10_1150_sg1folder to theboarddirectory:sudo cp -rf a10_1150_sg1 /opt/altera/aocl-pro-rte/aclrte-linux64/board/ - Convert the BSP files from DOS to UNIX: sudo chmod +x a10_1150_sg1find a10_1150_sg1 -type f -print0 | xargs -0 dos2unix
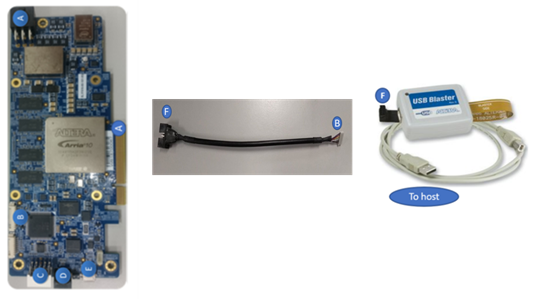
- Set up the USB Blaster:
- Connect the cable between the board and the host system. Use the letter codes in the diagram below for the connection points:
- Connect the B end of the cable to point B on the board.
- Connect the F end of the cable to point F on the FPGA download cable.
- From point F end of the cable to point F on the FPGA download cable, the connection is as shown:
- Source the
setup_env.shscript from thefpga_support_filesto set up the environment variables:source /home/<user>/Downloads/fpga_support_files/setup_env.sh - Update the Intel® FPGA Download Cable rules to program the board without root permissions and to flash the initialization bitstreams so that the Intel® FPGA Download Cable can communicate with the board: sudo cp config/51-usbblaster.rules /etc/udev/rules.d
- Load the USB rules: sudo udevadm control --reload-rules && udevadm trigger
- Unplug and re-plug the Intel® FPGA Download Cable to enable JTAG connection.
- Run
jtagconfigto ensure that your Intel FPFA Download Cable driver is ready to use:Your output is similar to:jtagconfig1) USB-Blaster [1-6]02E660DD 10AX115H1(.|E2|ES)/10AX115H2/.. - Download Intel® Quartus® Prime Software Lite Edition 18.1. Install the Intel® Quartus® Prime Software Lite to the
/home/<user>/intelFPGA/18.1directory.NOTE: You will need the complete the Intel® Quartus® Prime Software Lite version when you want to program the
boardtest_1ddr_top.aocxinto the flash for permanent availability. - Export the Intel® Quartus® Prime Software Lite environment variable: export QUARTUS_ROOTDIR=/home/<user>/intelFPGA/18.1/quartus
- Use
jtagconfigto slow the clock:jtagconfig --setparam 1 JtagClock 6M - (OPTIONAL) Confirm the clock is set to 6M: You should see the following:jtagconfig --getparam 1 JtagClock6M
- Go to
/opt/altera/aocl-pro-rte/aclrte-linux64/board/a10_1150_sg1/bringup, whereboardtest_1ddr_top.aocxis located:cd /opt/altera/aocl-pro-rte/aclrte-linux64/board/a10_1150_sg1/bringup - Program the
boardtest_1ddr_top.aocxfile to the flash to be made permanently available even after power cycle:aocl flash acl0 boardtest_1ddr_top.aocxNOTE: You will need the USB Blaster for this.
- Reboot the host system.
- Check if the host system recognizes the Intel® Vision Accelerator Design with Intel® Arria® 10 FPGA board. Confirm you can detect the PCIe card: Your output is similar to:lspci | grep -i Altera01:00.0 Processing accelerators: Altera Corporation Device 2494 (rev 01)
- Source the
setup_env.shscript from thefpga_support_filesdirectory to setup the environment variables:source /home/<user>/Downloads/fpga_support_file/setup_env.sh - Uninstall the previous BSP before installing the OpenCL drivers for the 2019R1 BSP: aocl uninstall /opt/altera/aocl-pro-rte/aclrte-linux64/board/<BSP_package>/
- Export and source the environment script: export AOCL_BOARD_PACKAGE_ROOT=/opt/altera/aocl-pro-rte/aclrte-linux64/board/a10_1150_sg1source /opt/altera/aocl-pro-rte/aclrte-linux64/init_opencl.sh
- Install OpenCL™ devices: aocl install
- Run the
diagnosecommand:You should seeaocl diagnoseDIAGNOSTIC_PASSEDbefore proceeding to the next steps.
3. Program a Bitstream
The bitstream you program should correspond to the topology you want to deploy. In this section, you program a SqueezeNet bitstream and deploy the classification sample with a SqueezeNet model that you used the Model Optimizer to convert in the steps before.
IMPORTANT: Only use bitstreams from the installed version of the Intel® Distribution of OpenVINO™ toolkit. Bitstreams from older versions of the Intel® Distribution of OpenVINO™ toolkit are incompatible with later versions of the Intel® Distribution of OpenVINO™ toolkit. For example, you cannot use the
1-0-1_A10DK_FP16_Genericbitstream, when the Intel® Distribution of OpenVINO™ toolkit supports the2-0-1_A10DK_FP16_Genericbitstream.
Depending on how many bitstreams you selected, there are different folders for each FPGA card type which were downloaded in the Intel® Distribution of OpenVINO™ toolkit package:
- For the Intel® Vision Accelerator Design with Intel® Arria® 10 FPGA the pre-trained bistreams are in
/opt/intel/computer_vision_sdk/bitstreams/a10_vision_design_bitstreams. This example uses a SqueezeNet bitstream with low precision for the classification sample. - Rerun the environment setup script: source /home/<user>/Downloads/fpga_support_files/setup_env.sh
- Change to your home directory: cd /home/<user>
- Program the bitstream for the Intel® Vision Accelerator Design with Intel® Arria® 10 FPGA: aocl program acl0 /opt/intel/computer_vision_sdk/bitstreams/a10_vision_design_bitstreams/2019R1_PL1_FP11_SqueezeNet.aocx
Optional Steps to Flash the FPGA Card
NOTE:
- To avoid having to reprogram the board after a power down, a bitstream will be programmed to permanent memory on the Intel® Vision Accelerator Design with Intel® Arria® 10 FPGA. This will take about 20 minutes.
- The following steps 1-5 need to be done only once for a new Intel® Arria 10 FPGA card.
- Plug in the micro USB cable to the card and your host system.
- Run
jtagconfigto ensure that the cable is properly inserted:jtagconfig - Use
jtagconfigto slow the clock:jtagconfig --setparam 1 JtagClock 6M - Store the Intel® Vision Accelerator Design with Intel® Arria® 10 FPGA bistream on the board: Your output is similar to:aocl flash acl0 /opt/intel/computer_vision_sdk/bitstreams/a10_vision_design_bitstreams/2019R1_PL1_FP11_SqueezeNet.aocxUSB-BlasterII [1-14]02E660DD 10AX115H1(.|E2|ES)/10AX115H2/..020A40DD 5M(1270ZF324|2210Z)/EPM2210
4. Setup a Neural Network Model for FPGA
In this section, you will create an FP16 model suitable for hardware accelerators. For more information, see the FPGA plugin section in the Inference Engine Developer Guide.
- Create a directory for the FP16 SqueezeNet Model: mkdir /home/<user>/squeezenet1.1_FP16
- Go to
/home/<user>/squeezenet1.1_FP16:cd /home/<user>/squeezenet1.1_FP16 - Use the Model Optimizer to convert an FP16 SqueezeNet Caffe* model into an optimized Intermediate Representation (IR): python3 /opt/intel/computer_vision_sdk/deployment_tools/model_optimizer/mo.py --input_model /home/<user>/openvino_models/FP32/classification/squeezenet/1.1/caffe/squeezenet1.1.caffemodel --data_type FP16 --output_dir .
- The
squeezenet1.1.labelsfile contains the classesImageNetuses. This file is included so that the inference results show text instead of classification numbers. Copysqueezenet1.1.labelsto the your optimized model location:cp /home/<user>/openvino_models/ir/squeezenet1.1/FP32/squeezenet1.1.labels . - Copy a sample image to the release directory. You will use this with your optimized model: sudo cp /opt/intel/computer_vision_sdk/deployment_tools/demo/car.png ~/inference_engine_samples/intel64/Release
5. Run a Sample Application
- Go to the samples directory cd /home/<user>/inference_engine_samples/intel64/Release
- Use an Inference Engine sample to run a sample application on the CPU: Note the CPU throughput in Frames Per Second (FPS). This tells you how quickly the inference is done on the hardware. Now run the inference using the FPGA../classification_sample -i car.png -m ~/openvino_models/ir/squeezenet1.1/FP32/squeezenet1.1.xml
- Add the
-doption to target the FPGA:The throughput on FPGA is listed and may show a lower FPS. This is due to the initialization time. To account for that, the next step increases the iterations to get a better sense of the speed the FPGA can run inference at../classification_sample -i car.png -m ~/squeezenet1.1_FP16/squeezenet1.1.xml -d HETERO:FPGA,CPU - Use
-nito increase the number of iterations, This option reduces the initialization impact:./classification_sample -i car.png -m ~/squeezenet1.1_FP16/squeezenet1.1.xml -d HETERO:FPGA,CPU -ni 100
Congratulations, you are done with the Intel® Distribution of OpenVINO™ toolkit installation for FPGA. To learn more about how the Intel® Distribution of OpenVINO™ toolkit works, the Hello World tutorial and are other resources are provided below.
Hello World Face Detection Tutorial
Use the Intel® Distribution of OpenVINO™ toolkit with FPGA Hello World Face Detection Exercise to learn more about how the software and hardware work together.
Additional Resources
Intel® Distribution of OpenVINO™ toolkit home page: https://software.intel.com/en-us/openvino-toolkit
Intel® Distribution of OpenVINO™ toolkit documentation: https://docs.openvinotoolkit.org/
Inference Engine FPGA plugin documentation: https://docs.openvinotoolkit.org/latest/_docs_IE_DG_supported_plugins_FPGA.html