Introduction
This guide explains how to install Microsoft Visual Studio* 2017 or 2015 instead of 2019 with your OpenVINO™ toolkit for Microsoft Windows* OS. You do not need to use this document if you chose to install Microsoft Visual Studio 2019.
Microsoft Visual Studio with Visual Studio C++ is required for building the Intel® Deep Learning Deployment Toolkit samples and demonstration applications. You can choose to install either the Professional or the free Community version of this software. These instructions show how to install the free Community version of Microsoft Visual Studio.
For full OpenVINO instructions for Windows OS, see Installing the OpenVINO™ Toolkit for Windows* 10.
NOTE: The full installation takes about 45 minutes.
Install Microsoft Visual Studio* 2017
NOTE: These steps are only required if you want to use Microsoft Visual Studio 2017 instead of 2019 or 2015.
To install Microsoft Visual Studio 2017:
- Go to the Visual Studio downloads page.
-
Click Community in the Visual Studio 2017 box:

An executable file named
vs_community__313888930.1524151023.exe, or similar, is saved in yourDownloadsfolder. - Double-click the executable file to launch the Visual Studio installer.
- On the opened window, click Continue. Visual Studio Installer configuration takes several minutes.
-
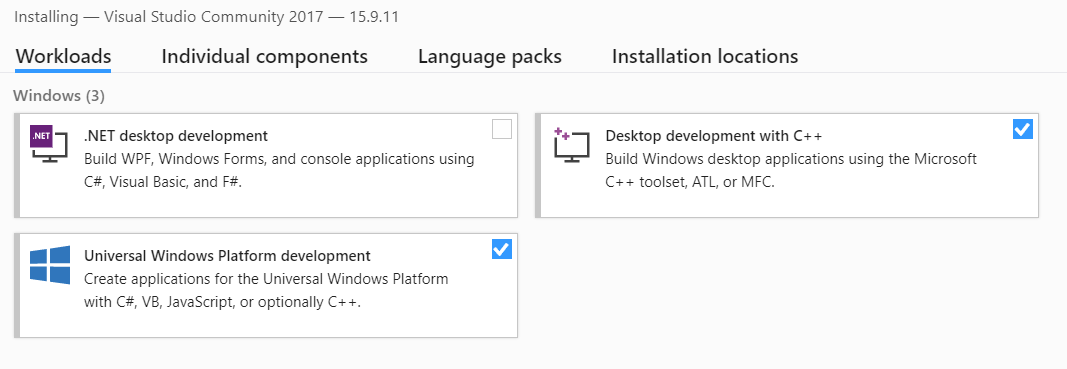
From the Workloads tab, use the check boxes to select Universal Windows Platform development and Desktop development with C++.
-
Under the Individual components tab, select MSBuild:

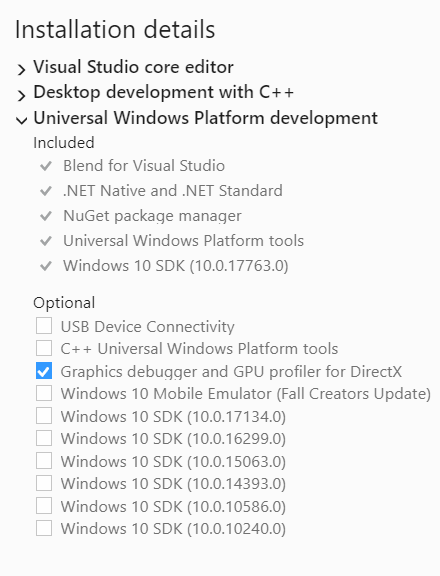
The Installation details at the right side of the screen displays your installation selections:
- Make no other changes. Click Install. The installation begins and takes around 30 minutes to complete.
- If you see a prompt to restart your computer after the installation completes, dismiss it.
Continue to the next section to install the Build Tools for Visual Studio 2017.
Install the Build Tools for Visual Studio 2017
The Microsoft Build Tools 2017 is the second part of the Microsoft Visual Studio dependency. You must complete this installation.
- Go to the Visual Studio Dev Essentials page and sign in to your account or create an account if you do not have it. This step is essential to download older versions of the Microsoft Visual Studio and their components.
- Go to the Downloads page. Click Download next to the Build Tools for Visual Studio 2017 (version 15.9).

- An executable file named
vs_buildtools__313888930.1524151023.exe, or similar, is saved in yourDownloadsfolder. - Double-click the file to install Build Tools for Visual Studio 2017.
-
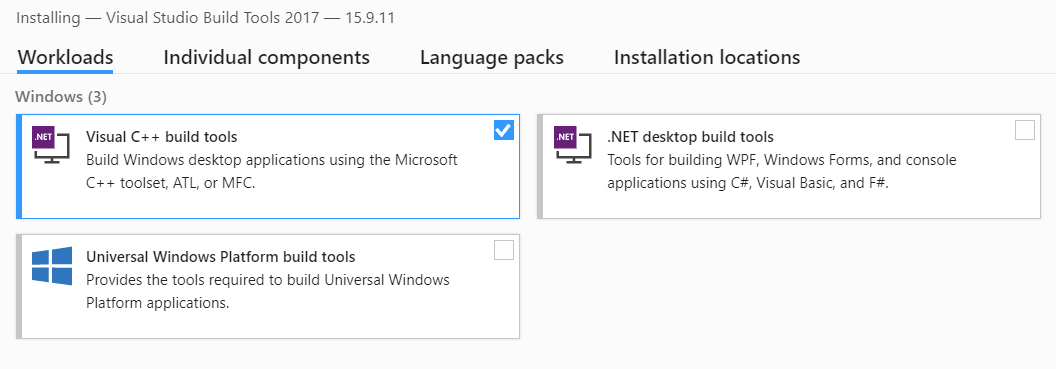
The installation opens to the Workloads tab. Select Visual C++ build tools:
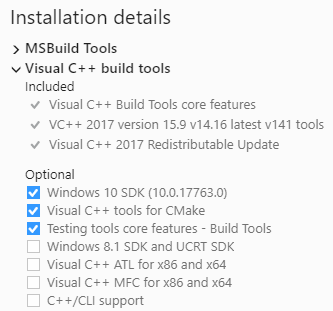
The Installation Details on the right side shows the features you chose to install:
- Click Install.
- When the installation completes, restart your computer if prompted to do so.
You have completed the Visual Studio 2017 installation.
Install Microsoft Visual Studio* 2015
NOTE: These steps are only required if you want to use Microsoft Visual Studio 2015 instead of 2019 or 2017.
To install Microsoft Visual Studio 2015:
- Go to the Visual Studio Dev Essentials page and sign in to your account or create an account if you do not have it. This step is essential to download older versions of the Microsoft Visual Studio.
- Go to the Download Older Visual Studio Software page.
- Expand the 2015 tab and click Download next to Visual Studio 2015 and other Products.
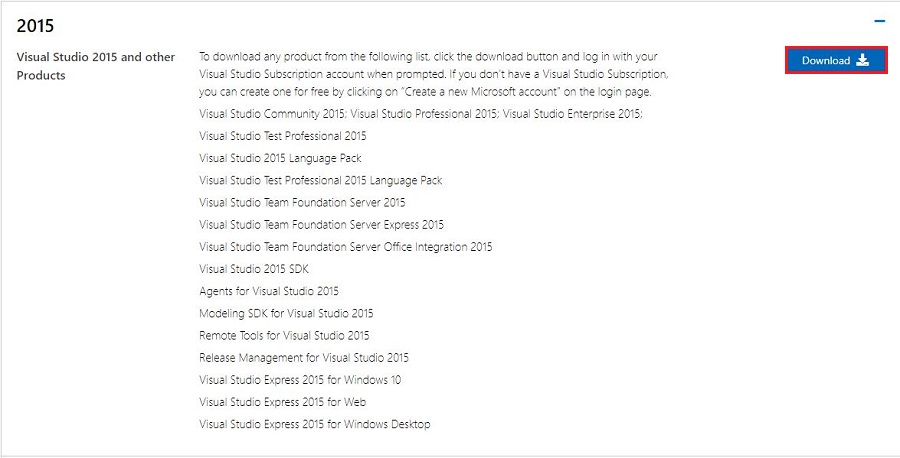
- You will be redirected to the Downloads page. Click Download next to the Visual Studio Community 2015 with Update 3.

- An executable file named
en_visual_studio_community_2015_with_update_3_x86_x64_web_installer_8922963.exe, or similar, is saved in yourDownloadsfolder. - Double-click the file to install Visual Studio Community 2015 with Update 3.
- On the opened installation window, select the Custom option. Click Next.
- Expand the Programming Languages. A list of options displays.
- Expand the Visual C++ options.
- Click the Visual C++ box and the sub-component boxes until each Visual C++ displays a checkmark. You might need to click these boxes more than once.
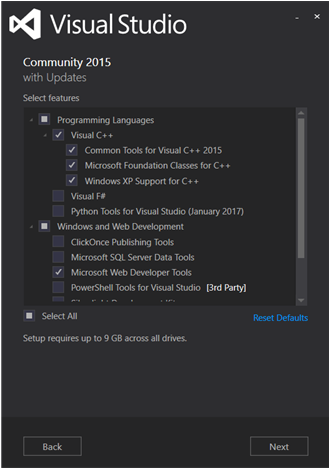
- Make no other changes. Click Next. You will see an overview of the features that will be installed:

- Click Install.
- After the installation completes, click the option to restart your computer if you are prompted to do so. Otherwise, close the window and continue to the next section.
Continue to the next section to install the Build Tools for Visual Studio 2015.
Install the Build Tools for Visual Studio 2015
The Microsoft Build Tools 2015 is the second part of the Microsoft Visual Studio dependency. You must complete this installation.
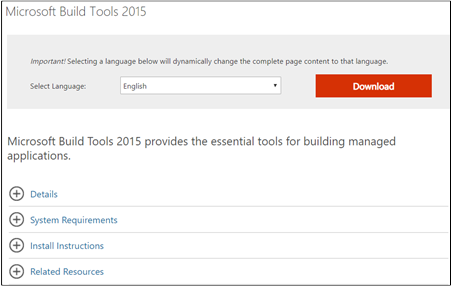
- Go to Microsoft Build Tools 2015 download page.
- Click the Download button.
- An executable file named
BuildTools_Full.exe, or similar, is saved in yourDownloadsfolder. - Double-click the file to install the Microsoft Build Tools 2015.
- Follow the on-screen instructions. This installation takes only a few seconds.
- When the installation completes, restart your computer if prompted to do so.
You have completed the Visual Studio 2015 installation.
Refer to the Installing the OpenVINO™ Toolkit for Windows* 10 to install your next dependency (CMake* or Python*) or if you have installed all the dependencies, configure the Model Optimizer.